这篇文章将为大家详细讲解有关在Android控件View文字周围添加图标的示例,小编觉得挺实用的,因此分享给大家做个参考,希望大家阅读完这篇文章后可以有所收获。
在Android控件View的文字周围添加图标
在控件TextView文字周围放置图片(基于TextView的Button也能实现),减少多布局组合嵌套。
优点:使用LinearLayout对ImageView和TextView组合布局固然可行, 但是布局文件会冗长许多。
在XML布局文件中设置以下5个属性:
drawableTop: 指定文本上方的图形。
drawableBottom: 指定文本下方的图形。
drawableLeft: 指定文本左边的图形。
drawableRight: 指定文本右边的图形。
drawablePadding: 指定图形与文本的间距。
若在代码中实现, 则可调用如下方法。
etCompoundDrawables: 设置文本周围的图形。 可分别设置左边、 上边、 右边、 下边的图形。
setCompoundDrawablePadding: 设置图形与文本的间距。
setBounds: 设置图形对象的矩形边界大小,必须设置图片大小,否则不会显示图片。
:
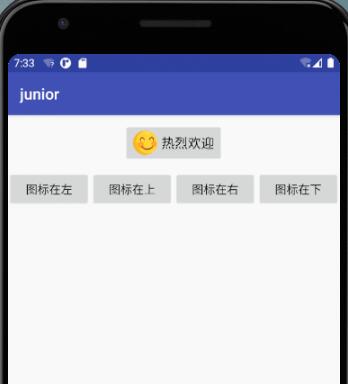
运行效果图:
示例代码如下:
public class IconActivity extends AppCompatActivity implements View.OnClickListener {
 private Button btn_icon; // 声明一个按钮对象
 private Drawable drawable; // 声明一个图形对象

 @Override
 protected void onCreate(Bundle savedInstanceState) {
  super.onCreate(savedInstanceState);
  setContentView(R.layout.activity_icon);
  // 从布局文件中获取名叫btn_icon的按钮控件
  btn_icon = findViewById(R.id.btn_icon);
  // 从资源文件ic_launcher.png中获取图形对象
  drawable = getResources().getDrawable(R.drawable.ic_smile);
  // 设置图形对象的矩形边界大小,注意必须设置图片大小,否则不会显示图片
  drawable.setBounds(0, 0, drawable.getMinimumWidth(), drawable.getMinimumHeight());

  // 通过四个按钮分别演示:左、上、右、下四个方向展示图标的效果
  findViewById(R.id.btn_left).setOnClickListener(this);
  findViewById(R.id.btn_top).setOnClickListener(this);
  findViewById(R.id.btn_right).setOnClickListener(this);
  findViewById(R.id.btn_bottom).setOnClickListener(this);
 }

 @Override
 public void onClick(View v) { // 一旦监听到点击动作,就触发监听器的onClick方法
  // 监听到点击动作,就触发监听器的onClick方法
  switch (v.getId()) {
   case R.id.btn_left:
    // 设置按钮控件btn_icon内部文字左边的图标
    btn_icon.setCompoundDrawables(drawable, null, null, null);
    break;
   case R.id.btn_top:
    // 设置按钮控件btn_icon内部文字上方的图标
    btn_icon.setCompoundDrawables(null, drawable, null, null);
    break;
   case R.id.btn_right:
    // 设置按钮控件btn_icon内部文字右边的图标
    btn_icon.setCompoundDrawables(null, null, drawable, null);
    break;
   case R.id.btn_bottom:
    // 设置按钮控件btn_icon内部文字下方的图标
    btn_icon.setCompoundDrawables(null, null, null, drawable);
    break;
   default:
 }
}
xml中设置的2行核心代码
//在控件左侧设置图标
android:drawableLeft="@drawable/ic_smile"
//设置图标与控件文件的间距
android:drawablePadding="10dp"
布局xml文件
<?xml version="1.0" encoding="utf-8"?>
<LinearLayout xmlns:android="http://schemas.android.com/apk/res/android"
 android:layout_width="match_parent"
 android:layout_height="match_parent"
 android:padding="12dp"
 android:orientation="vertical">
 <Button
  android:id="@+id/btn_icon"
  android:layout_width="wrap_content"
  android:layout_height="wrap_content"
  android:layout_gravity="center"
  android:padding="10dp"
  android:drawableLeft="@drawable/ic_smile"
  android:drawablePadding="10dp"
  android:text="热烈欢迎"
  android:textSize="17sp" />
 <LinearLayout
  android:layout_width="match_parent"
  android:layout_height="wrap_content"
  android:layout_marginTop="10dp"
  android:orientation="horizontal">
  <Button
   android:id="@+id/btn_left"
   android:layout_width="0dp"
   android:layout_height="wrap_content"
   android:layout_weight="1"
   android:text="图标在左"
   android:textSize="15sp" />
  <Button
   android:id="@+id/btn_top"
   android:layout_width="0dp"
   android:layout_height="wrap_content"
   android:layout_weight="1"
   android:text="图标在上"
   android:textSize="15sp" />
  <Button
   android:id="@+id/btn_right"
   android:layout_width="0dp"
   android:layout_height="wrap_content"
   android:layout_weight="1"
   android:text="图标在右"
   android:textSize="15sp" />
  <Button
   android:id="@+id/btn_bottom"
   android:layout_width="0dp"
   android:layout_height="wrap_content"
   android:layout_weight="1"
   android:text="图标在下"
   android:textSize="15sp" />
 </LinearLayout>
</LinearLayout>
关于“在Android控件View文字周围添加图标的示例”这篇文章就分享到这里了,希望以上内容可以对大家有一定的帮助,使各位可以学到更多知识,如果觉得文章不错,请把它分享出去让更多的人看到。
免责声明:本站发布的内容(图片、视频和文字)以原创、转载和分享为主,文章观点不代表本网站立场,如果涉及侵权请联系站长邮箱:is@yisu.com进行举报,并提供相关证据,一经查实,将立刻删除涉嫌侵权内容。


