这篇文章将为大家详细讲解有关React中配置子路由的实现方法,小编觉得挺实用的,因此分享给大家做个参考,希望大家阅读完这篇文章后可以有所收获。
import Admin from './Admin'
import FormCom from './FormCom'
import One from './One'
import ButtonCom from './ButtonCom'
import MenuCom from './MenuCom'
import StepsCom from './StepsCom'
import TabsCom from './TabsCom'
import TableCom from './TableCom'
import MessageCom from './MessageCom'
import NotificationCom from './NotificationCom'
import ProgressCom from './ProgressCom'
import SpinCom from './SpinCom'
import BadgeCom from './BadgeCom'
First.js完整代码如下:
import React from 'react'
import { Layout, Menu } from 'antd';
import { UserOutlined, LaptopOutlined, NotificationOutlined } from '@ant-design/icons';
import { HashRouter, Route, Link } from 'react-router-dom'
import Admin from './Admin'
import FormCom from './FormCom'
import One from './One'
import ButtonCom from './ButtonCom'
import MenuCom from './MenuCom'
import StepsCom from './StepsCom'
import TabsCom from './TabsCom'
import TableCom from './TableCom'
import MessageCom from './MessageCom'
import NotificationCom from './NotificationCom'
import ProgressCom from './ProgressCom'
import SpinCom from './SpinCom'
import BadgeCom from './BadgeCom'
const { SubMenu } = Menu;
const { Header, Content, Sider } = Layout;

export default class First extends React.Component {
    constructor() {
        super();
    }

    //只展开当前父级菜单 begin
    rootSubmenuKeys = ['sub1', 'sub2', 'sub3'];

    state = {
        openKeys: ['sub1'],
    };

    onOpenChange = openKeys => {
        const latestOpenKey = openKeys.find(key => this.state.openKeys.indexOf(key) === -1);
        if (this.rootSubmenuKeys.indexOf(latestOpenKey) === -1) {
            this.setState({ openKeys });
        } else {
            this.setState({
                openKeys: latestOpenKey ? [latestOpenKey] : [],
            });
        }
    };
    //只展开当前父级菜单 end

    render() {
        return (<div>
            <Layout>
                <HashRouter>
                    <Header className="header" style={{ position: 'fixed', zIndex: 1, width: '100%', paddingLeft: '20px'}}>
                        <div className="logo" style={{fontSize: '32px', color: '#ffffff', fontWeight: 'bold'}}>React App</div>
                        <Menu theme="dark" mode="horizontal" defaultSelectedKeys={['1']}>
                            {/*<Menu.Item key="1">nav 1</Menu.Item>
                            <Menu.Item key="2">nav 2</Menu.Item>
                            <Menu.Item key="3">nav 3</Menu.Item>*/}
                        </Menu>
                    </Header>
                    <Layout>
                        <Sider width={200} className="site-layout-background" style={{
                            overflow: 'auto',
                            height: '100vh',
                            position: 'fixed',
                            left: 0,
                        }}>
                            <Menu
                                theme="dark"
                                mode="inline"
                                defaultSelectedKeys={['2']}
                                defaultOpenKeys={['sub1']}
                                style={{ height: '100%', paddingTop: '60px', borderRight: 0 }}
                                onOpenChange={this.onOpenChange}
                                openKeys={this.state.openKeys}
                            >
                                <SubMenu key="sub1" icon={<UserOutlined />} title="subnav 1">
                                    <Menu.Item key="1"><Link to={`${this.props.match.path}/admin`}>admin</Link></Menu.Item>
                                    <Menu.Item key="2"><Link to={`${this.props.match.path}/form`}>form</Link></Menu.Item>
                                    <Menu.Item key="3"><Link to={`${this.props.match.path}/one`}>One</Link></Menu.Item>
                                    <Menu.Item key="4"><Link to={`${this.props.match.path}/menu`}>Menu</Link></Menu.Item>
                                </SubMenu>
                                <SubMenu key="sub2" icon={<LaptopOutlined />} title="subnav 2">
                                    <Menu.Item key="5"><Link to={`${this.props.match.path}/step`}>Step</Link></Menu.Item>
                                    <Menu.Item key="6"><Link to={`${this.props.match.path}/tabs`}>Tabs</Link></Menu.Item>
                                    <Menu.Item key="7"><Link to={`${this.props.match.path}/table`}>Table</Link></Menu.Item>
                                    <Menu.Item key="8"><Link to={`${this.props.match.path}/message`}>Message</Link></Menu.Item>
                                </SubMenu>
                                <SubMenu key="sub3" icon={<NotificationOutlined />} title="subnav 3">
                                    <Menu.Item key="9"><Link to={`${this.props.match.path}/notification`}>Notification</Link></Menu.Item>
                                    <Menu.Item key="10"><Link to={`${this.props.match.path}/progress`}>ProgressCom</Link></Menu.Item>
                                    <Menu.Item key="11"><Link to={`${this.props.match.path}/spin`}>Spin</Link></Menu.Item>
                                    <Menu.Item key="12"><Link to={`${this.props.match.path}/badge`}>Badge</Link></Menu.Item>
                                    <Menu.Item key="13"><Link to={`${this.props.match.path}/button`}>Button</Link></Menu.Item>
                                </SubMenu>
                            </Menu>
                        </Sider>
                        <Layout style={{ padding: '84px 20px 20px', marginLeft: 200}}>
                            <Content
                                className="site-layout-background"
                                style={{
                                    padding: 24,
                                    margin: 0
                                }}
                            >
                                <Route path={`${this.props.match.path}/admin`} exact component={Admin}></Route>
                                <Route path={`${this.props.match.path}/form`} component={FormCom}></Route>
                                <Route path={`${this.props.match.path}/one`} component={One}></Route>
                                <Route path={`${this.props.match.path}/menu`} component={MenuCom}></Route>
                                <Route path={`${this.props.match.path}/step`} component={StepsCom}></Route>
                                <Route path={`${this.props.match.path}/tabs`} component={TabsCom}></Route>
                                <Route path={`${this.props.match.path}/table`} component={TableCom}></Route>
                                <Route path={`${this.props.match.path}/message`} component={MessageCom}></Route>
                                <Route path={`${this.props.match.path}/notification`} component={NotificationCom}></Route>
                                <Route path={`${this.props.match.path}/progress`} component={ProgressCom}></Route>
                                <Route path={`${this.props.match.path}/spin`} component={SpinCom}></Route>
                                <Route path={`${this.props.match.path}/badge`} component={BadgeCom}></Route>
                                <Route path={`${this.props.match.path}/button`} component={ButtonCom}></Route>
                            </Content>
                        </Layout>
                    </Layout>
                </HashRouter>
            </Layout>
        </div>)
    }
}
其中
${this.props.match.path}是关键。
import React from 'react'
import { Button } from 'antd';

export default class Login extends React.Component {
    constructor() {
        super();
    }

    redirectHandle = () => {
        console.log("aaa");
        this.props.history.push("/home");
    }

    render() {
        return (<Button type="primary" onClick={()=>this.redirectHandle()}>Primary Button</Button>)
    }
}
假设React项目用的是React脚手架搭建,则在src目录下的App.js文件中设置路由:
  render() {
    return (<HashRouter>
      <Switch>
        <Route exact={true} path="/login" component={Login} />
        <Route path="/home" component={First} />
        <Redirect to='/login' /> {/*/login和/home之外的路由直接跳转到/login*/}
      </Switch>
    </HashRouter>)
  }
App.js完整代码如下:
import React from 'react';
import { notification } from 'antd'
import { HashRouter, Route, Switch, Redirect } from 'react-router-dom';
import First from './First';
import Login from './Login';
import './App.css';

class App extends React.Component {
  constructor() {
    super();
    this.openNotificationWithIcon = type => {
      notification[type]({
        message: 'Notification Title',
        description:
          'This is the content of the notification. This is the content of the notification. This is the content of the notification.',
      });
    }
  }

  clickHandle() {
    console.log("clicked!!!");
  }

  render() {
    return (<HashRouter>
      <Switch>
        <Route exact={true} path="/login" component={Login} /> {/**exact 防止混路由混合   如:输入127.xx.xx.xx/home 中有/login页面*/}
        <Route path="/home" component={First} />
        <Redirect to='/login' />
      </Switch>
    </HashRouter>)
  }
}

export default App;
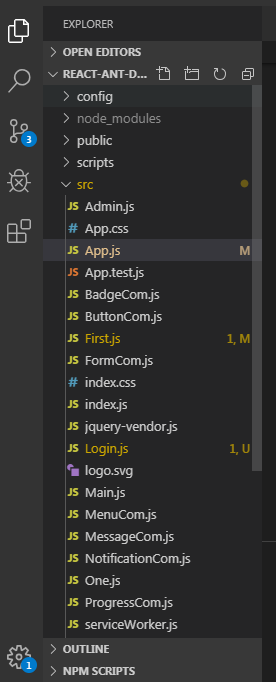
项目目录结构如下:

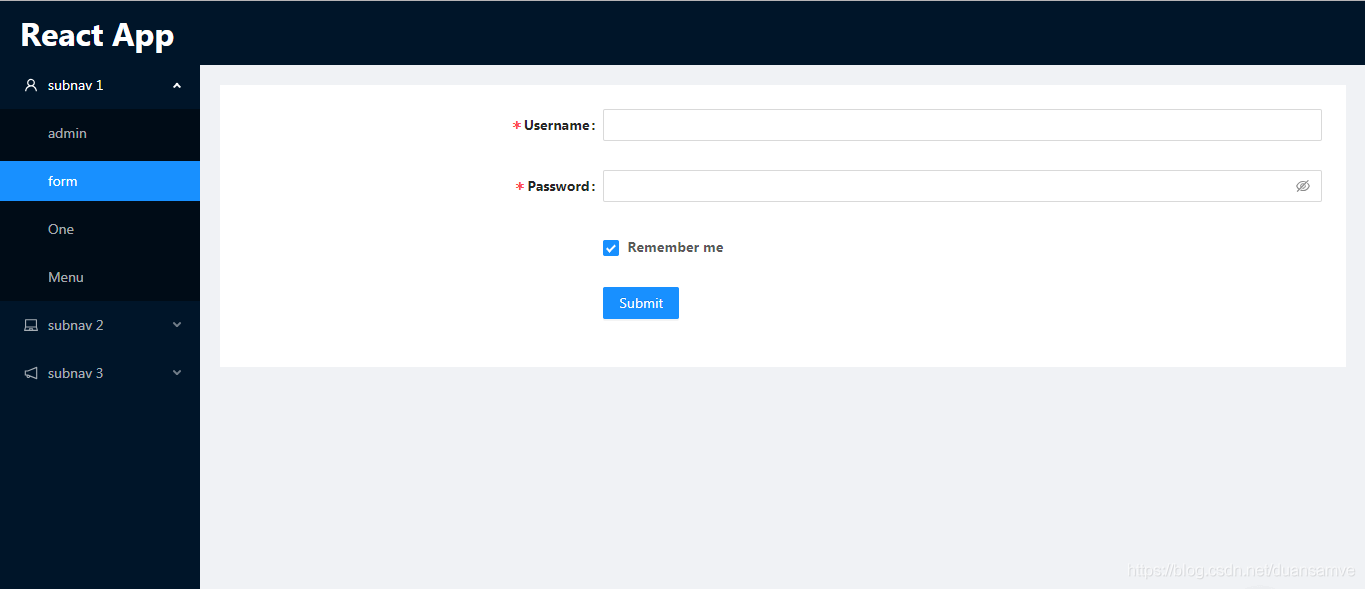
项目预览效果如下:

关于“React中配置子路由的实现方法”这篇文章就分享到这里了,希望以上内容可以对大家有一定的帮助,使各位可以学到更多知识,如果觉得文章不错,请把它分享出去让更多的人看到。
免责声明:本站发布的内容(图片、视频和文字)以原创、转载和分享为主,文章观点不代表本网站立场,如果涉及侵权请联系站长邮箱:is@yisu.com进行举报,并提供相关证据,一经查实,将立刻删除涉嫌侵权内容。