Linux操作系统基础的网络管理知识有哪些,很多新手对此不是很清楚,为了帮助大家解决这个难题,下面小编将为大家详细讲解,有这方面需求的人可以来学习下,希望你能有所收获。
网络管理
(1) 网络状态查看
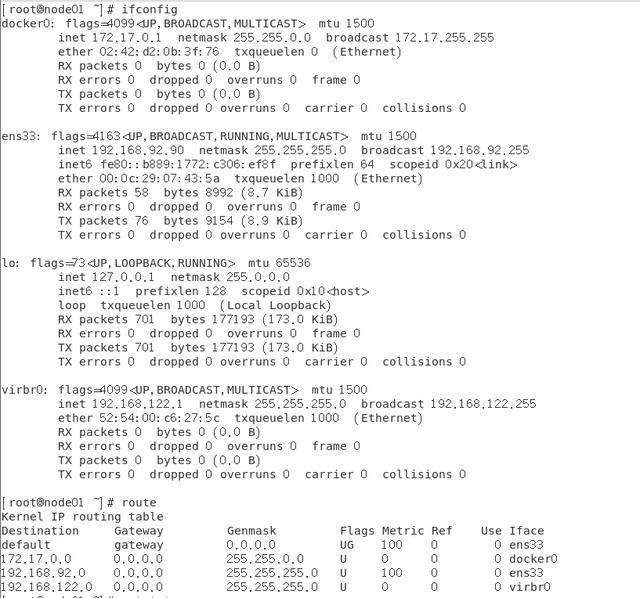
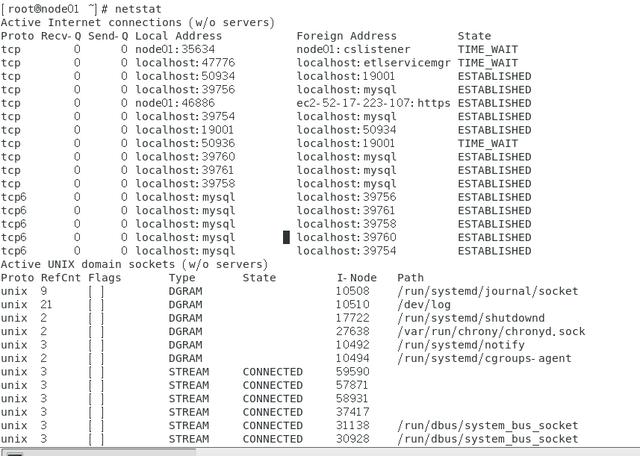
在Linux中经常使用ifconfig,route和netstat查看网络状态,它们就是. net-tools工具,下面我来使用下。


我就说下ifconfig和route。
在我们的linux中有很多网卡接口,比如eth0第一块网卡网络接口,eno1板载⽹网卡, ens33 PCI-E⽹网卡 。CentOS 7 使⽤用了⼀致性⽹络设备命名,以上都不匹配,则使⽤ eth0
[root@node01 ~]# ifconfig eth0 eth0: error fetching interface information: Device not found [root@node01 ~]# ifconfig ens33 ens33: flags=4163<UP,BROADCAST,RUNNING,MULTICAST> mtu 1500 inet 192.168.92.90 netmask 255.255.255.0 broadcast 192.168.92.255 inet6 fe80::b889:1772:c306:ef8f prefixlen 64 scopeid 0x20<link> ether 00:0c:29:07:43:5a txqueuelen 1000 (Ethernet) RX packets 910 bytes 954985 (932.6 KiB) RX errors 0 dropped 0 overruns 0 frame 0 TX packets 450 bytes 38942 (38.0 KiB) TX errors 0 dropped 0 overruns 0 carrier 0 collisions 0(2) 网络配置文件
ifcfg-eth0,/etc/hosts
在配置hadoop,elasticsearch集群的时候需要在/etc/hosts配置集群IP和主机名,有时候你ping不了百度,可能域名解析不了,需要在/etc/sysconfig/network-scripts/ifcfg-eth0配置
[root@node01 ~]# vim /etc/sysconfig/network ######### HOSTNAME=node01 [root@node01 ~]# vim /etc/hosts ######### 192.168.92.90 node01 192.168.92.91 node02 192.168.92.92 node03 [root@node01 ~]# 配置DNS,域名解析服务 [root@node01 ~]# vim /etc/sysconfig/network-scripts/ifcfg-eth0 DNS1=202.106.0.20 DNS2=8.8.8.8(3) 故障排除命令
第一,ping百度:查看目标机器的网络是否可通
maoli@ubuntu:~$ ping baidu.com PING baidu.com (220.181.38.148) 56(84) bytes of data. 64 bytes from 220.181.38.148: icmp_seq=1 ttl=128 time=49.6 ms 64 bytes from 220.181.38.148: icmp_seq=2 ttl=128 time=48.2 ms ^C --- baidu.com ping statistics --- 2 packets transmitted, 2 received, 0% packet loss, time 1001ms rtt min/avg/max/mdev = 48.223/48.948/49.673/0.725 mstraceroute
nslookup:nslookup www.baidu.com Server即为域名对应的ip
maoli@ubuntu:~$ nslookup www.baidu.com Server: 127.0.1.1 Address: 127.0.1.1#53 Non-authoritative answer: www.baidu.com canonical name = www.a.shifen.com. Name: www.a.shifen.com Address: 182.61.200.6 Name: www.a.shifen.com Address: 182.61.200.7telnet:如果ip是可达的,但是服务仍有然有问题,则可以通过telnet去查看服务端口状态
tcpdump:tcpdump -i any -n port 80 # 抓取所有网卡(any)80端口数据包,并且以ip形式显示(-n)
maoli@ubuntu:~$ sudo tcpdump -i any -n port 80 -n tcpdump: verbose output suppressed, use -v or -vv for full protocol decode listening on any, link-type LINUX_SLL (Linux cooked), capture size 262144 bytes 10:28:11.003675 IP 192.168.92.1.53951 > 192.168.92.135.80: Flags [S], seq 185886164, win 64240, options [mss 1460,nop,wscale 8,nop,nop,sackOK], length 0 10:28:11.003875 IP 192.168.92.135.80 > 192.168.92.1.53951: Flags [S.], seq 2863640054, ack 185886165, win 64240, options [mss 1460,nop,nop,sackOK,nop,wscale 7], length 0 10:28:11.004114 IP 192.168.92.1.53951 > 192.168.92.135.80: Flags [.], ack 1, win 4106, length 0 10:28:11.010472 IP 192.168.92.1.53951 > 192.168.92.135.80: Flags [P.], seq 1:476, ack 1, win 4106, length 475: HTTP: GET /sqli-labs/ HTTP/1.1tcpdump -i any -n host 10.0.0.1 and port 80# 抓取所有网卡的80端口和10.0.0.1之间的数据包,并且以ip形式显示
netstat 查看服务监听端口状态是否正确 -n 显示ip地址 -t tcp协议 -p 显示端口对应的进程 -l tcp的监听状态(listen) -ntpl 查看端口开放情况
maoli@ubuntu:~$ sudo netstat -ntlp 激活Internet连接 (仅服务器) Proto Recv-Q Send-Q Local Address Foreign Address State PID/Program name tcp 0 0 0.0.0.0:22 0.0.0.0:* LISTEN 1111/sshd tcp 0 0 127.0.0.1:631 0.0.0.0:* LISTEN 14200/cupsd tcp 0 0 127.0.0.1:3306 0.0.0.0:* LISTEN 1148/mysqld tcp 0 0 127.0.0.1:6379 0.0.0.0:* LISTEN 1165/redis-server 1 tcp 0 0 127.0.1.1:53 0.0.0.0:* LISTEN 1285/dnsmasq tcp6 0 0 :::22 :::* LISTEN 1111/sshd tcp6 0 0 ::1:631 :::* LISTEN 14200/cupsd tcp6 0 0 :::9000 :::* LISTEN 2234/docker-proxy tcp6 0 0 :::80 :::* LISTEN 1842/apache2(4) 网络服务管理
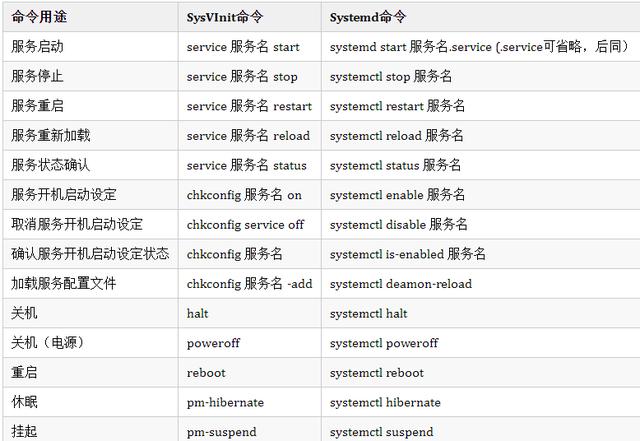
⽹络服务管理程序分为两种,分别为SysV和systemd。现在Systemd已经基本取代了SysV的Init。

(5) 设置静态ip
在搭建任何集群,都是要设置静态ip的。
[root@node01]# vim /etc/sysconfig/network-scripts/ifcfg-ens33 ################ BOOTPROTO=static ONBOOT="yes" # 网关地址根据系统的网络而定 GATEWAY=192.168.92.2 # 设置的静态ip IPADDR=192.168.92.92 NETMASK=255.255.255.0 # 配置DNS服务器 DNS1=8.8.8.8 DNS2=8.8.4.4看完上述内容是否对您有帮助呢?如果还想对相关知识有进一步的了解或阅读更多相关文章,请关注亿速云行业资讯频道,感谢您对亿速云的支持。
亿速云「云服务器」,即开即用、新一代英特尔至强铂金CPU、三副本存储NVMe SSD云盘,价格低至29元/月。点击查看>>
免责声明:本站发布的内容(图片、视频和文字)以原创、转载和分享为主,文章观点不代表本网站立场,如果涉及侵权请联系站长邮箱:is@yisu.com进行举报,并提供相关证据,一经查实,将立刻删除涉嫌侵权内容。
原文链接:https://www.toutiao.com/a6821793020531180043/