1.模块和包
● 模块定义:用来从逻辑上组织python代码(变量,函数,类,逻辑:实现一个功能),本质就是.py结尾的python文件(文件名test.py,对应的模块名:test)
● 包定义:用来从逻辑上组件模块的,本质就是一个目录(必须带有一个__init__.py文件)
2.模块和包导入本质
● 导入模块的本质就是把python文件解释一遍
● 导入包的本质就是执行该包下的__init__.py文件;如果要导入包下面的模块:需要先导入包,然后包下的__init__.py文件中再导入该包下的模块
3.导入模块
import module_name                            #导入一个模块
import module1_name,module2_name              #导入多个模块
module_name.logger()                           #执行模块里的函数
modele_name.var                                #调用模块里的变量

from module_name import method1 method2
from module_name import *                   #导入模块的所有方法,不建议用
logger()                                       #直接调用模块里的方法 ,不用模块名加点

from module_name import logger as logger_feng         #导入将模块里的logger方法并改名
4.导入不同包(目录)下的python模块
import os,sys
#print(__file__)                                 #动态获取当前文件相当路径
#print(os.path.abspath(__file__))                        #动态获取当前文件绝对路径
#print(os.path.dirname(os.path.abspath(__file__))                         #动态获取当前文件父目录路径
PATH=os.path.dirname(os.path.dirname(os.path.abspath(__file__)))                 #这里获取到的是ATM这个目录的绝对路径
sys.path.append(PATH)                               #将获取到的绝对路径加到环境变量
from core import main                             #从core目录下import main
main.name("fengxiaoli")                              #调用main里的函数name
5.time模块
python中通常时间的表示
●时间戳
●格式化的时间字符串
●元组时间
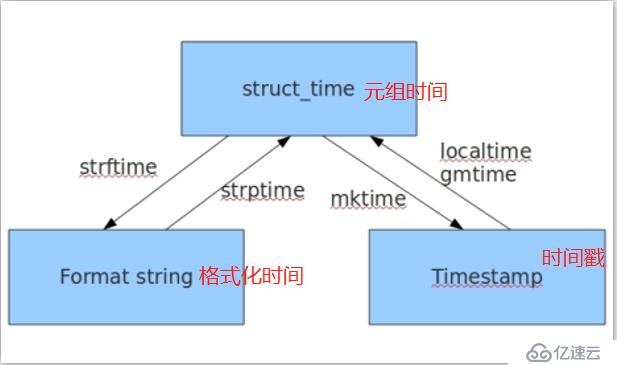
●时间戳-->元组时间
>>> x = time.time()                           #获取当前时间戳
>>> time.gmtime(x)                            #将当前时间戳转化为utc时间元组
time.struct_time(tm_year=2018, tm_mon=2, tm_mday=4, tm_hour=10, tm_min=4, tm_sec
=22, tm_wday=6, tm_yday=35, tm_isdst=0)
>>> time.localtime(x)                           #将当前时间戳转化为本地时间(utc+8)元组
time.struct_time(tm_year=2018, tm_mon=2, tm_mday=4, tm_hour=18, tm_min=4, tm_sec
=22, tm_wday=6, tm_yday=35, tm_isdst=0)

>>> x1 = time.localtime(x)
>>> x1.tm_year                                   #获取元组时间
2018
>>> x1.tm_mon
2
●元组时间-->时间戳
>>> x1
time.struct_time(tm_year=2018, tm_mon=2, tm_mday=4, tm_hour=18, tm_min=4, tm_sec
=22, tm_wday=6, tm_yday=35, tm_isdst=0)
>>> time.mktime(x1)
1517738662.0
●元组时间-->自定义格式化字符串时间
>>> x1
time.struct_time(tm_year=2018, tm_mon=2, tm_mday=4, tm_hour=18, tm_min=4, tm_sec
=22, tm_wday=6, tm_yday=35, tm_isdst=0)
>>> time.strftime("%Y-%m-%d %H:%M:%S",x1)
'2018-02-04 18:04:22'
●自定义格式化字符串时间-->元组时间
>>> help(time.strptime)       #查看strptime帮助
strptime(...)
    strptime(string, format) -> struct_time

>>> time.strptime("2018-02-04 18:04:22","%Y-%m-%d %H:%M:%S")
time.struct_time(tm_year=2018, tm_mon=2, tm_mday=4, tm_hour=18, tm_min=4, tm_sec
=22, tm_wday=6, tm_yday=35, tm_isdst=-1)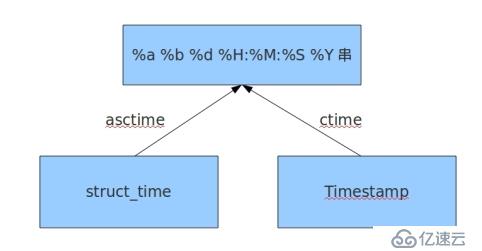
●时间戳-->格式化字符串
>>> x
1517738662.821426
>>> time.ctime(x)
'Sun Feb  4 18:04:22 2018'
●元组-->格式化字符串
>>> x1
time.struct_time(tm_year=2018, tm_mon=2, tm_mday=4, tm_hour=18, tm_min=4, tm_sec
=22, tm_wday=6, tm_yday=35, tm_isdst=0)
>>> time.asctime(x1)
'Sun Feb  4 18:04:22 2018'
●time模块其他方法
>>> import time
>>> time.timezone                   #标准时间(utc)和本地时间(utc+8)相差多少秒
-28800                              #这里是本地时间比标准时间早28800秒,也就是早8小时,也就是中国为utc+8时区
>>> 28800/3600
8.0

>>> time.altzone                   #标准时间和夏令时相差多少
-32400
>>> time.daylight                   #判断是否是夏令时
0

>>> time.clock()                    #当运行time.clock()开始,返回一个时间
1.0263524545646598e-05
>>> time.clock()
2.1054247858986015
>>> time.clock()
3.8245134020248224
>>> time.clock()
6.940938975648932
>>> time.clock()
15.189280774964526

>>> time.sleep(2)                 #程序睡2秒
>>> time.sleep(1)

>>> time.time()                    #返回一个时间戳,该时间戳是从1970到现在多少秒
1517737506.325569
>>> x=time.time()
>>> x/3600/24/365
48.12714301673213
>>> 1970+48
2018
6.datetime模块
>>> import datetime
>>> print(datetime.datetime.now())                         #获取当前时间
2018-02-04 18:37:25.319604

>>> print(datetime.date.fromtimestamp(time.time()))                #将时间戳改为格式化字符串
2018-02-04

>>> print(datetime.datetime.now() + datetime.timedelta(3))            #当前时间+3天
2018-02-07 18:40:59.8228
>>> print(datetime.datetime.now() + datetime.timedelta(-3))           #当前时间-3天
2018-02-01 18:41:06.402249
>>> print(datetime.datetime.now() + datetime.timedelta(hours=3))         #当前时间加3小时
2018-02-04 21:41:29.079546
>>> print(datetime.datetime.now() + datetime.timedelta(minutes= -3))      #当前时间减3分钟
2018-02-04 18:38:40.102177

>>> c_time = datetime.datetime.now()
>>> print(c_time.replace(minute=3,hour=2))                     #更改时间
2018-02-04 02:03:47.909055
7.random模块
#随机浮点数
>>> import random
>>> random.random()                         #生成一个0-1的随机浮点数
0.7370268365256588
>>> random.uniform(1,3)                           #随机打印1-3直接的浮点数
2.907184937455974
>>> random.uniform(1,5)
3.1441005290312556


#随机整数
>>> random.randint(1,5)                                       #生成一个1-5的随机整数,包括1和5
5
>>> random.randint(1,5)
2

#随机选取0-100间的偶数
>>> random.randrange(0,101,2)
6

>>> random.randrange(1,5)                                    #生成一个1-4的随机整数,不包括5
3
>>> random.randrange(1,5)
4

#随机字符
>>> random.choice("hello")                                #随机打印一个前面对象的元素
'o'
>>> random.choice([1,2,3,4])
2

#多个字符选取特定数量字符
>>> random.sample("hello",2)                               #指定个数随机打印前面对象元素
['l', 'o']
>>> random.sample([1,2,3,4],2)
[3, 4]


#洗牌
>>> x = [1,2,3,4,5]
>>> random.shuffle(x)                       #将列表随机打乱
>>> print(x)
[3, 1, 2, 4, 5]

#验证码,生成4位随机验证码
import random
n = 4
checkcode = ""
for i in range(n):
    current = random.randrange(0,n)
    if i < current:
        tmp = random.randint(0,9)
    elif i==current:
        tmp = chr(random.randrange(97, 122))
    else:
        tmp = chr(random.randrange(65,90))
    checkcode+=str(tmp)
print(checkcode)
8.os模块
#提供对操作系统进行调用的接口

#对目录操作
os.getcwd()                      #获取当前工作目录,即当前python脚本工作的目录路径
os.chdir("dirname")                      #改变当前脚本工作目录;相当于shell下cd
os.curdir                        #返回当前目录: ('.')
os.pardir                        #获取当前目录的父目录字符串名:('..')
os.makedirs('dirname1/dirname2')                        #可生成多层递归目录
os.removedirs('dirname1')                        #若目录为空,则删除,并递归到上一级目录,如若也为空,则删除,依此类推
os.mkdir('dirname')                        #生成单级目录;相当于shell中mkdir dirname
os.rmdir('dirname')                        #删除单级空目录,若目录不为空则无法删除,报错;相当于shell中rmdir dirname
os.listdir('dirname')                        #列出指定目录下的所有文件和子目录,包括隐藏文件,并以列表方式打印

#对文件操作
os.remove()                       #删除一个文件
os.rename("oldname","newname")                       #重命名文件/目录
os.stat('path/filename')                       #获取文件/目录信息

os.sep                          #输出操作系统特定的路径分隔符,win下为"\\",Linux下为"/"
os.linesep                        #输出当前平台使用的行终止符,win下为"\r\n",Linux下为"\n"
os.pathsep                        #输出用于分割文件路径的字符串
os.name                         #输出字符串指示当前使用平台。win->'nt'; Linux->'posix'

os.system("bash command")                     #运行shell命令,直接显示
os.environ                       #获取系统环境变量

os.path.abspath(path)                #返回path规范化的绝对路径
os.path.split(path)                #将path分割成目录和文件名二元组返回
os.path.dirname(path)                #返回path的目录。其实就是os.path.split(path)的第一个元素
os.path.basename(path)                #返回path最后的文件名。如何path以/或\结尾,那么就会返回空值。即os.path.split(path)的第二个元素
os.path.exists(path)                #如果path存在,返回True;如果path不存在,返回False
os.path.isabs(path)                #如果path是绝对路径,返回True
os.path.isfile(path)                #如果path是一个存在的文件,返回True。否则返回False
os.path.isdir(path)                #如果path是一个存在的目录,则返回True。否则返回False
os.path.join(path2[, path3[, ...]])            #将多个路径组合后返回,第一个绝对路径之前的参数将被忽略
os.path.getatime(path)               #返回path所指向的文件或者目录的最后存取时间
os.path.getmtime(path)              #返回path所指向的文件或者目录的最后修改时
9.sys模块
import sys
print(sys.argv)         #以list格式返回该脚本参数,返回的第一个参数是执行该脚本相当路径
如:python test.py 1 2 3
['test.py','1','2','3']

sys.exit(n)         #退出程序,正常退出时exit(0)
sys.version         #获取python版本
sys.path            #返回模块搜索路径,初始化时使用pythonpath环境变量的值
sys.platform         #返回操作系统平台
sys.stdout.write("--")     #标准输出到屏幕
10.shutil模块
#高级的 文件、文件夹、压缩包 处理模块

import shutil

f1 = open("file1","r",encoding="utf-8")
f2 = open("file2","w",encoding="utf-8")
shutil.copyfileobj(f1,f2)                     #复制文件1内容到文件2,需要自己打开关闭文件


shutil.copyfile("file1","file2")               #复制文件1内容到文件2,不需要自己打开关闭文件
shutil.copymode("file1","file2")               #仅拷贝权限,内容,组,用户均不变
shutil.copystat("file1","file2")                 #拷贝状态的信息,包括 mode bits,atime,mtime,flags
shutil.copy("file1","file2")                   #拷贝文件和权限
shutil.copy2("file1","file2")                   #拷贝文件和状态信息
shutil.copytree("srcdir","dstdir")                #递归的拷贝文件
shutil.rmtree("dstdir")                      #递归删除文件
shutil.move("src","dst")                     #递归的去移动文件


shutil.make_archive("base_name", format,...)           #创建压缩包并返回文件路径,例如:zip、tar

base_name:压缩包的文件名,也可以是压缩包的路径。只是文件名时,则保存至当前目录,否则保存至指定路径。
format:压缩包种类,“zip”, “tar”, “bztar”,“gztar”
root_dir:要压缩的文件夹路径(默认当前目录)
owner:用户,默认当前用户
group:组,默认当前组
logger:用于记录日志,通常是logging.Logger对象
11.zipfile模块
import zipfile
impot os


#压缩单个文件
import zipfileimport
oswith zipfile.ZipFile('test.zip', 'w') as z:
    z.write('log.txt')


#压缩某个目录下所有文件
def compress_file(zipfilename, dirname):                              # zipfilename是压缩包名字,dirname是要打包的目录/文件
    if os.path.isfile(dirname):
        with zipfile.ZipFile(zipfilename, 'w') as z:
            z.write(dirname)
    else:
        with zipfile.ZipFile(zipfilename, 'w') as z:
            for root, dirs, files in os.walk(dirname):        #这里用到了os.walk遍历目录下的文件,详情参考os的walk方法
                for single_file in files:
                    if single_file != zipfilename:
                        filepath = os.path.join(root, single_file)
                        z.write(filepath)

compress_file('a.zip', '.')                                                #执行函数


#添加文件到已有的zip包中
def addfile(zipfilename, dirname):
    if os.path.isfile(dirname):
        with zipfile.ZipFile(zipfilename, 'a') as z:
            z.write(dirname)
    else:
        with zipfile.ZipFile(zipfilename, 'a') as z:
            for root, dirs, files in os.walk(dirname):
                for single_file in files:
                    if single_file != zipfilename:
                        filepath = os.path.join(root, single_file)
                        z.write(filepath)

addfile('a.zip', 'test.txt')


#查看压缩包中的文件
def viewfile(zipfilename):
    with zipfile.ZipFile(zipfilename, 'r') as z:
        print(z.namelist())

viewfile('a.zip')


#解压
with zipfile.ZipFile('test.zip', 'r') as z:
    print(z.namelist())                                     # 查看压缩包中的文件列表
    # print(z.read(z.namelist()[0]))                              # 读出来压缩包中的第一个文件的内容打印到屏幕,也可保存到文件中
    z.extractall('C:\\Users\\Administrator\\PycharmProjects\\aaa')                         # 解压,可设置解压路径
    # z.extract('log.txt')                                   # 解压,可选择解压压缩包中的某个文件
    #z.extractall()                                       # 解压全部
12.tarfile模块
import tarfile
import os

#压缩文件
with tarfile.open('a.tar', 'w') as tar:
    tar.add('log.log', arcname='log.log')
    tar.add('test.txt', arcname='test.txt')


#解压文件
with tarfile.open('a.tar', 'r') as tar:
    print(tar.getmembers())                                      # 查看压缩包内文件成员
    # tar.extract('test.txt')                                    # 可选择解压某个文件
    # tar.extractall('ccc')                                      # 可设置解压路径
    tar.extractall()                                             # 解压全部


#压缩某个目录下所有文件
def compress_file(tarfilename, dirname):                         # tarfilename是压缩包名字,dirname是要打包的目录
    if os.path.isfile(dirname):
        with tarfile.open(tarfilename, 'w') as tar:
            tar.add(dirname)
    else:
        with tarfile.open(tarfilename, 'w') as tar:
            for root, dirs, files in os.walk(dirname):
                for single_file in files:
                    # if single_file != tarfilename:
                    filepath = os.path.join(root, single_file)
                    tar.add(filepath)

compress_file('test.tar', 'test.txt')
compress_file('t.tar', '.')


#添加文件到已有的tar包中
def addfile(tarfilename, dirname):                                # tarfilename是压缩包名字,dirname是要打包的目录
    if os.path.isfile(dirname):
        with tarfile.open(tarfilename, 'a') as tar:
            tar.add(dirname)
    else:
        with tarfile.open(tarfilename, 'a') as tar:
            for root, dirs, files in os.walk(dirname):
                for single_file in files:
                    # if single_file != tarfilename:
                    filepath = os.path.join(root, single_file)
                    tar.add(filepath)

addfile('t.tar', 'ttt.txt')
addfile('t.tar', 'ttt')
13.xml模块
import xml.etree.ElementTree as ET              #导入xml模块并取别名

tree = ET.parse("xml_test.xml")                 #找到xml文件内存地址
root = tree.getroot()                           #找到xml文件根内存地址
print(root.tag)                                 #打印xml文件根标签

# 遍历xml文档
for child in root:
    print(child.tag, child.attrib)
    for i in child:
        print(i.tag, i.text,i.attrib)

# 只遍历year 节点
for node in root.iter('year'):
    print(node.tag, node.text)


#修改和删除xml文档内容
import xml.etree.ElementTree as ET
tree = ET.parse("xmltest.xml")
root = tree.getroot()

# 修改
for node in root.iter('year'):
    new_year = int(node.text) + 1
    node.text = str(new_year)
    node.set("updated", "yes")

tree.write("xmltest.xml")

# 删除node
for country in root.findall('country'):
    rank = int(country.find('rank').text)
    if rank > 50:
        root.remove(country)

tree.write('output.xml')

#自己创建xml文件
import xml.etree.ElementTree as ET

new_xml = ET.Element("namelist")
name = ET.SubElement(new_xml, "name", attrib={"enrolled": "yes"})
age = ET.SubElement(name, "age", attrib={"checked": "no"})
sex = ET.SubElement(name, "sex")
sex.text = '33'
name2 = ET.SubElement(new_xml, "name", attrib={"enrolled": "no"})
age = ET.SubElement(name2, "age")
age.text = '19'

et = ET.ElementTree(new_xml)  # 生成文档对象
et.write("test.xml", encoding="utf-8", xml_declaration=True)

ET.dump(new_xml)              # 打印生成的格式
14.configparser模块
#将字符写为配置文件的形式
import configparser

config = configparser.ConfigParser()
config["DEFAULT"] = {'ServerAliveInterval': '45',
                     'Compression': 'yes',
                     'CompressionLevel': '9'}

config['bitbucket.org'] = {}
config['bitbucket.org']['User'] = 'hg'

config['topsecret.server.com'] = {}
topsecret = config['topsecret.server.com']

topsecret['Host Port'] = '50022'  # mutates the parser
topsecret['ForwardX11'] = 'no'  # same here

config['DEFAULT']['ForwardX11'] = 'yes'

with open('example.ini', 'w') as configfile:
    config.write(configfile)


#读configparser文件
import configparser
conf =configparser.ConfigParser()
conf.read("example.ini")

# print(conf.defaults())
# print(conf["bitbucket.org"]["user"])
# #print(conf.sections())
for i in conf["topsecret.server.com"]:
    print(i)


#删除
import configparser
conf =configparser.ConfigParser()
conf.read("example.ini")
sec=conf.remove_section("bitbucket.org")
conf.write(open("example.cfg","w"))


#改写
import configparser
conf =configparser.ConfigParser()
conf.read("example.ini")
sec=conf.remove_section("bitbucket.org")
sec=conf.add_section("fengxiaoli.org")
sec=conf.set("fengxiaoli.org","k1","111")

conf.write(open("example.cfg","w"))
14.re模块
# re.match 从头开始匹配 ,返回一个
# re.search 匹配包含,返回一个
# re.findall 把所有匹配到的字符放到以列表中的元素返回,返回所有
# re.splitall 以匹配到的字符当做列表分隔符
# re.sub 匹配字符并替换
import re

#match方法
c="chen234feng3252cxasfgj54gvf"
res1=re.match("chen",c)
res2=re.match("^chen\d+",c)
res3=re.match(".+",c)
#res4=re.match("cx",c)  #匹配不到cx,因为re.match只能从头开始匹配
print(res1.group())
print(res2.group())
print(res3.group())
#print(res4.group())

#search方法
c="chen234fengdfasfcx3252cxasfgj54gvf"
res1=re.search("cx",c)
res2=re.search("feng.*cx",c)
res3=re.search("^chen.+cx",c)
res4=re.search("feng[a-z]+cx",c)
res5=re.search("[0-9]{3}",c)  #匹配连续出现3次数字的字符
res6=re.search("[0-9]{1,3}",c)  #匹配连续出现数字,1次到3次的字符,re.search只能返回一个
res7=re.search("(abc){2}","fengabcabcffcxabc")  #将abc分组,匹配连续出现两次的abc
print(res1.group())
print(res2.group())
print(res3.group())
print(res4.group())
print(res5.group())
print(res6.group())
print(res7.group())


#分组匹配  '(?P<name>...)'
res10=re.search("(?P<id>[0-9]+)(?P<name>[a-zA-Z]{4})",c).groupdict()
print(res10)
#输出
{'id': '234', 'name': 'feng'}


res11=re.search("(?P<province>[0-9]{4})(?P<city>[0-9]{2})(?P<birthday>[0-9]{4})", "371481199306143242").groupdict()
#结果
print(res11)
#{'province': '3714', 'city': '81', 'birthday': '1993'}


#findall方法
c="c1hen234fengdfas1fcx3252cxasfgj54gvf"
res1=re.findall("cx",c)
res2=re.findall("feng|cx",c)
res6=re.findall("[0-9]{1,3}",c)
print(res1)
print(res2)
print(res6)


#split方法
res=re.split("[0-9]","dsf34dsf46kjl6")  #按指定字符分割
res1=re.split(":","dsf:34ds:f46kjl6")
print(res)
print(res1)


#sub方法
res=re.sub("[0-9]+","AAA","afd454dffb56756sdg11feng") #将匹配的字符替换为指定字符
res1=re.sub("[0-9]+","AAA","afd454dffb56756sdg11feng",count=2) #指定替换的次数
print(res)
print(res1)


注:
# re.I(re.IGNORECASE): 忽略大小写(括号内是完整写法,下同)
# M(MULTILINE): 多行模式,改变'^'和'$'的行为
# S(DOTALL): 点任意匹配模式,改变'.'的行为

#res1=re.search("fengxiaoli","\nFengXiaoLi123Cx456\nKdf564",flags=re.I)  #忽略大小写
#res1=re.search("^Feng","\nFengXiaoLi123Cx456\nKdf564",flags=re.M)   #
res1=re.search("Cx.+564","\nFengXiaoLi123Cx456\nKdf564",flags=re.S)  #默认点不能匹配\n,加上re.S后可以
print(res1.group())免责声明:本站发布的内容(图片、视频和文字)以原创、转载和分享为主,文章观点不代表本网站立场,如果涉及侵权请联系站长邮箱:is@yisu.com进行举报,并提供相关证据,一经查实,将立刻删除涉嫌侵权内容。


