这篇文章将为大家详细讲解有关C#中怎么利用WinForm控件实现一个下拉式属性编辑器,文章内容质量较高,因此小编分享给大家做个参考,希望大家阅读完这篇文章后对相关知识有一定的了解。
首先我们要创建一个用于编辑属性的控件,在本系列文章的开始,我们介绍了自定义控件有三种类型:复合控件,扩展控件,自定义控件。在本例中我们制作一个复合控件(Compsite control),复合控件的C# WinForm控件开发比较简单,不在本系列文章的讲解范围。
我简单做个介绍,在Solution 浏览器里右键点击CustomControlSample工程选择Add->User Control…,输入文件名ScopeEditorControl.cs。我们做的这个复合控件上一篇文章介绍的模态对话框所包含子控件基本一样,除了用于确认和取消的按钮,如下图:
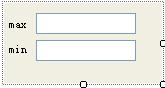
C# WinForm控件开发下拉式属性编辑器
由于我们取消了用于确认和取消的按钮,并且是一个下拉的编辑器控件,在出现下面三种情况的时候下拉的编辑器控件会关闭:用户敲了回车,用户敲了ESC键,用户点击了编辑器以外的地方。当下拉编辑器控件关闭的时候我们就需要更新属性的值。下边是这个控件的代码:
using System;
using System.Collections.Generic;
using System.ComponentModel;
using System.Drawing;
using System.Data;
using System.Text;
using System.Windows.Forms;
namespace CustomControlSample
{
public partial class ScopeEditorControl : UserControl
{
private Scope _oldScope;
private Scope _newScope;
private Boolean canceling;
public ScopeEditorControl(Scope scope)
{
_oldScope = scope;
_newScope = scope;
InitializeComponent();
}
public Scope Scope
{
get
{
return _newScope;
}
}
private void textBox1_Validating(object sender, CancelEventArgs e)
{
try
{
Int32.Parse(textBox1.Text);
}
catch (FormatException)
{
e.Cancel = true;
MessageBox.Show("无效的值", "验证错误",
MessageBoxButtons.OK, MessageBoxIcon.Error);}
}
private void textBox2_Validating(object sender, CancelEventArgs e)
{
try
{
Int32.Parse(textBox2.Text);
}
catch (FormatException)
{
e.Cancel = true;
MessageBox.Show("无效的值", "验证错误",
MessageBoxButtons.OK, MessageBoxIcon.Error);}
}
protected override bool ProcessDialogKey(Keys keyData)
{
if (keyData == Keys.Escape)
{
_oldScope = _newScope;
canceling = true;
}
return base.ProcessDialogKey(keyData);
}
private void ScopeEditorControl_Leave(object sender, EventArgs e)
{
if (!canceling)
{
_newScope.Max = Convert.ToInt32(textBox1.Text);
_newScope.Min = Convert.ToInt32(textBox2.Text);
}
}
private void ScopeEditorControl_Load(object sender, EventArgs e)
{
textBox1.Text = _oldScope.Max.ToString();
textBox2.Text = _oldScope.Min.ToString();
}
}
}
和模态对话框编辑器一样,C# WinForm控件开发环境并不会直接调用我们的编辑器控件,而是用过UITypeEditor类的派生来实现编辑器的调用,所以我们必须实现一个下拉式编辑器。代码如下:
using System;
using System.ComponentModel;
using System.Drawing.Design;
using System.Windows.Forms.Design;
using System.Windows.Forms;
namespace CustomControlSample
{
public class ScopeDropDownEditor : UITypeEditor
{
public override UITypeEditorEditStyle GetEditStyle
(ITypeDescriptorContext context){
if (context != null && context.Instance != null)
{
return UITypeEditorEditStyle.DropDown;
}
return base.GetEditStyle(context);
}
public override object EditValue(ITypeDescriptorContext context,
IServiceProvider provider, object value){
IWindowsFormsEditorService editorService = null;
if (context !=
null && context.Instance != null && provider != null){
editorService =
(IWindowsFormsEditorService)provider.GetService
(typeof(IWindowsFormsEditorService));if (editorService != null)
{
MyListControl control =
(MyListControl)context.Instance;ScopeEditorControl editorControl =
new ScopeEditorControl(control.Scope);editorService.DropDownControl(editorControl);
value = editorControl.Scope;
return value;
}
}
return value;
}
}
}
看过上一篇文章的朋友应该对这段代码很熟悉,是的,这两个编辑器的代码只有几行不同之处,在GetEditStyle方法中,我们返回的是UITypeEditorEditStyle.DropDown,而不是UITypeEditorEditStyle.Modal,表明我们的编辑器是一个下拉式的编辑器。
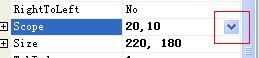
在EditValue中的不同之处是,我们使用DropDownControl方法来显示编辑器。编辑器制作完毕,我们把Scope以前的编辑器替换成下拉式编辑器,如下:
[Browsable(true)] [Editor(typeof(ScopeDropDownEditor), typeof(UITypeEditor))] public Scope Scope { get { return _scope; } set { _scope = value; } }现在build CustomControlSample工程,然后切换到测试工程查看Scope属性。当我们点击属性的值,在属性值的后边出现了一个按钮:
C# WinForm控件开发下拉式属性编辑器
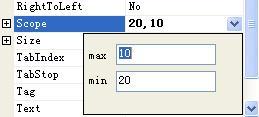
当点击这个按钮的时候,下拉的属性编辑器出现了:
好了,C# WinForm控件开发的下拉式属性编辑器的编辑到这里就讲完了。
C# WinForm控件开发下拉式属性编辑器
关于C#中怎么利用WinForm控件实现一个下拉式属性编辑器就分享到这里了,希望以上内容可以对大家有一定的帮助,可以学到更多知识。如果觉得文章不错,可以把它分享出去让更多的人看到。
免责声明:本站发布的内容(图片、视频和文字)以原创、转载和分享为主,文章观点不代表本网站立场,如果涉及侵权请联系站长邮箱:is@yisu.com进行举报,并提供相关证据,一经查实,将立刻删除涉嫌侵权内容。


