本篇内容主要讲解“spring mvc怎么实现页面访问”,感兴趣的朋友不妨来看看。本文介绍的方法操作简单快捷,实用性强。下面就让小编来带大家学习“spring mvc怎么实现页面访问”吧!
servlet的定义
Servlet is a technology which is used to create a web application. servlet是一项用来创建web application的技术。
Servlet is an API that provides many interfaces and classes including documentation. servlet是一个提供很多接口和类api及其相关文档。
Servlet is an interface that must be implemented for creating any Servlet.servlet是一个接口,创建任何servlet都要实现的接口。
Servlet is a class that extends the capabilities of the servers and responds to the incoming requests. It can respond to any requests. servlet是一个实现了服务器各种能力的类,对请求做出响应。它可以对任何请求做出响应。
Servlet is a web component that is deployed on the server to create a dynamic web page.servlet是一个web组件,部署到一个web server上(如tomcat,jetty),用来产生一个动态web页面。
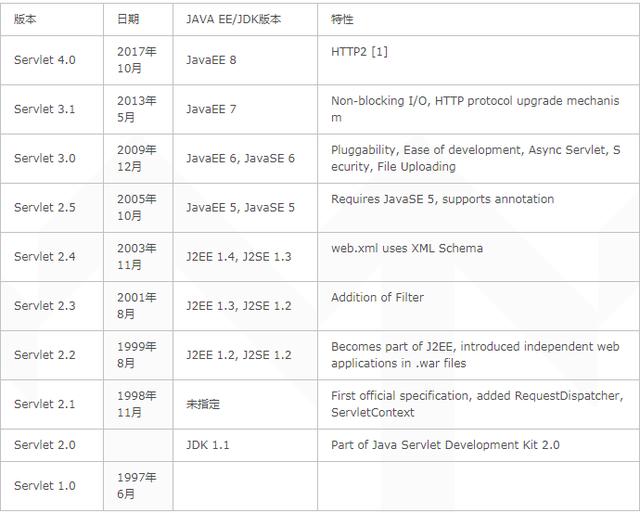
servlet的历史
web Container
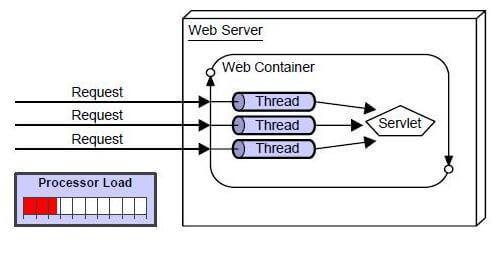
web容器也叫servlet容器,负责servlet的生命周期,映射url请求到相应的servlet。
A web container (also known as a servlet container;[1] and compare "webcontainer"[2]) is the component of a web server that interacts with Java servlets. A web container is responsible for managing the lifecycle of servlets, mapping a URL to a particular servlet and ensuring that the URL requester has the correct access-rights.A web container handles requests to servlets, JavaServer Pages (JSP) files, and other types of files that include server-side code. The Web container creates servlet instances, loads and unloads servlets, creates and manages request and response objects, and performs other servlet-management tasks.A web container implements the web component contract of the Java EE architecture. This architecture specifies a runtime environment for additional web components, including security, concurrency, lifecycle management, transaction, deployment, and other services.
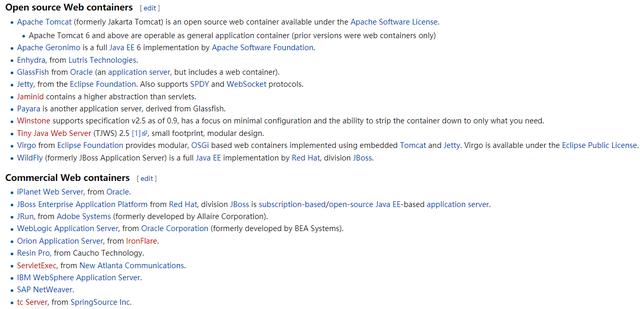
常见的web容器如下:
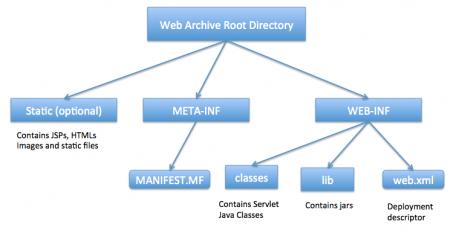
在web容器中,web应用服务器的结构如下:
1.普通servlet实现页面访问
1.1 实例1:使用web.xml实现一个http服务
实现一个简单的servlet
package com.howtodoinjava.servlets; import java.io.IOException; import java.io.PrintWriter; import javax.servlet.ServletException; import javax.servlet.http.HttpServlet; import javax.servlet.http.HttpServletRequest; import javax.servlet.http.HttpServletResponse; public class MyFirstServlet extends HttpServlet { private static final long serialVersionUID = -1915463532411657451L; @Override protected void doGet(HttpServletRequest request, HttpServletResponse response) throws ServletException, IOException { response.setContentType("text/html;charset=UTF-8"); PrintWriter out = response.getWriter(); try { // Write some content out.println("<html>"); out.println("<head>"); out.println("<title>MyFirstServlet</title>"); out.println("</head>"); out.println("<body>"); out.println("<h3>Servlet MyFirstServlet at " + request.getContextPath() + "</h3>"); out.println("</body>"); out.println("</html>"); } finally { out.close(); } } @Override protected void doPost(HttpServletRequest request, HttpServletResponse response) throws ServletException, IOException { //Do some other work } @Override public String getServletInfo() { return "MyFirstServlet"; } }web.xml配置servlet
/MyFirstServlet MyFirstServlet com.howtodoinjava.servlets.MyFirstServlet MyFirstServlet /MyFirstServlet
1.2 编程方式实现一个http服务请求
不需要xml
package com.journaldev.first; import java.io.IOException; import java.io.PrintWriter; import java.util.Date; import javax.servlet.ServletException; import javax.servlet.annotation.WebInitParam; import javax.servlet.annotation.WebServlet; import javax.servlet.http.HttpServlet; import javax.servlet.http.HttpServletRequest; import javax.servlet.http.HttpServletResponse; /** * Servlet implementation class FirstServlet */ @WebServlet(description = "My First Servlet", urlPatterns = { "/FirstServlet" , "/FirstServlet.do"}, initParams = {@WebInitParam(name="id",value="1"),@WebInitParam(name="name",value="pankaj")}) public class FirstServlet extends HttpServlet { private static final long serialVersionUID = 1L; public static final String HTML_START="<html><body>"; public static final String HTML_END="</body></html>"; /** * @see HttpServlet#HttpServlet() */ public FirstServlet() { super(); // TODO Auto-generated constructor stub } /** * @see HttpServlet#doGet(HttpServletRequest request, HttpServletResponse response) */ protected void doGet(HttpServletRequest request, HttpServletResponse response) throws ServletException, IOException { PrintWriter out = response.getWriter(); Date date = new Date(); out.println(HTML_START + "<h3>Hi There!</h3><br/><h4>Date="+date +"</h4>"+HTML_END); } /** * @see HttpServlet#doPost(HttpServletRequest request, HttpServletResponse response) */ protected void doPost(HttpServletRequest request, HttpServletResponse response) throws ServletException, IOException { // TODO Auto-generated method stub } }2.spring mvc实现页面访问
2.1 web.xml方式
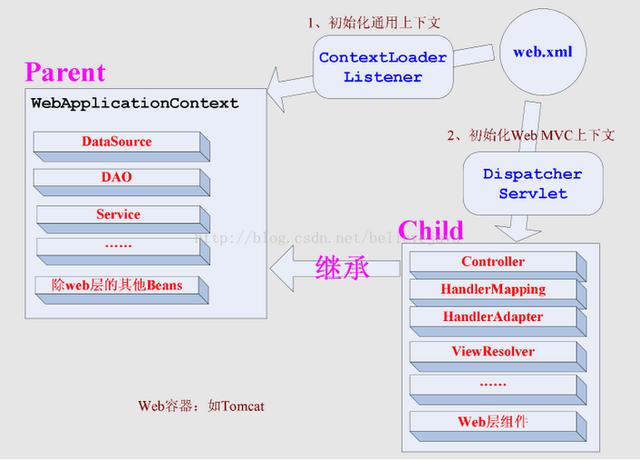
示例:
<web-app xmlns="http://java.sun.com/xml/ns/javaee" xmlns:xsi="http://www.w3.org/2001/XMLSchema-instance" xsi:schemaLocation="http://java.sun.com/xml/ns/javaee http://java.sun.com/xml/ns/javaee/web-app_2_5.xsd" version="2.5"> <display-name>Gradle + Spring MVC Hello World + XML</display-name> <description>Spring MVC web application</description> <!-- For web context --> <servlet> <servlet-name>hello-dispatcher</servlet-name> <servlet-class>org.springframework.web.servlet.DispatcherServlet</servlet-class> <init-param> <param-name>contextConfigLocation</param-name> <param-value>/WEB-INF/spring-mvc-config.xml</param-value> </init-param> <load-on-startup>1</load-on-startup> </servlet> <servlet-mapping> <servlet-name>hello-dispatcher</servlet-name> <url-pattern>/</url-pattern> </servlet-mapping> <!-- For root context --> <listener> <listener-class>org.springframework.web.context.ContextLoaderListener</listener-class> </listener> <context-param> <param-name>contextConfigLocation</param-name> <param-value>/WEB-INF/spring-core-config.xml</param-value> </context-param> </web-app>2.2 编码方式
public class MyWebAppInitializer implements WebApplicationInitializer { @Override public void onStartup(ServletContext container) { // Create the 'root' Spring application context AnnotationConfigWebApplicationContext rootContext = new AnnotationConfigWebApplicationContext(); rootContext.register(AppConfig.class); // Manage the lifecycle of the root application context container.addListener(new ContextLoaderListener(rootContext)); // Create the dispatcher servlet's Spring application context AnnotationConfigWebApplicationContext dispatcherContext = new AnnotationConfigWebApplicationContext(); dispatcherContext.register(DispatcherConfig.class); // Register and map the dispatcher servlet ServletRegistration.Dynamic dispatcher = container.addServlet("dispatcher", new DispatcherServlet(dispatcherContext)); dispatcher.setLoadOnStartup(1); dispatcher.addMapping("/"); } }内部实现

3.spring boot
继承了spring mvc的框架,实现SpringBootServletInitializer
package com.mkyong; import org.springframework.boot.SpringApplication; import org.springframework.boot.autoconfigure.SpringBootApplication; import org.springframework.boot.builder.SpringApplicationBuilder; import org.springframework.boot.web.support.SpringBootServletInitializer; @SpringBootApplication public class SpringBootWebApplication extends SpringBootServletInitializer { @Override protected SpringApplicationBuilder configure(SpringApplicationBuilder application) { return application.sources(SpringBootWebApplication.class); } public static void main(String[] args) throws Exception { SpringApplication.run(SpringBootWebApplication.class, args); } }然后controller
package com.mkyong; import java.util.Map; import org.springframework.beans.factory.annotation.Value; import org.springframework.stereotype.Controller; import org.springframework.web.bind.annotation.RequestMapping; @Controller public class WelcomeController { // inject via application.properties @Value("${welcome.message:test}") private String message = "Hello World"; @RequestMapping("/") public String welcome(Map<String, Object> model) { model.put("message", this.message); return "welcome"; } }到此,相信大家对“spring mvc怎么实现页面访问”有了更深的了解,不妨来实际操作一番吧!这里是亿速云网站,更多相关内容可以进入相关频道进行查询,关注我们,继续学习!
亿速云「云服务器」,即开即用、新一代英特尔至强铂金CPU、三副本存储NVMe SSD云盘,价格低至29元/月。点击查看>>
免责声明:本站发布的内容(图片、视频和文字)以原创、转载和分享为主,文章观点不代表本网站立场,如果涉及侵权请联系站长邮箱:is@yisu.com进行举报,并提供相关证据,一经查实,将立刻删除涉嫌侵权内容。
原文链接:https://www.toutiao.com/a6725162863251423747/