本篇内容介绍了“IOS程序员必须知道的Android要点有哪些”的有关知识,在实际案例的操作过程中,不少人都会遇到这样的困境,接下来就让小编带领大家学习一下如何处理这些情况吧!希望大家仔细阅读,能够学有所成!
UI设计简要说明
本文不 会深入研究关于IOS和Android两个平台之间的用户体验或者设计模式之间的差异,不过如果能够理解Android上的一些优秀的UI范例也很有帮 助:ActionBar、Overflow menu、back button share action等等。假如你很想尝试Android开发,那么强烈推荐你去Google Play Store上购置一台Nexus5,然后把它作为你日常使用的设备使用一周,然后尝试仔细了解这个操作系统的各种功能和扩展特性,如果开发者连操作系统的 各种使用规则都不了解,那么做出来的产品一定有问题。
编程语言的应用框架
Objective-C和Java之间有很多不同之处,如果把Objective-C的编程风格带到Java里面的话,很多代码也许会和底层的应用框架冲突。简单地说,就是需要注意一些区别:
去掉Objective-C里面的类前缀,因为Java里有显式的命名空间和包结构,所以就没必要用类前缀了。
实例变量的前缀用“m”,不用“_”,在写代码的过程中要多利用JavaDoc文档。这样能使代码更清晰,更适合团队合作。
注意检查NULL值,Objective-C对空值检查做的很好,不过Java没有。
不直接使用属性,如果需要setter和getter,需要创建一个getVariableName()方法,然后显式调用它。如果直接使用“this.object”不会调用自定义的getter方法,你必须使用this.getObject这样的方法。
同样的,方法命名时带有get和set前缀来标示它是getter和setter方法,Java的方法很喜欢写成actions或者queries等,比如Java会使用getCell(),而不用cellForRowAtIndexPath。
项目结构
Android 应用程序主要分为两部分。***部分是Java源代码,以Java包结构排布,也可以根据自己的喜好进行结构排布。最基本的结构就是分为这几个顶层目 录:activities、fragments、views、adapters和data(models和managers)。
第 二部分是res文件夹,就是“resource”的简称,res目录存放的是图片、xml布局文件,还有其它xml值文件,是非代码资源的一部分。在 IOS上,图片只需要匹配两个尺寸,而在Android上有很多种屏幕尺寸需要考虑,Android上用文件夹来管理管理图片、字符串,还有其它的屏幕配 置数值等。res文件夹里也含有类似IOS中xib文件的xml文件,还有存储字符串资源、整数值,以及样式的xml文件。
***,在项目结构上还有一点相似的地方,就是AndroidManifest.xml文件。这个文件相当于IOS的Project-Info.plist文 件,它存储了activities、application还有Intent的信息,要了解更多关于Intent的资料,可以继续阅读这篇文章。
Activities
Activities 是Android APP最基本的可视单元,就像UIViewControllers是IOS最基本的显示组件一样。Android系统使用一个Activity栈来管理 Activity,而IOS使用UINavigationController进行管理。当APP启动的时候,Android系统会把Main Activity压栈,值得注意的是这是还可以再运行别的APP Activity,然后把它放到Activity栈中。返回键默认会从Activity栈进行pop操作,所以如果用户按下返回键,就可以切换运行已运行 的App了。
Activities还可以用Intent组件初始化别的Activity,初始化时 可携带数据。启动一个新的Activity类似于IOS上创建一个UIViewController。最基本的启动一个新的Activity的方式就是创 建一个带有data的Intent组件。Android上实现自定义Intent初始化器的***方法就是写一个静态getter方法。在Activity 结束的时候也可以返回数据,在Activity结束的时候可以往Intent里面放置额外的数据。
IOS 和Android的一个大的区别是,任何一个在AndroidManifest文件中注册的Activity都可以作为程序的入口,为Activity设 置一个intent filter属性比如“media intent”,就可以处理系统的媒体文件了。***的例子就是编辑照片Activity。它可以打开一张照片,然后进行修改,***在Activity结束 时返回修改后的照片。
附加提醒:要想在Activity和Fragment之间传递对象,必须要实 现Parcelable接口,就像在IOS里需要遵循协议一样。还有,Parcelable对象可以存在于Activity或者Fragment的 savedInstanceState里,这样在它们被销毁后可以更容易重建它们的状态。
下面就来看看怎么在一个Activity中启动另一个Activity,然后在第二个Activity结束时进行返回。
启动其它Activity并返回结果
// A request code is a unique value for returning activities private static final int REQUEST_CODE_NEXT_ACTIVITY = 1234; protected void startNextActivity() { // Intents need a context, so give this current activity as the context Intent nextActivityIntent = new Intent(this, NextActivity.class); startActivityForResult(nextActivityResult, REQUEST_CODE_NEXT_ACTIVITY); } @Override protected void onActivityResult(int requestCode, int resultCode, Intent data) { switch (requestCode) { case REQUEST_CODE_NEXT_ACTIVITY: if (resultCode == RESULT_OK) { // This means our Activity returned successfully. For now, Toast this text. // This just creates a simple pop-up message on the screen. Toast.makeText(this, "Result OK!", Toast.LENGTH_SHORT).show(); } return; } super.onActivityResult(requestCode, resultCode, data); }Fragment 的概念在Android上比较独特,从Android3.0开始引入。Fragment是一个迷你版的控制器,可以显示在Activity上。它有自己的 状态和逻辑,同时在一个屏幕上支持多个Fragment同时显示。Activity充当Fragment的控制器,Fragment没有自己的上下文环 境,只能依赖Activity存在。
使用Fragment***的例子就是在平板上的应用。可以在屏幕左边放一个fragment列表,然后在屏幕的右边放fragment的详细信息。Fragment可以把屏幕分成可重复利用的小块,分别控制管理。不过要注意Fragment的生命周期,会有些细微的差别。
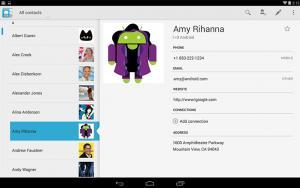
Fragment 是实现Android结构化的一种新的方式,就像IOS中的不用UITableview而用UICollectionView实现列表数据结构化。因为只 使用Activity而不用Fragment的话,会简单一些。不过,之后你会遇到麻烦。如果不使用Fragment代替全盘使用Activity的话, 在后面需要利用intent和进行多屏幕支持的时候就会遇到困难。
下面看一个UITableViewController的例子和一个ListFragment的地铁时刻表示例。
表格实现
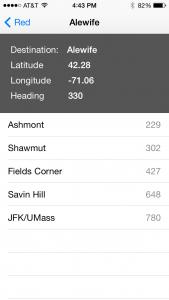
@interface MBTASubwayTripTableTableViewController () @property (assign, nonatomic) MBTATrip *trip; @end @implementation MBTASubwayTripTableTableViewController -(instancetype)initWithTrip:(MBTATrip *)trip { self = [super initWithStyle:UITableViewStylePlain]; if (self) { _trip = trip; [self setTitle:trip.destination]; } return self; } -(void)viewDidLoad { [super viewDidLoad]; [self.tableView registerClass:[MBTAPredictionCell class] forCellReuseIdentifier:[MBTAPredictionCell reuseId]]; [self.tableView registerNib:[UINib nibWithNibName:NSStringFromClass([MBTATripHeaderView class]) bundle:nil] forHeaderFooterViewReuseIdentifier:[MBTATripHeaderView reuseId]]; } #pragma mark - UITableViewDataSource -(NSInteger)numberOfSectionsInTableView:(UITableView *)tableView { return 1; } -(NSInteger)tableView:(UITableView *)tableView numberOfRowsInSection:(NSInteger)section { return [self.trip.predictions count]; } #pragma mark - UITableViewDelegate -(CGFloat)tableView:(UITableView *)tableView heightForHeaderInSection:(NSInteger)section { return [MBTATripHeaderView heightWithTrip:self.trip]; } -(UIView *)tableView:(UITableView *)tableView viewForHeaderInSection:(NSInteger)section { MBTATripHeaderView *headerView = [self.tableView dequeueReusableHeaderFooterViewWithIdentifier:[MBTATripHeaderView reuseId]]; [headerView setFromTrip:self.trip]; return headerView; } -(UITableViewCell *)tableView:(UITableView *)tableView cellForRowAtIndexPath:(NSIndexPath *)indexPath { UITableViewCell *cell = [tableView dequeueReusableCellWithIdentifier:[MBTAPredictionCell reuseId] forIndexPath:indexPath]; MBTAPrediction *prediction = [self.trip.predictions objectAtIndex:indexPath.row]; [(MBTAPredictionCell *)cell setFromPrediction:prediction]; return cell; } -(BOOL)tableView:(UITableView *)tableView canEditRowAtIndexPath:(NSIndexPath *)indexPath { return NO; } - (void)tableView:(UITableView *)tableView didSelectRowAtIndexPath:(NSIndexPath *)indexPath { [tableView deselectRowAtIndexPath:indexPath animated:YES]; } @endList Fragment实现

public class TripDetailFragment extends ListFragment { /** * The configuration flags for the Trip Detail Fragment. */ public static final class TripDetailFragmentState { public static final String KEY_FRAGMENT_TRIP_DETAIL = "KEY_FRAGMENT_TRIP_DETAIL"; } protected Trip mTrip; /** * Use this factory method to create a new instance of * this fragment using the provided parameters. * * @param trip the trip to show details * @return A new instance of fragment TripDetailFragment. */ public static TripDetailFragment newInstance(Trip trip) { TripDetailFragment fragment = new TripDetailFragment(); Bundle args = new Bundle(); args.putParcelable(TripDetailFragmentState.KEY_FRAGMENT_TRIP_DETAIL, trip); fragment.setArguments(args); return fragment; } public TripDetailFragment() { } @Override public View onCreateView(LayoutInflater inflater, ViewGroup container, Bundle savedInstanceState) { Prediction[] predictions= mTrip.predictions.toArray(new Prediction[mTrip.predictions.size()]); PredictionArrayAdapter predictionArrayAdapter = new PredictionArrayAdapter(getActivity(), predictions); setListAdapter(predictionArrayAdapter); return super.onCreateView(inflater,container, savedInstanceState); } @Override public void onViewCreated(View view, Bundle savedInstanceState) { super.onViewCreated(view, savedInstanceState); TripDetailsView headerView = new TripDetailsView(getActivity()); headerView.updateFromTripObject(mTrip); getListView().addHeaderView(headerView); } }下面,我们来分析Android上特有的一些组件。
Android通用组件
ListView和Adapter
ListView 和IOS的UITableView最像,也是使用最频繁的组件之一。类似于UITableView的 UITableViewController,ListView也有一个ListActivity,还有ListFragment。这些组件会更好地处理 一些布局问题,也为操作数据适配器提供了便利,这个接下来会说到。下面这个例子就是使用ListFragment来展示数据,类似TableView的 datasource。
关于datasource,Android上没有datasource和 delegate,只有Adapter。Adapter有很多种形式,主要功能其实就是为了把datasource和delegate合在一起。 Adapter拿到数据然后填充到Listview中,在ListView中初始化响应的组件并显示出来,下面是arrayAdapter的使用:
public class PredictionArrayAdapter extends ArrayAdapter { int LAYOUT_RESOURCE_ID = R.layout.view_three_item_list_view; public PredictionArrayAdapter(Context context) { super(context, R.layout.view_three_item_list_view); } public PredictionArrayAdapter(Context context, Prediction[] objects) { super(context, R.layout.view_three_item_list_view, objects); } @Override public View getView(int position, View convertView, ViewGroup parent) { Prediction prediction = this.getItem(position); View inflatedView = convertView; if(convertView==null) { LayoutInflater inflater = (LayoutInflater)getContext().getSystemService(Context.LAYOUT_INFLATER_SERVICE); inflatedView = inflater.inflate(LAYOUT_RESOURCE_ID, parent, false); } TextView stopNameTextView = (TextView)inflatedView.findViewById(R.id.view_three_item_list_view_left_text_view); TextView middleTextView = (TextView)inflatedView.findViewById(R.id.view_three_item_list_view_middle_text_view); TextView stopSecondsTextView = (TextView)inflatedView.findViewById(R.id.view_three_item_list_view_right_text_view); stopNameTextView.setText(prediction.stopName); middleTextView.setText(""); stopSecondsTextView.setText(prediction.stopSeconds.toString()); return inflatedView; } }可 以看到,adapter里面有一个很重要的方法叫getView,和IOS的cellForRowAtIndexPath方法一样。还有一个相似之处就是 循环利用的策略,和IOS6上的实现很相似。在Android和IOS上循环利用View都很重要,事实上它对列表的实现有很大帮助。这个adapter 很简单,使用了一个内建的类ArrayAdapter来存放数据,也解释了怎么把数据填入ListView中。
AsyncTask
对于IOS上的Grand Central Dispatch,Android上也有AsyncTask。它是异步操作工具的又一选择,用一种很友好的方式实现异步任务。不过AsyncTask有点超出了本文的范围,所以本人还是推荐你看看这里。
Activity的生命周期
IOS开发者在写Android的过程中还要注意的就是Android的生命周期。可以先从Activity的生命周期文档开始:
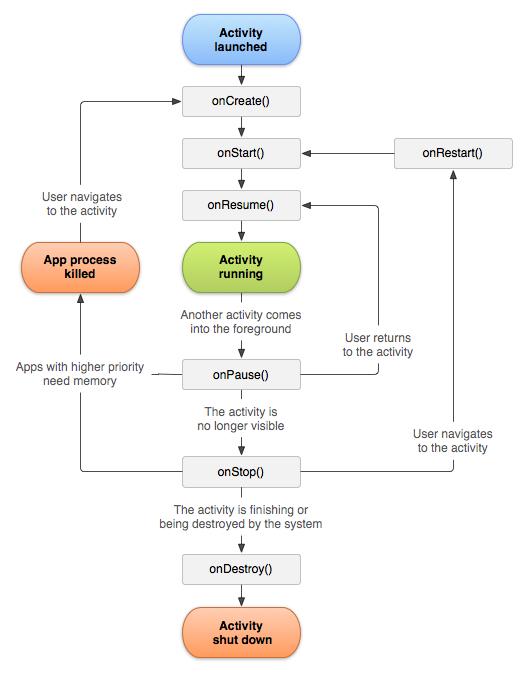
本 质上Activity的生命周期很像UIViewController的生命周期,主要区别在于Android上可以任意销毁Activity,所以保证 Activity的数据和状态很重要,如果在onCreate()中保存了的话,可以在saved state中恢复Activity的状态。***的方法就是使用saveInstanceState来存储bundled数据,例如下面的 TripListActivity是示例工程的一部分,用来保存当前显示的数据:
public static Intent getTripListActivityIntent(Context context, TripList.LineType lineType) { Intent intent = new Intent(context, TripListActivity.class); intent.putExtra(TripListActivityState.KEY_ACTIVITY_TRIP_LIST_LINE_TYPE, lineType.getLineName()); return intent; } public static final class TripListActivityState { public static final String KEY_ACTIVITY_TRIP_LIST_LINE_TYPE = "KEY_ACTIVITY_TRIP_LIST_LINE_TYPE"; } TripList.LineType mLineType; @Override protected void onCreate(Bundle savedInstanceState) { super.onCreate(savedInstanceState); mLineType = TripList.LineType.getLineType(getIntent().getStringExtra(TripListActivityState.KEY_ACTIVITY_TRIP_LIST_LINE_TYPE)); }还 有一个要注意的地方就是屏幕旋转:如果屏幕发生旋转,会改变Activity的生命周期。也就是说,Activity会先被销毁,然后再重建。如果已经保 存了数据和状态,Activity可以重建原来的状态,实现无缝重建。很多APP开发者在遇到APP旋转时会出现问题,因为Activity没有处理旋转 的改变。注意不要用锁定屏幕的方向来解决这个问题,因为这样会存在一个隐含的生命周期的bug,在某些情况下还是可能发生的。
Fragment生命周期
Fragment的生命周期和Activity的很像,但是有一些区别:
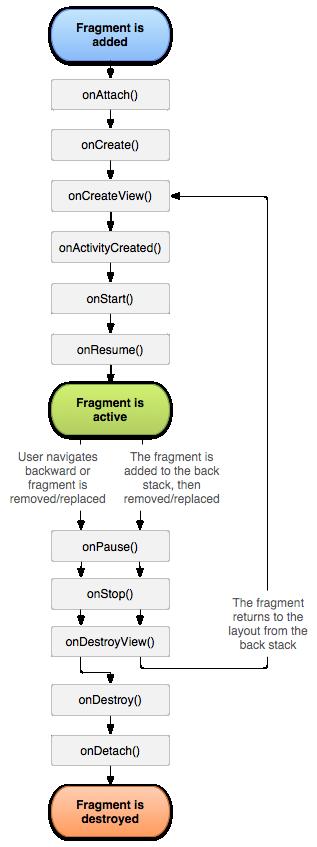
还 有一个问题就是Fragment和Activity通信的问题。需要注意的是onAttach()方法在onActivityCreated()方法之前 被调用,这就意味着在fragment创建完成后Activity还不能保证已经存在。如果需要为父Activity设置接口或者代理,则需要在 onActivityCreated()方法调用之后。
Fragment也有可能会在系统需要的时候被创建和销毁。如果要保存它的状态,那么也要像Activity一样进行处理。下面这个是示例项目中的一个小例子,trip列表Fragment会记录相应的数据,和上面的地铁时间示例一样:
/** * The configuration flags for the Trip List Fragment. */ public static final class TripListFragmentState { public static final String KEY_FRAGMENT_TRIP_LIST_LINE_TYPE = "KEY_FRAGMENT_TRIP_LIST_LINE_TYPE"; public static final String KEY_FRAGMENT_TRIP_LIST_DATA = "KEY_FRAGMENT_TRIP_LIST_DATA"; } /** * Use this factory method to create a new instance of * this fragment using the provided parameters. * * @param lineType the subway line to show trips for. * @return A new instance of fragment TripListFragment. */ public static TripListFragment newInstance(TripList.LineType lineType) { TripListFragment fragment = new TripListFragment(); Bundle args = new Bundle(); args.putString(TripListFragmentState.KEY_FRAGMENT_TRIP_LIST_LINE_TYPE, lineType.getLineName()); fragment.setArguments(args); return fragment; } protected TripList mTripList; protected void setTripList(TripList tripList) { Bundle arguments = this.getArguments(); arguments.putParcelable(TripListFragmentState.KEY_FRAGMENT_TRIP_LIST_DATA, tripList); mTripList = tripList; if (mTripArrayAdapter != null) { mTripArrayAdapter.clear(); mTripArrayAdapter.addAll(mTripList.trips); } } @Override public void onCreate(Bundle savedInstanceState) { super.onCreate(savedInstanceState); if (getArguments() != null) { mLineType = TripList.LineType.getLineType(getArguments().getString(TripListFragmentState.KEY_FRAGMENT_TRIP_LIST_LINE_TYPE)); mTripList = getArguments().getParcelable(TripListFragmentState.KEY_FRAGMENT_TRIP_LIST_DATA); } }还 要注意的是,Fragment经常会在onCreate方法中利用bundled参数重建自己的状态。而自定义的Trip列表模型类相关的setter方 法也会把对象添加到bundled参数中。这样就可以保证在Fragment被销毁或者重建时,比如屏幕旋转后,可以利用***的数据去重建状态。
关于布局
和Android上其它部分的开发工作一样,指定布局文件也有自己的优缺点。Android上的布局文件都存放在res/layouts文件夹中,以易读的xml形式存储。
地铁列表布局
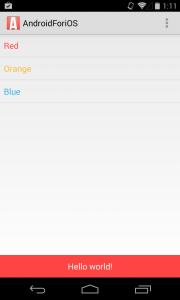
xmlns:tools="http://schemas.android.com/tools" android:layout_width="match_parent" android:layout_height="match_parent" tools:context="com.example.androidforios.app.activities.MainActivity$PlaceholderFragment"> android:id="@+id/fragment_subway_list_listview" android:layout_width="match_parent" android:layout_height="match_parent" android:paddingBottom="@dimen/Button.Default.Height"/> android:id="@+id/fragment_subway_list_Button" android:layout_width="match_parent" android:layout_height="@dimen/Button.Default.Height" android:minHeight="@dimen/Button.Default.Height" android:background="@drawable/button_red_selector" android:text="@string/hello_world" android:textColor="@color/Button.Text" android:layout_alignParentBottom="true" android:gravity="center"/>下面这个是IOS上用UITableView和UIButton来制作的类似效果:
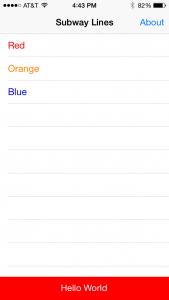
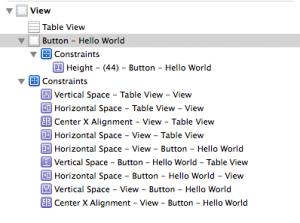
可以发现,Android的布局文件更容易阅读和理解,而且提供了多种布局方式,我们只介绍了其中的一小部分。
通常来说,我们接触的最基本的UI结构就是ViewGroup的子类,RelativeLayout、LinearLayout、FrameLayout是最常用的。这些ViewGroup的子类可以容纳别的View,并包含了一些排布控件的属性。
一个很好的例子就是上面用到的RelativeLayout,在里面可以使用android:layout_alignParentBottom="true"来把按钮定位到布局底部。
***,如果要在Fragment或者Activity中使用这些控件的话,可以在onCreateView()方法中使用布局的资源ID:
@Override public View onCreateView(LayoutInflater inflater, ViewGroup container, Bundle savedInstanceState) { return inflater.inflate(R.layout.fragment_subway_listview, container, false); }布局小贴士
请使用dp(density-independent pixels),不直接使用dx(pixels);
不要在可视化编辑器中移动布局组件——通常来说可视化编辑器在你调好高和宽后,会为组件添加一些多余的像素,所以***就是直接操作xml文件;
如果在布局的height和width看到有用fill_parent这个属性的话,你会发现在API 8的时候这个属性就已经被限制了,改用match_parent替换。
如果要了解更多关于这方面的内容可以看看这篇文章——responsive android applications。
数据
Android上的数据存储也和IOS上差不多:
SharedPreferences、NSUserDefaults;
内存存储对象;
internal、external文件读写document directory文件读写;
SQLite数据库存储Core Data形式数据库存储。
其中最基本的区别就是Core Data。在Android上可以直接访问sqlite数据库并可以返回cursor对象得到结果。更详细的介绍请看这篇文章—— using SQLite on Android。
“IOS程序员必须知道的Android要点有哪些”的内容就介绍到这里了,感谢大家的阅读。如果想了解更多行业相关的知识可以关注亿速云网站,小编将为大家输出更多高质量的实用文章!
亿速云「云服务器」,即开即用、新一代英特尔至强铂金CPU、三副本存储NVMe SSD云盘,价格低至29元/月。点击查看>>
免责声明:本站发布的内容(图片、视频和文字)以原创、转载和分享为主,文章观点不代表本网站立场,如果涉及侵权请联系站长邮箱:is@yisu.com进行举报,并提供相关证据,一经查实,将立刻删除涉嫌侵权内容。