这篇文章主要讲解了“android Robospice的工作原理是什么”,文中的讲解内容简单清晰,易于学习与理解,下面请大家跟着小编的思路慢慢深入,一起来研究和学习“android Robospice的工作原理是什么”吧!
Robospice 比起 AsyncTask 的确好太多了,但是依然存在一些问题。比如下面这段常见代码,通过Robospice在Activity中发起一个请求的过程。你并不需要细读,只要有个大概的概念就好:
FollowersRequest request = new FollowersRequest(user); lastRequestCacheKey = request.createCacheKey(); spiceManager.execute(request, lastRequestCacheKey, DurationInMillis.ONE_MINUTE, new RequestListener<FollowerList> { @Override public void onRequestFailure(SpiceException e) { // On success } @Override public void onRequestSuccess(FollowerList listFollowers) { // On failure } });然后是请求的具体代码:
public class FollowersRequest extends SpringAndroidSpiceRequest<FollowerList> { private String user; public FollowersRequest(String user) { super(FollowerList.class); this.user = user; } @Override public FollowerList loadDataFromNetwork() throws Exception { String url = format("https://api.github.com/users/%s/followers", user); return getRestTemplate().getForObject(url, FollowerList.class); } public String createCacheKey() { return "followers." + user; } }你需要为每个请求都做上述的处理,代码会显得很臃肿:
- 对于你的每种请求你都需要继承SpiceRequest写一个特定的子类。
- 同样的,对于每种请求你都需要实现一个RequestListener来监听。
- 如果你的缓存过期时间很短,用户就需要花较长时间等待你的每个请求结束。
- RequestListener持有了Activity的隐式引用,那么是不是还需要内存泄露的问题。
综上,这并不是一个很好的解决方案。
在我开始开发Candyshop的时候,我尝试了其他的方法。我试图通过混合一些拥有有趣特性的库来构造一个简单而健壮的解决方案。这是我用到的库的列表:
* AndroidAnnotations用来处理后台任务,EBean等等……
* Spring RestTemplate用来处理 REST(含状态传输)的网络请求,这个库和AndroidAnnotations配合的非常好。
* SnappyDB这个库主要用来将一些 Java 对象缓存到本地文件中。
* EventBus 通过 Event Bus 来解耦处理 App 内部组建间的通讯。
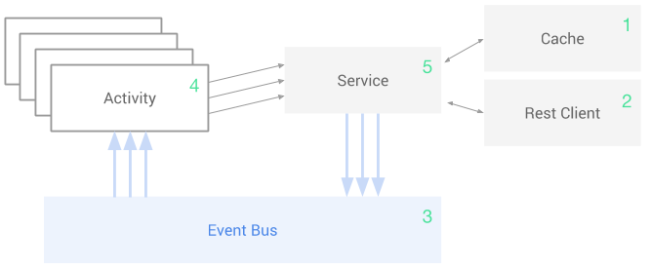
下图就是我将要详细讲解的整体架构:

你肯定会需要一个持久化的缓存系统,保持这个系统尽可能简单。
@EBean public class Cache { public static enum CacheKey { USER, CONTACTS, ... } public <T> T get(CacheKey key, Class<T> returnType) { ... } public void put(CacheKey key, Object value) { ... } }这里我通过下面的例子来说明。记得要确保你使用 REST API 放在同一个地方。
@Rest(rootUrl = "http://anything.com") public interface CandyshopApi { @Get("/api/contacts/") ContactsWrapper fetchContacts(); @Get("/api/user/") User fetchUser(); }在程序最初的时候就初始化Event bus对象,然后应用的全局都可以访问到这个对象。在Android中, Application初始化是一个很好的时机。
public class CandyshopApplication extends Application { public final static EventBus BUS = new EventBus(); ... }对于这一类的Activity,我的处理方式和Robospice非常类似,同样是基于Service解决。不同的是,我的Service并不是Android提供的那个,而是一个常规的单例对象。这个对象可以被App的各处访问到,具体的代码我们会在第五步进行讲解,在这一步,我们先看看这种处理Activity代码结构是怎么样的。因为,这一步可以看到的是我们简化效果***烈的部分!
@EActivity(R.layout.activity_main) public class MainActivity extends Activity { // Inject the service @Bean protected AppService appService; // Once everything is loaded… @AfterViews public void afterViews() { // … request the user and his contacts (returns immediately) appService.getUser(); appService.getContacts(); } /* The result of the previous calls will come as events through the EventBus. We'll probably update the UI, so we need to use @UiThread. */ @UiThread public void onEvent(UserFetchedEvent e) { ... } @UiThread public void onEvent(ContactsFetchedEvent e) { ... } // Register the activity in the event bus when it starts @Override protected void onStart() { super.onStart(); BUS.register(this); } // Unregister it when it stops @Override protected void onStop() { super.onStop(); BUS.unregister(this); } }一行代码完成对用户数据的请求,同样也只需要一行代码来解析请求所返回的数据。对于通讯录等其他数据也可以用一样的方式来处理,听起来不错吧!
正如我在上一步说的那样,这里使用的Service并不是Android提供的Service类。其实,一开始的时候,我考虑使用Android提供的Services,不过***还是放弃了,原因还是为了简化。因为 Android提供的Services通常情况下是为那些在没有Activity展示情况下但还需要处理的操作提供服务的。另一种情况,你需要提供一些功能给其他的应用。这其实和我的需求并不完全相符,而且用单例来处理我的后台请求可以让我避免使用复杂的借口,譬如:ServiceConnection,Binder等等……
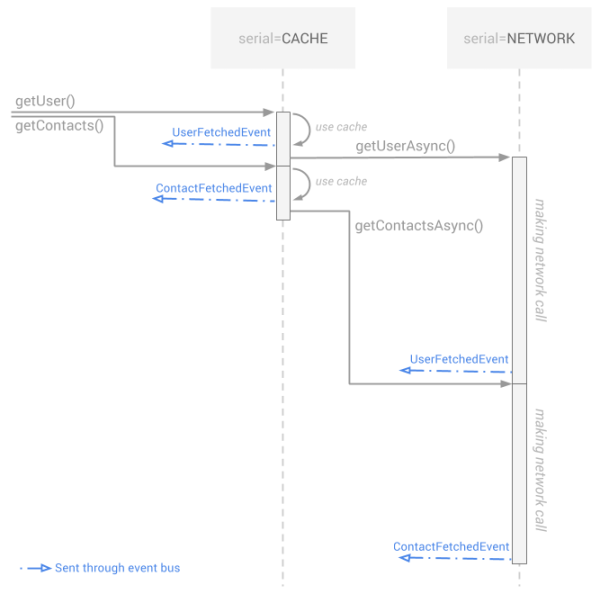
这一部分可以探讨的地方就多了。为了方便理解,我们从架构切入展示当Activity调用getUser()和getContacts()的时候究竟发生了什么。
你可以把下图中每个serial当作一个线程:

正如你所看到的,这是我非常喜欢的模式。大部分情况下用户不需要等待,程序的视图会立刻被缓存数据填充。然后,当抓取到了服务端的***数据,视图数据会被新数据替代掉。与此对应的是,你需要确保你的Activity可以接受多次同样类型的数据。在构建Activity的时候记住这一点就没有任何问题啦。
下面是一些示例代码:
// As I said, a simple class, with a singleton scope @EBean(scope = EBean.Scope.Singleton) public class AppService { // (Explained later) public static final String NETWORK = "NETWORK"; public static final String CACHE = "CACHE"; // Inject the cache (step 1) @Bean protected Cache cache; // Inject the rest client (step 2) @RestService protected CandyshopApi candyshopApi; // This is what the activity calls, it's public @Background(serial = CACHE) public void getContacts() { // Try to load the existing cache ContactsFetchedEvent cachedResult = cache.get(KEY_CONTACTS, ContactsFetchedEvent.class); // If there's something in cache, send the event if (cachedResult != null) BUS.post(cachedResult); // Then load from server, asynchronously getContactsAsync(); } @Background(serial = NETWORK) private void getContactsAsync() { // Fetch the contacts (network access) ContactsWrapper contacts = candyshopApi.fetchContacts(); // Create the resulting event ContactsFetchedEvent event = new ContactsFetchedEvent(contacts); // Store the event in cache (replace existing if any) cache.put(KEY_CONTACTS, event); // Post the event BUS.post(event); } }似乎每个请求之中的代码还是有点多!实际上,这是我为了更好说明才进行了展开。不难发现,这些请求都遵守了类似的模式,所以你可以很容易的构造一个 Helper 来简化他们。比如 getUser()可以是这样的:
@Background(serial = CACHE) public void getUser() { postIfPresent(KEY_USER, UserFetchedEvent.class); getUserAsync(); } @Background(serial = NETWORK) private void getUserAsync() { cacheThenPost(KEY_USER, new UserFetchedEvent(candyshopApi.fetchUser())); }那么serial是用来做什么的? 让我们看看文档是怎么说的:
默认情况下,所有@Background的匿名方法都是并行执行的。但是如果两个方法使用了同样名字的serial则会顺序运行在同一个线程中,一个接着一个执行。
虽然把网络请求放在一个线程中顺序执行可能会导致性能下降,但是这使得“先POST然后GET获得数据”的那类事务处理起来非常容易,这是个特性值得为此牺牲一些性能。退一步讲,如果你真的发现性能不可接受,还是可以很容易使用多个serial来解决。现在版本的Candyshop中,我同时使用了四个不同的serial。
感谢各位的阅读,以上就是“android Robospice的工作原理是什么”的内容了,经过本文的学习后,相信大家对android Robospice的工作原理是什么这一问题有了更深刻的体会,具体使用情况还需要大家实践验证。这里是亿速云,小编将为大家推送更多相关知识点的文章,欢迎关注!
亿速云「云服务器」,即开即用、新一代英特尔至强铂金CPU、三副本存储NVMe SSD云盘,价格低至29元/月。点击查看>>
免责声明:本站发布的内容(图片、视频和文字)以原创、转载和分享为主,文章观点不代表本网站立场,如果涉及侵权请联系站长邮箱:is@yisu.com进行举报,并提供相关证据,一经查实,将立刻删除涉嫌侵权内容。