本篇内容介绍了“Android程序怎么实现兼容手机和平板”的有关知识,在实际案例的操作过程中,不少人都会遇到这样的困境,接下来就让小编带领大家学习一下如何处理这些情况吧!希望大家仔细阅读,能够学有所成!
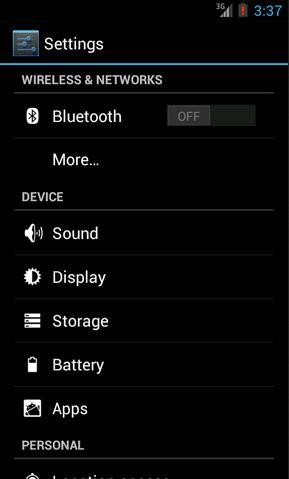
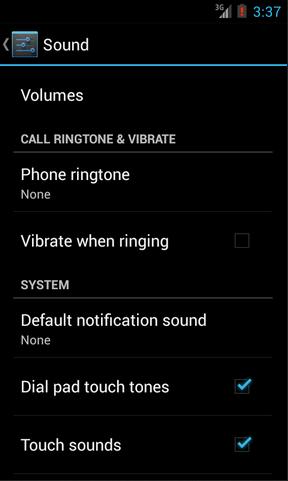
我们先来看一下Android手机的设置界面,点击一下Sound,可以跳转到声音设置界面,如下面两张图所示:
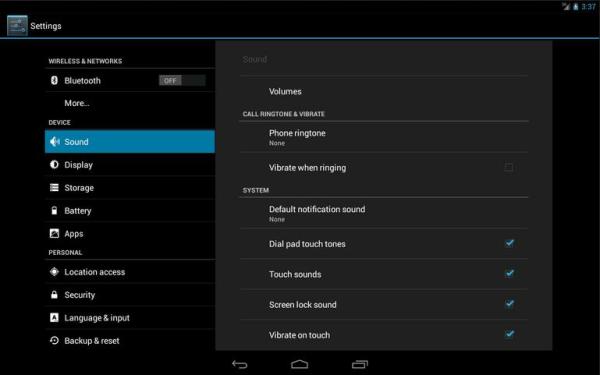
然后再来看一下Android Pad的设置界面,主设置页面和声音设置页面都是在一个界面显示的,如下图所示:
如果这分别是两个不同的App做出的效果,那没有丝毫惊奇之处。但如果是同一个App,在手机上和平板上运行分别有以上两种效果的话,你是不是就已经心动了?我们现在就来模拟实现一下。
首先你需要对Fragment有一定的了解,如果你还没接触过Fragment,建议可以先阅读 Android Fragment完全解析,关于碎片你所需知道的一切 这篇文章。并且本次的代码是运行在Android 4.0版本上的,如果你的SDK版本还比较低的话,建议可以先升升级了。
新建一个Android项目,取名叫FragmentDemo。打开或新建MainActivity作为程序的主Activity,里面有如下自动生成的内容:
publicclass MainActivity extends Activity {
@Override
publicvoid onCreate(Bundle savedInstanceState) {
super.onCreate(savedInstanceState);
setContentView(R.layout.activity_main);
}
}
public class MainActivity extends Activity { @Override public void onCreate(Bundle savedInstanceState) { super.onCreate(savedInstanceState); setContentView(R.layout.activity_main); } }作为一个Android老手,上面的代码实在太小儿科了,每个Activity中都会有这样的代码。不过今天我们的程序可不会这么简单,加载布局这一块还是大有文章的。
打开或新建res/layout/activity_main.xml作为程序的主布局文件,里面代码如下:
<LinearLayoutxmlns:android="http://schemas.android.com/apk/res/android"
xmlns:tools="http://schemas.android.com/tools"
android:layout_width="fill_parent"
android:layout_height="fill_parent"
android:orientation="horizontal"
tools:context=".MainActivity">
<fragment
android:id="@+id/menu_fragment"
android:name="com.example.fragmentdemo.MenuFragment"
android:layout_width="fill_parent"
android:layout_height="fill_parent"
/>
</LinearLayout>
<LinearLayout xmlns:android="http://schemas.android.com/apk/res/android" xmlns:tools="http://schemas.android.com/tools" android:layout_width="fill_parent" android:layout_height="fill_parent" android:orientation="horizontal" tools:context=".MainActivity" > <fragment android:id="@+id/menu_fragment" android:name="com.example.fragmentdemo.MenuFragment" android:layout_width="fill_parent" android:layout_height="fill_parent" /> </LinearLayout>
这个布局引用了一个MenuFragment,我们稍后来进行实现,先来看一下今天的一个重点,我们需要再新建一个activity_main.xml,这个布局文件名和前面的主布局文件名是一样的,但是要放在不同的目录下面。
别走开,下页为您继续介绍Fragment实现Android程序手机平板兼容
在res目录下新建layout-large目录,然后这个目录下创建新的activity_main.xml,加入如下代码:
<LinearLayoutxmlns:android="http://schemas.android.com/apk/res/android"
xmlns:tools="http://schemas.android.com/tools"
android:layout_width="fill_parent"
android:layout_height="fill_parent"
android:orientation="horizontal"
android:baselineAligned="false"
tools:context=".MainActivity"
>
<fragment
android:id="@+id/left_fragment"
android:name="com.example.fragmentdemo.MenuFragment"
android:layout_width="0dip"
android:layout_height="fill_parent"
android:layout_weight="1"
/>
<FrameLayout
android:id="@+id/details_layout"
android:layout_width="0dip"
android:layout_height="fill_parent"
android:layout_weight="3"
></FrameLayout>
</LinearLayout>
<LinearLayout xmlns:android="http://schemas.android.com/apk/res/android" xmlns:tools="http://schemas.android.com/tools" android:layout_width="fill_parent" android:layout_height="fill_parent" android:orientation="horizontal" android:baselineAligned="false" tools:context=".MainActivity" > <fragment android:id="@+id/left_fragment" android:name="com.example.fragmentdemo.MenuFragment" android:layout_width="0dip" android:layout_height="fill_parent" android:layout_weight="1" /> <FrameLayout android:id="@+id/details_layout" android:layout_width="0dip" android:layout_height="fill_parent" android:layout_weight="3" ></FrameLayout> </LinearLayout>
这个布局同样也引用了MenuFragment,另外还加入了一个FrameLayout用于显示详细内容。其实也就是分别对应了平板界面上的左侧布局和右侧布局。
这里用到了动态加载布局的技巧,首先Activity中调用 setContentView(R.layout.activity_main) ,表明当前 的Activity想加载activity_main这个布局文件。而Android系统又会根据当前的运行环境判断程序是否运行在大屏幕设备上,如果运 行在大屏幕设备上,就加载layout-large目录下的activity_main.xml,否则就默认加载layout目录下的 activity_main.xml。
关于动态加载布局的更多内容,可以阅读 Android官方提供的支持不同屏幕大小的全部方法 这篇文章。
下面我们来实现久违的MenuFragment,新建一个MenuFragment类继承自Fragment,具体代码如下:
publicclass MenuFragment extends Fragment implements OnItemClickListener {
/**
* 菜单界面中只包含了一个ListView。
*/
private ListView menuList;
/**
* ListView的适配器。
*/
private ArrayAdapter<String> adapter;
/**
* 用于填充ListView的数据,这里就简单只用了两条数据。
*/
private String[] menuItems = { "Sound", "Display" };
/**
* 是否是双页模式。如果一个Activity中包含了两个Fragment,就是双页模式。
*/
privateboolean isTwoPane;
/**
* 当Activity和Fragment建立关联时,初始化适配器中的数据。
*/
@Override
publicvoid onAttach(Activity activity) {
super.onAttach(activity);
adapter = new ArrayAdapter<String>(activity, android.R.layout.simple_list_item_1, menuItems);
}
/**
* 加载menu_fragment布局文件,为ListView绑定了适配器,并设置了监听事件。
*/
@Override
public View onCreateView(LayoutInflater inflater, ViewGroup container, Bundle savedInstanceState) {
View view = inflater.inflate(R.layout.menu_fragment, container, false);
menuList = (ListView) view.findViewById(R.id.menu_list);
menuList.setAdapter(adapter);
menuList.setOnItemClickListener(this);
return view;
}
/**
* 当Activity创建完毕后,尝试获取一下布局文件中是否有details_layout这个元素,如果有说明当前
* 是双页模式,如果没有说明当前是单页模式。
*/
@Override
publicvoid onActivityCreated(Bundle savedInstanceState) {
super.onActivityCreated(savedInstanceState);
if (getActivity().findViewById(R.id.details_layout) != null) {
isTwoPane = true;
} else {
isTwoPane = false;
}
}
/**
* 处理ListView的点击事件,会根据当前是否是双页模式进行判断。如果是双页模式,则会动态添加Fragment。
* 如果不是双页模式,则会打开新的Activity。
*/
@Override
publicvoid onItemClick(AdapterView<?> arg0, View view, int index, long arg3) {
if (isTwoPane) {
Fragment fragment = null;
if (index == 0) {
fragment = new SoundFragment();
} elseif (index == 1) {
fragment = new DisplayFragment();
}
getFragmentManager().beginTransaction().replace(R.id.details_layout, fragment).commit();
} else {
Intent intent = null;
if (index == 0) {
intent = new Intent(getActivity(), SoundActivity.class);
} elseif (index == 1) {
intent = new Intent(getActivity(), DisplayActivity.class);
}
startActivity(intent);
}
}
}
public class MenuFragment extends Fragment implements OnItemClickListener { /** * 菜单界面中只包含了一个ListView。 */ private ListView menuList; /** * ListView的适配器。 */ private ArrayAdapter<String> adapter; /** * 用于填充ListView的数据,这里就简单只用了两条数据。 */ private String[] menuItems = { "Sound", "Display" }; /** * 是否是双页模式。如果一个Activity中包含了两个Fragment,就是双页模式。 */ private boolean isTwoPane; /** * 当Activity和Fragment建立关联时,初始化适配器中的数据。 */ @Override public void onAttach(Activity activity) { super.onAttach(activity); adapter = new ArrayAdapter<String>(activity, android.R.layout.simple_list_item_1, menuItems); } /** * 加载menu_fragment布局文件,为ListView绑定了适配器,并设置了监听事件。 */ @Override public View onCreateView(LayoutInflater inflater, ViewGroup container, Bundle savedInstanceState) { View view = inflater.inflate(R.layout.menu_fragment, container, false); menuList = (ListView) view.findViewById(R.id.menu_list); menuList.setAdapter(adapter); menuList.setOnItemClickListener(this); return view; } /** * 当Activity创建完毕后,尝试获取一下布局文件中是否有details_layout这个元素,如果有说明当前 * 是双页模式,如果没有说明当前是单页模式。 */ @Override public void onActivityCreated(Bundle savedInstanceState) { super.onActivityCreated(savedInstanceState); if (getActivity().findViewById(R.id.details_layout) != null) { isTwoPane = true; } else { isTwoPane = false; } } /** * 处理ListView的点击事件,会根据当前是否是双页模式进行判断。如果是双页模式,则会动态添加Fragment。 * 如果不是双页模式,则会打开新的Activity。 */ @Override public void onItemClick(AdapterView<?> arg0, View view, int index, long arg3) { if (isTwoPane) { Fragment fragment = null; if (index == 0) { fragment = new SoundFragment(); } else if (index == 1) { fragment = new DisplayFragment(); } getFragmentManager().beginTransaction().replace(R.id.details_layout, fragment).commit(); } else { Intent intent = null; if (index == 0) { intent = new Intent(getActivity(), SoundActivity.class); } else if (index == 1) { intent = new Intent(getActivity(), DisplayActivity.class); } startActivity(intent); } } }这个类的代码并不长,我简单的说明一下。在onCreateView方法中加载了menu_fragment这个布局,这个布局里面包含 了一个ListView,然后我们对这个ListView填充了两个简单的数据 "Sound" 和 "Display" 。又在 onActivityCreated方法中做了一个判断,如果Activity的布局中包含了details_layout这个元素,那么当前就是双页模 式,否则就是单页模式。onItemClick方法则处理了ListView的点击事件,发现如果当前是双页模式,就动态往details_layout 中添加Fragment,如果当前是单页模式,就直接打开新的Activity。
别走开,下页为您继续介绍Fragment实现Android程序手机平板兼容
我们把MenuFragment中引用到的其它内容一个个添加进来。新建menu_fragment.xml文件,加入如下代码:
<?xmlversion="1.0"encoding="UTF-8"?>
<LinearLayoutxmlns:android="http://schemas.android.com/apk/res/android"
android:layout_width="fill_parent"
android:layout_height="fill_parent">
<ListView
android:id="@+id/menu_list"
android:layout_width="fill_parent"
android:layout_height="fill_parent"
></ListView>
</LinearLayout>
<?xml version="1.0" encoding="UTF-8"?> <LinearLayout xmlns:android="http://schemas.android.com/apk/res/android" android:layout_width="fill_parent" android:layout_height="fill_parent" > <ListView android:id="@+id/menu_list" android:layout_width="fill_parent" android:layout_height="fill_parent" ></ListView> </LinearLayout>
然后新建SoundFragment,里面内容非常简单:
publicclass SoundFragment extends Fragment {
@Override
public View onCreateView(LayoutInflater inflater, ViewGroup container, Bundle savedInstanceState) {
View view = inflater.inflate(R.layout.sound_fragment, container, false);
return view;
}
}
public class SoundFragment extends Fragment { @Override public View onCreateView(LayoutInflater inflater, ViewGroup container, Bundle savedInstanceState) { View view = inflater.inflate(R.layout.sound_fragment, container, false); return view; } }这里SoundFragment需要用到sound_fragment.xml布局文件,因此这里我们新建这个布局文件,并加入如下代码:
<?xmlversionxmlversion="1.0"encoding="utf-8"?>
ativeLayoutxmlns:androidRelativeLayoutxmlns:android="http://schemas.android.com/apk/res/android"
android:layout_width="match_parent"
android:layout_height="match_parent"
android:background="#00ff00"
android:orientation="vertical">
<TextView
android:layout_width="wrap_content"
android:layout_height="wrap_content"
android:layout_centerInParent="true"
android:textSize="28sp"
android:textColor="#000000"
android:text="This is sound view"
/>
</RelativeLayout>
<?xml version="1.0" encoding="utf-8"?> <RelativeLayout xmlns:android="http://schemas.android.com/apk/res/android" android:layout_width="match_parent" android:layout_height="match_parent" android:background="#00ff00" android:orientation="vertical" > <TextView android:layout_width="wrap_content" android:layout_height="wrap_content" android:layout_centerInParent="true" android:textSize="28sp" android:textColor="#000000" android:text="This is sound view" /> </RelativeLayout>
同样的道理,我们再新建DisplayFragment和display_fragment.xml布局文件:
publicclass DisplayFragment extends Fragment {
public View onCreateView(LayoutInflater inflater, ViewGroup container, Bundle savedInstanceState) {
View view = inflater.inflate(R.layout.display_fragment, container, false);
return view;
}
}
<?xmlversion="1.0"encoding="utf-8"?>
<RelativeLayoutxmlns:android="http://schemas.android.com/apk/res/android"
android:layout_width="match_parent"
android:layout_height="match_parent"
android:background="#0000ff"
android:orientation="vertical">
<TextView
android:layout_width="wrap_content"
android:layout_height="wrap_content"
android:layout_centerInParent="true"
android:textSize="28sp"
android:textColor="#000000"
android:text="This is display view"
/>
</RelativeLayout>
<?xml version="1.0" encoding="utf-8"?> <RelativeLayout xmlns:android="http://schemas.android.com/apk/res/android" android:layout_width="match_parent" android:layout_height="match_parent" android:background="#0000ff" android:orientation="vertical" > <TextView android:layout_width="wrap_content" android:layout_height="wrap_content" android:layout_centerInParent="true" android:textSize="28sp" android:textColor="#000000" android:text="This is display view" /> </RelativeLayout>
然后新建SoundActivity,代码如下:
publicclass SoundActivity extends Activity {
@Override
protectedvoid onCreate(Bundle savedInstanceState) {
super.onCreate(savedInstanceState);
setContentView(R.layout.sound_activity);
}
}
public class SoundActivity extends Activity { @Override protected void onCreate(Bundle savedInstanceState) { super.onCreate(savedInstanceState); setContentView(R.layout.sound_activity); } }这个Activity只是加载了一个布局文件,现在我们来实现sound_activity.xml这个布局文件:
<?xmlversion="1.0"encoding="utf-8"?>
<fragmentxmlns:android="http://schemas.android.com/apk/res/android"
android:id="@+id/sound_fragment"
android:name="com.example.fragmentdemo.SoundFragment"
android:layout_width="match_parent"
android:layout_height="match_parent">
</fragment>
<?xml version="1.0" encoding="utf-8"?> <fragment xmlns:android="http://schemas.android.com/apk/res/android" android:id="@+id/sound_fragment" android:name="com.example.fragmentdemo.SoundFragment" android:layout_width="match_parent" android:layout_height="match_parent" > </fragment>
这个布局文件引用了SoundFragment,这样写的好处就是,以后我们只需要在SoundFragment中修改代码,SoundActivity就会跟着自动改变了,因为它所有的代码都是从SoundFragment中引用过来的。
好,同样的方法,我们再完成DisplayActivity:
publicclass DisplayActivity extends Activity {
@Override
protectedvoid onCreate(Bundle savedInstanceState) {
super.onCreate(savedInstanceState);
setContentView(R.layout.display_activity);
}
}
public class DisplayActivity extends Activity { @Override protected void onCreate(Bundle savedInstanceState) { super.onCreate(savedInstanceState); setContentView(R.layout.display_activity); } }别走开,下页为您继续介绍Fragment实现Android程序手机平板兼容
然后加入display_activity.xml:
<?xmlversion="1.0"encoding="utf-8"?>
<fragmentxmlns:android="http://schemas.android.com/apk/res/android"
android:id="@+id/display_fragment"
android:name="com.example.fragmentdemo.DisplayFragment"
android:layout_width="match_parent"
android:layout_height="match_parent">
</fragment>
<?xml version="1.0" encoding="utf-8"?> <fragment xmlns:android="http://schemas.android.com/apk/res/android" android:id="@+id/display_fragment" android:name="com.example.fragmentdemo.DisplayFragment" android:layout_width="match_parent" android:layout_height="match_parent" > </fragment>
现在所有的代码就都已经完成了,我们来看一下效果吧。
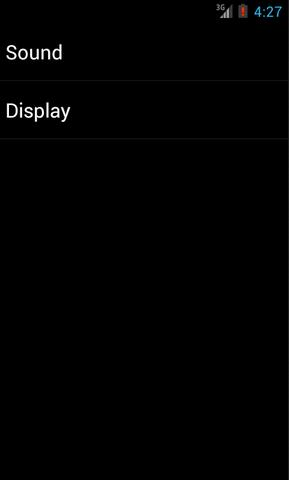
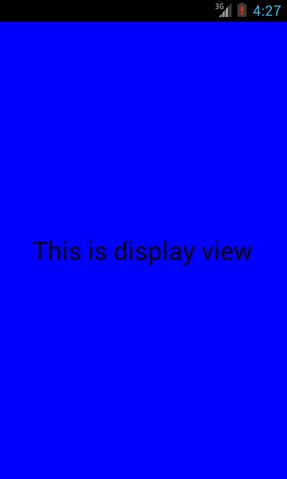
首先将程序运行在手机上,效果图如下:
分别点击Sound和Display,界面会跳转到声音和显示界面:

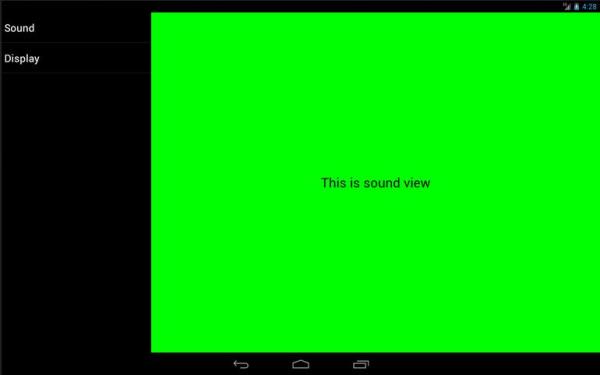
然后将程序在平板上运行,点击Sound,效果图如下:
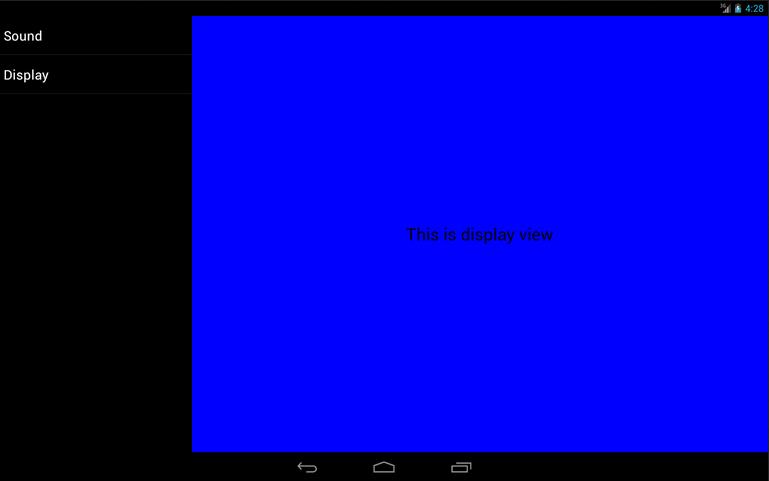
然后点击Display切换到显示界面,效果图如下:
“Android程序怎么实现兼容手机和平板”的内容就介绍到这里了,感谢大家的阅读。如果想了解更多行业相关的知识可以关注亿速云网站,小编将为大家输出更多高质量的实用文章!
免责声明:本站发布的内容(图片、视频和文字)以原创、转载和分享为主,文章观点不代表本网站立场,如果涉及侵权请联系站长邮箱:is@yisu.com进行举报,并提供相关证据,一经查实,将立刻删除涉嫌侵权内容。


