本篇文章给大家分享的是有关如何使用WriteHat生成渗透测试报告,小编觉得挺实用的,因此分享给大家学习,希望大家阅读完这篇文章后可以有所收获,话不多说,跟着小编一起来看看吧。
关于WriteHat
WriteHat是一款功能强大的渗透测试报告工具,在该工具的帮助下,广大研究人员可以轻松生成渗透测试报告,从此不必再将大量的时间放在Microsoft Word等文字编辑工具身上了。从Markdown到HTML,再到PDF,应有尽有。这款工具由渗透测试人员开发,专为渗透测试人员设计,但是我们也可以用它来生成任意类型的报告。该工具基于Python 3开发,由Django驱动。
轻松生成漂亮美观的渗透测试报告;
动态拖放报告生成器;
Markdown支持,包括代码块和图标等等;
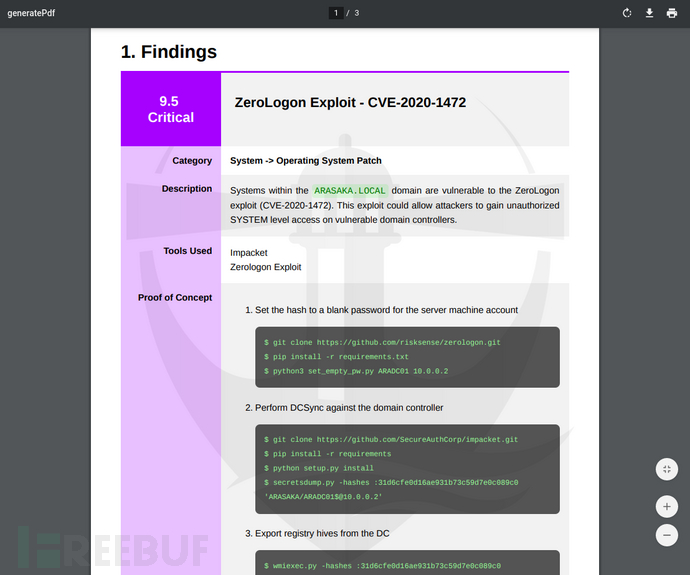
剪贴、注释、标题和上传图像支持;
可自定义报告背景/页脚;
为各个报告部分分配操作人员和跟踪状态;
能够克隆和模板化报告;
搜索结果数据库;
支持多种评分类型(CVSS 3.1,DARED);
可以从同一组分析结果轻松生成多个报告;
可扩展的设计使高级用户能够创建高度定制的报告部分;
LDAP集成;
该工具的使用要求本地主机安装Docker和Docker Compose。我们可以使用apt、pacman和dnf等工具来安装依赖组件:
$ sudo apt install docker.io docker-composeWriteHat可以使用下列一行命令轻松完成部署安装:
$ git clone https://github.com/blacklanternsecurity/writehat && cd writehat && docker-compose up接下来,在浏览器中访问https://127.0.0.1即可使用WriteHat,默认用户名和密码为“admin / PLEASECHANGETHISFORHEA*VENSSAKE”。
首先,我们还是需要安装Docker和Docker Compose。接下来,在/opt目录中使用下列命令将该项目源码克隆至本地:
$ cd /opt

$ git clone https://github.com/blacklanternsecurity/writehat

$ cd writehat接下来,在writehat/config/writehat.conf文件中创建安全保护密码,密码将用于:
Django
管理员用户
添加我们的目标主机名,在writehat/config/writehat.conf文件中的allowed_hosts字段中设置。
设置完成后,在nginx/中替换自签名的SSL证书:
writehat.crt

writehat.key现在,我们就可以使用下列命令测试工具是否配置正确:
$ docker-compose up --build注意,如果使用了VPN,你则需要在首次使用docker-compose运行服务之前断开VPN连接,这样才能保证Docker能够正确创建虚拟网络。
现在,我们就需要安装并激活Systemd服务了,配置后WriteHat将会在设备启动时自动运行:
$ sudo cp writehat/config/writehat.service /etc/systemd/system/

$ sudo systemctl enable writehat --now我们可以使用下列命令跟踪服务日志:
$ sudo journalctl -xefu writehat.service关于用户的创建,我们需要使用writehat/config/writehat.conf中定义的管理员凭证登录https://127.0.0.1/admin,因为有部分操作是只有管理员才能操作的,比如说数据库备份等等:
# Enter the app container

$ docker-compose exec writehat bash


# Promote the user and exit

$ ./manage.py ldap_promote <ldap_username>

$ exit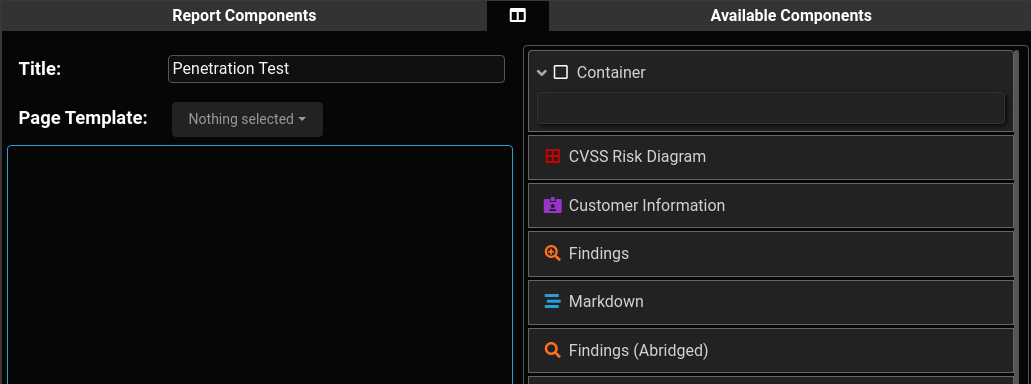
每一个报告组件都有下列内容组成:
1、writehat/components/中的Python文件;
2、writehat/templates/componentTemplates/中的HTML模板;
3、writehat/static/css/component/中的CSS文件;
我们建议大家直接引用这些目录下的已有文件,如果想要自定义开发的话,请参考下列样例。
from .base import *


class CustomComponentForm(ComponentForm):


    summary = forms.CharField(label='Component Text', widget=forms.Textarea, max_length=50000, required=False)

    field_order = ['name', 'summary', 'pageBreakBefore', 'showTitle']


class Component(BaseComponent):


    default_name = 'Custom Report Component'

    formClass = CustomComponentForm


    # the "templatable" attribute decides whether or not that field

    # gets sa*ved if the report is ever converted into a template

    fieldList = {

        'summary': StringField(markdown=True, templatable=True),

    }


    # make sure to specify the HTML template

    htmlTemplate = 'componentTemplates/CustomComponent.html'


    # Font Awesome icon type + color (HTML/CSS)

    # This is just eye candy in the web app

    iconType = 'fas fa-stream'

    iconColor = 'var(--blue)'


    # the "preprocess" function is executed when the report is rendered

    # use this to perform any last-minute operations on its data

    def preprocess(self, context):


        # for example, to uppercase the entire "summary" field:

        #   context['summary'] = context['summary'].upper()

return context{% load custom_tags %}
<section class="l{{ level }} component{% if pageBreakBefore %} page-break{% endif %}" id="container_{{ id }}">
{% include 'componentTemplates/Heading.html' %}
<div class='markdown-align-justify custom-component-summary'>
<p>
{% markdown summary %}
</p>
</div>
</section>div.custom-component-summary {
font-weight: bold;
}配置完成后,别忘了使用下列命令重启WriteHat服务:
$ docker-compose restart writehat
以上就是如何使用WriteHat生成渗透测试报告,小编相信有部分知识点可能是我们日常工作会见到或用到的。希望你能通过这篇文章学到更多知识。更多详情敬请关注亿速云行业资讯频道。
亿速云「云服务器」,即开即用、新一代英特尔至强铂金CPU、三副本存储NVMe SSD云盘,价格低至29元/月。点击查看>>
免责声明:本站发布的内容(图片、视频和文字)以原创、转载和分享为主,文章观点不代表本网站立场,如果涉及侵权请联系站长邮箱:is@yisu.com进行举报,并提供相关证据,一经查实,将立刻删除涉嫌侵权内容。
原文链接:https://www.freebuf.com/articles/es/266456.html


 计算
计算 安全
安全 数据库
数据库 网络和加速
网络和加速 企业服务
企业服务


