这期内容当中小编将会给大家带来有关怎么实现docker环境搭建,文章内容丰富且以专业的角度为大家分析和叙述,阅读完这篇文章希望大家可以有所收获。
vagrant、virtualbox、centos7、xshell:链接:https://pan.baidu.com/s/1iilSiJgOQ8Dk0Ol2JcZNzw 密码:kybq
官网下载:
Vagrant:https://www.vagrantup.com/
VirtualBox:https://www.virtualbox.org/
1、创建一个存放contos7的文件夹、并进入该目录(目录不要用中文)
2、在此目录输入cmd,运行:vagrant init centos/7,在此目录会生成一个Vagrantfile。
修改Vagrantfile:
# -*- mode: ruby -*-
# vi: set ft=ruby :

# All Vagrant configuration is done below. The "2" in Vagrant.configure
# configures the configuration version (we support older styles for
# backwards compatibility). Please don't change it unless you know what
# you're doing.
Vagrant.configure("2") do |config|
  # The most common configuration options are documented and commented below.
  # For a complete reference, please see the online documentation at
  # https://docs.vagrantup.com.

  # Every Vagrant development environment requires a box. You can search for
  # boxes at https://vagrantcloud.com/search.
  # 安装虚拟机
  config.vm.box = "centos/7"

  # Disable automatic box update checking. If you disable this, then
  # boxes will only be checked for updates when the user runs
  # `vagrant box outdated`. This is not recommended.
  # config.vm.box_check_update = false

  # Create a forwarded port mapping which allows access to a specific port
  # within the machine from a port on the host machine. In the example below,
  # accessing "localhost:8080" will access port 80 on the guest machine.
  # NOTE: This will enable public access to the opened port
  # config.vm.network "forwarded_port", guest: 80, host: 8080

  # Create a forwarded port mapping which allows access to a specific port
  # within the machine from a port on the host machine and only allow access
  # via 127.0.0.1 to disable public access
  # config.vm.network "forwarded_port", guest: 80, host: 8080, host_ip: "127.0.0.1"

  # Create a private network, which allows host-only access to the machine
  # using a specific IP.
  # config.vm.network "private_network", ip: "192.168.33.10"

  # Create a public network, which generally matched to bridged network.
  # Bridged networks make the machine appear as another physical device on
  # your network.
  # 共用网络
  config.vm.network "public_network"

  # Share an additional folder to the guest VM. The first argument is
  # the path on the host to the actual folder. The second argument is
  # the path on the guest to mount the folder. And the optional third
  # argument is a set of non-required options.
  # config.vm.synced_folder "../data", "/vagrant_data"

  # Provider-specific configuration so you can fine-tune various
  # backing providers for Vagrant. These expose provider-specific options.
  # Example for VirtualBox:
  #
  # config.vm.provider "virtualbox" do |vb|
  #   # Display the VirtualBox GUI when booting the machine
  #   vb.gui = true
  #
  #   # Customize the amount of memory on the VM:
  #   vb.memory = "1024"
  # end
    config.vm.provider "virtualbox" do |vb|
        vb.memory = "3000"
        vb.name= "xj-centos7"
        vb.cpus= 2
    end
  #
  # View the documentation for the provider you are using for more
  # information on available options.

  # Enable provisioning with a shell script. Additional provisioners such as
  # Puppet, Chef, Ansible, Salt, and Docker are also available. Please see the
  # documentation for more information about their specific syntax and use.
  # config.vm.provision "shell", inline: <<-SHELL
  #   apt-get update
  #   apt-get install -y apache2
  # SHELL
end3、将virtualbox.box文件添加到vagrant管理的镜像中
如文件virtualbox.box在E:\centOs\目录下:
vagrant box add centos/7 E:\centOs\virtualbox.box
4、查看本地是否安装成功:vagrant box list
5、启动contos7:vagrant up
进入创建的contos7:vagrant ssh
查看centos7状态:vagrant status
停止contos7:vagrant halt
删除contos7:vagrant destroy
vagrantfile中也可以写脚本命令,使得centos7更加丰富,但是要注意,修改了Vagrantfile,要想使正常运行的centos7生效,必须使用vagrant reload
1、查看contos7信息:vagrant ssh-config
关注IP:127.0.0.1、prot:2222、用户名/密码:vagrant/vagrant
文件:Identityfile指向的文件private-key
2、root设置密码:
sudo -i
vi /etc/ssh/sshd_config
修改PasswordAuthentication yes并保存
passwd root
systemctl restart sshd
使用账号root,密码root进行登录
1、退出虚拟机:vagrant halt
2、打包:vagrant package --output first-docker-centos7.box
3、得到first-docker-centos7.box
4、将first-docker-centos7.box添加到其他的vagrant环境中:vagrant box add first-docker-centos7 first-docker-centos7.box
5、得到Vagrantfile:vagrant init first-docker-centos7
6、根据Vagrantfile启动虚拟机:vagrant up [此时可以得到和之前一模一样的环境,但是网络要重新配置]
1、如果非root用户登陆需在命令前面加上sudo,或者将当前用户添加到docker用户组;
sudo groupadd docker #添加docker用户组
sudo gpasswd -a $USER docker #将登陆用户加入到docker用户组中
newgrp docker #更新用户组2、卸载之前安装的docker:
  sudo yum remove docker \
                  docker-client \
                  docker-client-latest \
                  docker-common \
                  docker-latest \
                  docker-latest-logrotate \
                  docker-logrotate \
docker-engine3、安装必要的依赖
sudo yum install -y yum-utils \
    device-mapper-persistent-data \
lvm24、添加仓库:
官网仓库:
sudo yum-config-manager \
      --add-repo \
https://download.docker.com/linux/centos/docker-ce.repo阿里云仓库:
sudo yum-config-manager \
    --add-repo \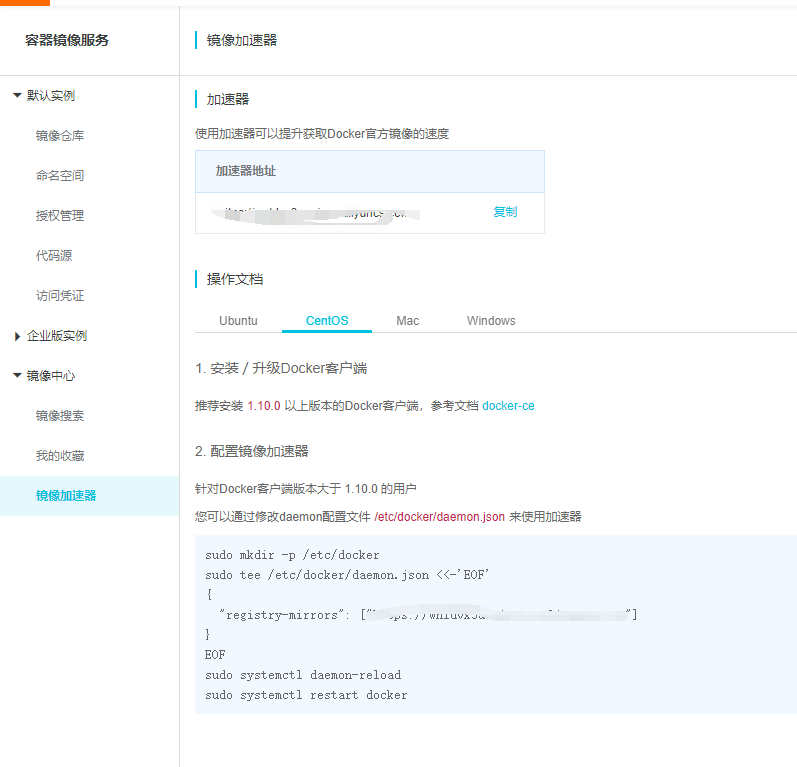
http://mirrors.aliyun.com/docker-ce/linux/centos/docker-ce.repo设置阿里云加速器需注销阿里云账号:https://cr.console.aliyun.com/cn-hangzhou/instances/mirrors
5、安装docker:
sudo yum install -y docker-ce docker-ce-cli containerd.io6、启动docker:
sudo systemctl start docker7、测试docker
sudo docker run hello-world
01 创建tomcat容器
	下载镜像:docker pull tomcat
	运行tomcat把8080端口映射到contos7的9090端口:docker run -d --name my-tomcat -p 9090:8080 tomcat
访问方式:contos7IP:9090(如果404检查webapps文件是否空文件,webapps.dist有内容)
rm -rf webapps
mv webapps.dist webapps

03 进入到容器里面
	docker exec -it containerid /bin/bash


docker pull        拉取镜像到本地
docker run         根据某个镜像创建容器
-d                 让容器在后台运行,其实就是一个进程
--name             给容器指定一个名字
-p                 将容器的端口映射到宿主机的端口
docker exec -it 进入到某个容器中并交互式运行上述就是小编为大家分享的怎么实现docker环境搭建了,如果刚好有类似的疑惑,不妨参照上述分析进行理解。如果想知道更多相关知识,欢迎关注亿速云行业资讯频道。
亿速云「云服务器」,即开即用、新一代英特尔至强铂金CPU、三副本存储NVMe SSD云盘,价格低至29元/月。点击查看>>
免责声明:本站发布的内容(图片、视频和文字)以原创、转载和分享为主,文章观点不代表本网站立场,如果涉及侵权请联系站长邮箱:is@yisu.com进行举报,并提供相关证据,一经查实,将立刻删除涉嫌侵权内容。
原文链接:https://my.oschina.net/u/4483459/blog/4624789


 计算
计算 安全
安全 数据库
数据库 网络和加速
网络和加速 企业服务
企业服务


