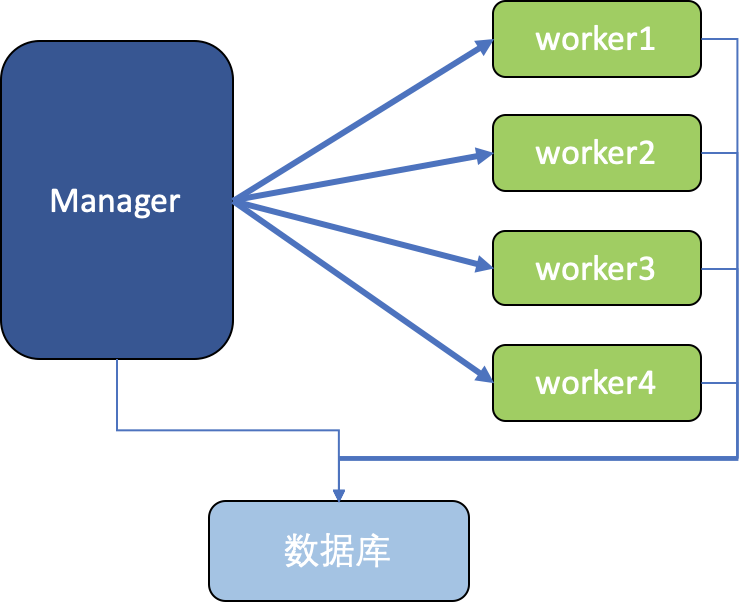
这期内容当中小编将会给大家带来有关如何分析Spring Batch远程分区的本地Jar包模式,文章内容丰富且以专业的角度为大家分析和叙述,阅读完这篇文章希望大家可以有所收获。
Spring Batch远程分区对于大量数据的处理非常擅长,它的实现有多种方式,如本地Jar包模式、MQ模式、Kubernetes模式。这三种模式的如下:
(1)本地Jar包模式:分区处理的worker为一个Java进程,从jar包启动,通过jvm参数和数据库传递参数;官方提供示例代码。
(2)MQ模式:worker是一个常驻进程,Manager和Worker通过消息队列来传递参数;网上有不少相关示例代码。
(3)Kubernetes模式:worker为K8s中的Pod,Manager直接启动Pod来处理;网上并没有找到任何示例代码。
下面将通过代码来讲解第一种模式(本地Jar包模式),其它后续再介绍。

建议先看下面文章了解一下:
Spring Batch入门:通过例子讲解Spring Batch入门,优秀的批处理框架
Spring Batch并行处理介绍:大量数据也不在话下,Spring Batch并行处理四种模式初探
本文代码中,Manager和Worker是放在一起的,在同一个项目里,也只会打一个jar包而已;我们通过profile来区别是manager还是worker,也就是通过Spring Profile实现一份代码,两份逻辑。实际上也可以拆成两份代码,但放一起更方便测试,而且代码量不大,就没有必要了。
首先我们需要准备一个数据库,因为Manager和Worker都需要同步状态到DB上,不能直接使用嵌入式的内存数据库了,需要一个外部可共同访问的数据库。这里我使用的是H2 Database,安装可参考:把H2数据库从jar包部署到Kubernetes,并解决Ingress不支持TCP的问题。
maven引入依赖如下所示:
<dependency>
  <groupId>org.springframework.boot</groupId>
  <artifactId>spring-boot-starter-batch</artifactId>
</dependency>
<dependency>
  <groupId>org.springframework.cloud</groupId>
  <artifactId>spring-cloud-starter-task</artifactId>
</dependency>
<dependency>
  <groupId>com.h3database</groupId>
  <artifactId>h3</artifactId>
  <scope>runtime</scope>
</dependency>

<dependency>
  <groupId>org.springframework.cloud</groupId>
  <artifactId>spring-cloud-deployer-local</artifactId>
  <version>2.4.1</version>
</dependency>

<dependency>
  <groupId>org.springframework.batch</groupId>
  <artifactId>spring-batch-integration</artifactId>
</dependency>spring-cloud-deployer-local用于部署和启动worker,非常关键;其它就是Spring Batch和Task相关的依赖;以及数据库连接。
Springboot的主类入口如下:
@EnableTask
@SpringBootApplication
@EnableBatchProcessing
public class PkslowRemotePartitionJar {
    public static void main(String[] args) {
        SpringApplication.run(PkslowRemotePartitionJar.class, args);
    }
}在Springboot的基础上,添加了Spring Batch和Spring Cloud Task的支持。
前面的数据库搭建和其它代码没有太多可讲的,接下来就开始关键代码的编写。
Partitioner是远程分区中的核心bean,它定义了分成多少个区、怎么分区,要把什么变量传递给worker。它会返回一组<分区名,执行上下文>的键值对,即返回Map<String, ExecutionContext>。把要传递给worker的变量放在ExecutionContext中去,支持多种类型的变量,如String、int、long等。实际上,我们不建议通过ExecutionContext来传递太多数据;可以传递一些标识或主键,然后worker自己去拿数据即可。
具体代码如下:
private static final int GRID_SIZE = 4;
@Bean
public Partitioner partitioner() {
  return new Partitioner() {
    @Override
    public Map<String, ExecutionContext> partition(int gridSize) {

      Map<String, ExecutionContext> partitions = new HashMap<>(gridSize);

      for (int i = 0; i < GRID_SIZE; i++) {
        ExecutionContext executionContext = new ExecutionContext();
        executionContext.put("partitionNumber", i);
        partitions.put("partition" + i, executionContext);
      }

      return partitions;
    }
  };
}上面分成4个区,程序会启动4个worker来处理;给worker传递的参数是partitionNumber。
PartitionHandler也是核心的bean,它决定了怎么去启动worker,给它们传递什么jvm参数(跟之前的ExecutionContext传递不一样)。
@Bean
public PartitionHandler partitionHandler(TaskLauncher taskLauncher, JobExplorer jobExplorer, TaskRepository taskRepository) throws Exception {

  Resource resource = this.resourceLoader.getResource(workerResource);

  DeployerPartitionHandler partitionHandler =
    new DeployerPartitionHandler(taskLauncher, jobExplorer, resource, "workerStep", taskRepository);

  List<String> commandLineArgs = new ArrayList<>(3);
  commandLineArgs.add("--spring.profiles.active=worker");
  commandLineArgs.add("--spring.cloud.task.initialize-enabled=false");
  commandLineArgs.add("--spring.batch.initializer.enabled=false");

  partitionHandler
    .setCommandLineArgsProvider(new PassThroughCommandLineArgsProvider(commandLineArgs));
  partitionHandler
    .setEnvironmentVariablesProvider(new SimpleEnvironmentVariablesProvider(this.environment));
  partitionHandler.setMaxWorkers(2);
  partitionHandler.setApplicationName("PkslowWorkerJob");

  return partitionHandler;
}上面代码中:
resource是worker的jar包地址,表示将启动该程序;
workerStep是worker将要执行的step;
commandLineArgs定义了启动worker的jvm参数,如--spring.profiles.active=worker;
environment是manager的系统环境变量,可以传递给worker,当然也可以选择不传递;
MaxWorkers是最多能同时启动多少个worker,类似于线程池大小;设置为2,表示最多同时有2个worker来处理4个分区。
完成了分区相关的代码,剩下的就只是如何定义Manager和Worker的业务代码了。
Manager作为管理者,不用太多业务逻辑,代码如下:
@Bean
@Profile("!worker")
public Job partitionedJob(PartitionHandler partitionHandler) throws Exception {
  Random random = new Random();
  return this.jobBuilderFactory.get("partitionedJob" + random.nextInt())
    .start(step1(partitionHandler))
    .build();
}

@Bean
public Step step1(PartitionHandler partitionHandler) throws Exception {
  return this.stepBuilderFactory.get("step1")
    .partitioner(workerStep().getName(), partitioner())
    .step(workerStep())
    .partitionHandler(partitionHandler)
    .build();
}Worker主要作用是处理数据,是我们的业务代码,这里就演示一下如何获取Manager传递过来的partitionNumber:
@Bean
public Step workerStep() {
  return this.stepBuilderFactory.get("workerStep")
    .tasklet(workerTasklet(null, null))
    .build();
}

@Bean
@StepScope
public Tasklet workerTasklet(final @Value("#{stepExecutionContext['partitionNumber']}") Integer partitionNumber) {
  return new Tasklet() {
    @Override
    public RepeatStatus execute(StepContribution contribution, ChunkContext chunkContext) throws Exception {
      Thread.sleep(6000); //增加延时,查看效果,通过jps:在jar情况下会新起java进程
      System.out.println("This tasklet ran partition: " + partitionNumber);

      return RepeatStatus.FINISHED;
    }
  };
}通过表达式@Value("#{stepExecutionContext['partitionNumber']}") 获取Manager传递过来的变量;注意要加注解@StepScope。
因为我们分为Manager和Worker,但都是同一份代码,所以我们先打包一个jar出来,不然manager无法启动。配置数据库和Worker的jar包地址如下:
spring.datasource.url=jdbc:h3:tcp://localhost:9092/test
spring.datasource.username=pkslow
spring.datasource.password=pkslow
spring.datasource.driver-class-name=org.h3.Driver

pkslow.worker.resource=file://pkslow/target/remote-partitioning-jar-1.0-SNAPSHOT.jar执行程序如下:

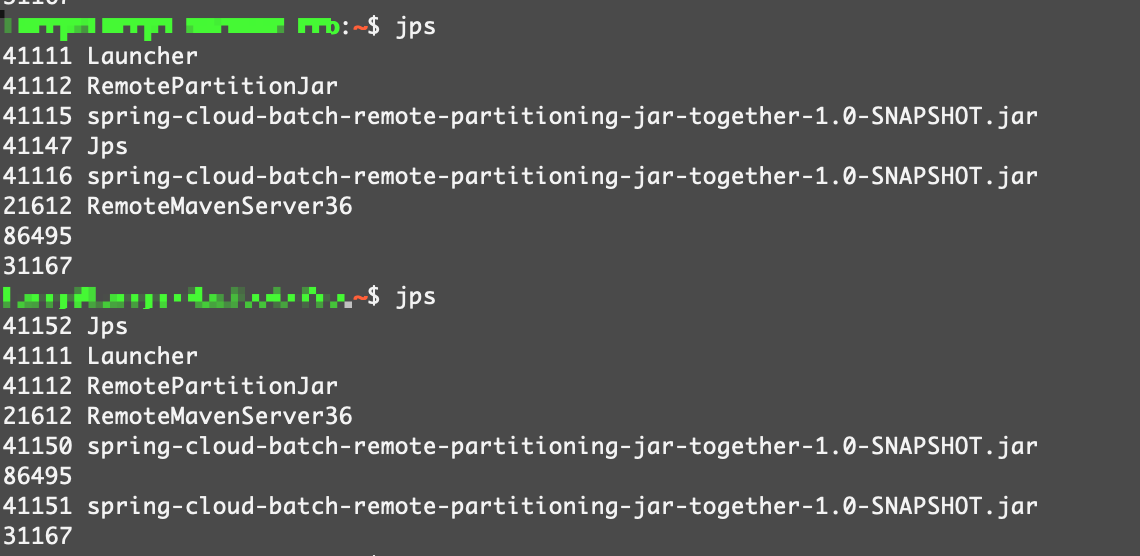
可以看到启动了4次Java程序,还给出日志路径。
通过jps命令查看,能看到一个Manager进程,还有两个worker进程:

前面讲了Manager可以通过ExecutionContext传递变量,如简单的String、long等。但其实它也是可以传递复杂的Java对象的,但对应的类需要可序列化,如:
import java.io.Serializable;

public class Person implements Serializable {
    private Integer age;
    private String name;
    private String webSite;
  //getter and setter
}Manager传递:
executionContext.put("person", new Person(0, "pkslow", "www.pkslow.com"));
Worker接收:
@Value("#{stepExecutionContext['person']}") Person person
上述就是小编为大家分享的如何分析Spring Batch远程分区的本地Jar包模式了,如果刚好有类似的疑惑,不妨参照上述分析进行理解。如果想知道更多相关知识,欢迎关注亿速云行业资讯频道。
亿速云「云服务器」,即开即用、新一代英特尔至强铂金CPU、三副本存储NVMe SSD云盘,价格低至29元/月。点击查看>>
免责声明:本站发布的内容(图片、视频和文字)以原创、转载和分享为主,文章观点不代表本网站立场,如果涉及侵权请联系站长邮箱:is@yisu.com进行举报,并提供相关证据,一经查实,将立刻删除涉嫌侵权内容。
原文链接:https://my.oschina.net/u/4228891/blog/4565143