这篇文章主要为大家展示了“RocketMQ中ConsumeQueue文件与Index文件是怎么样的”,内容简而易懂,条理清晰,希望能够帮助大家解决疑惑,下面让小编带领大家一起研究并学习一下“RocketMQ中ConsumeQueue文件与Index文件是怎么样的”这篇文章吧。
消息消费时先从ConsumeQueue中获取物理偏移量,再根据物理偏移量从commitLog中获取具体消息;消息检索时会用到索引文件,其中值得思考的问题:
1.ConsumeQueue构建流程是怎样的?
2.ConsumeQueue数据结构是怎样的?
3.Index索引文件构建流程怎样的?
4.Index数据结构时怎么样的?
//Broker启动初始化@1 BrokerStartup#mainstart(createBrokerController(args))boolean initResult = controller.initialize()@2 BrokerController#initializethis.messageStore = new DefaultMessageStore@3 DefaultMessageStore#DefaultMessageStore()this.reputMessageService = new ReputMessageService();this.dispatcherList = new LinkedList<>();this.dispatcherList.addLast(new CommitLogDispatcherBuildConsumeQueue());this.dispatcherList.addLast(new CommitLogDispatcherBuildIndex());//存储服务启动@4 DefaultMessageStore#start()//允许重复转发reputFromOffset设置为CommitLog的提交指针if (this.getMessageStoreConfig().isDuplicationEnable()) {this.reputMessageService.setReputFromOffset(this.commitLog.getConfirmOffset());} else {//不允许重复转发reputFromOffset设置为CommitLog内存中最大偏移量 this.reputMessageService.setReputFromOffset(this.commitLog.getMaxOffset();}this.reputMessageService.start();小结:@1中分别为dispatcherList添加了CommitLogDispatcherBuildConsumeQueue
和CommitLogDispatcherBuildIndex;
@4中duplicationEnable默认为false即不允许重复,从CommitLog中的最大偏移量开始转发,reputMessageService线程类在Broker启动时启动,主要负责构建consumeQueue与index文件。
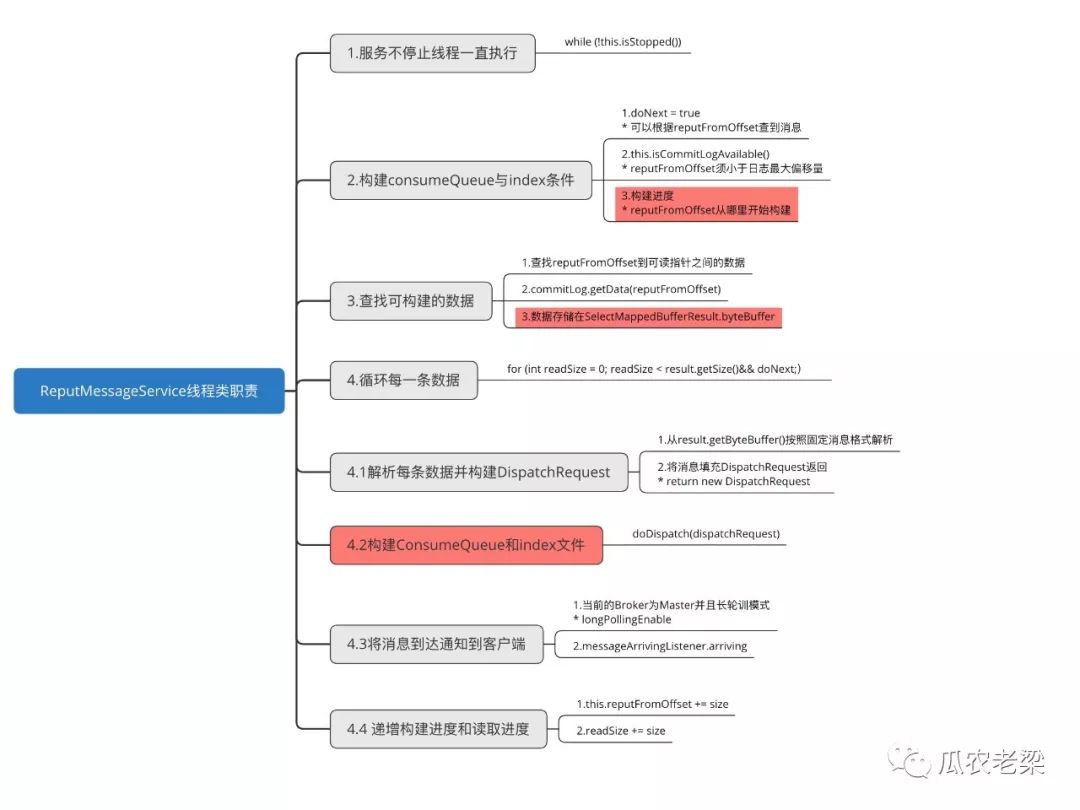
小结:ReputMessageServicee根据构建进度reputFromOffset查找可构建的消息数据,然后逐条解析组成构建请求,并构建consumeQueue和index文件构建;如果当前Broker为Master并且长轮询模式上通过消息到达监听器通知客户端。
在Broker启动时初始化了dispatcherList, 添加了分别负责ConsumeQueue文件和Index文件构建类;这部分关注ConsumeQueue构建。
this.dispatcherList = new LinkedList<>();//构建ConsumeQueuethis.dispatcherList.addLast(new CommitLogDispatcherBuildConsumeQueue());//构建Indexthis.dispatcherList.addLast(new CommitLogDispatcherBuildIndex());public void doDispatch(DispatchRequest req) {for (CommitLogDispatcher dispatcher : this.dispatcherList) {dispatcher.dispatch(req);}}@1 DefaultMessageStore#putMessagePositionInfo@2 ConsumeQueue#putMessagePositionInfoWrapper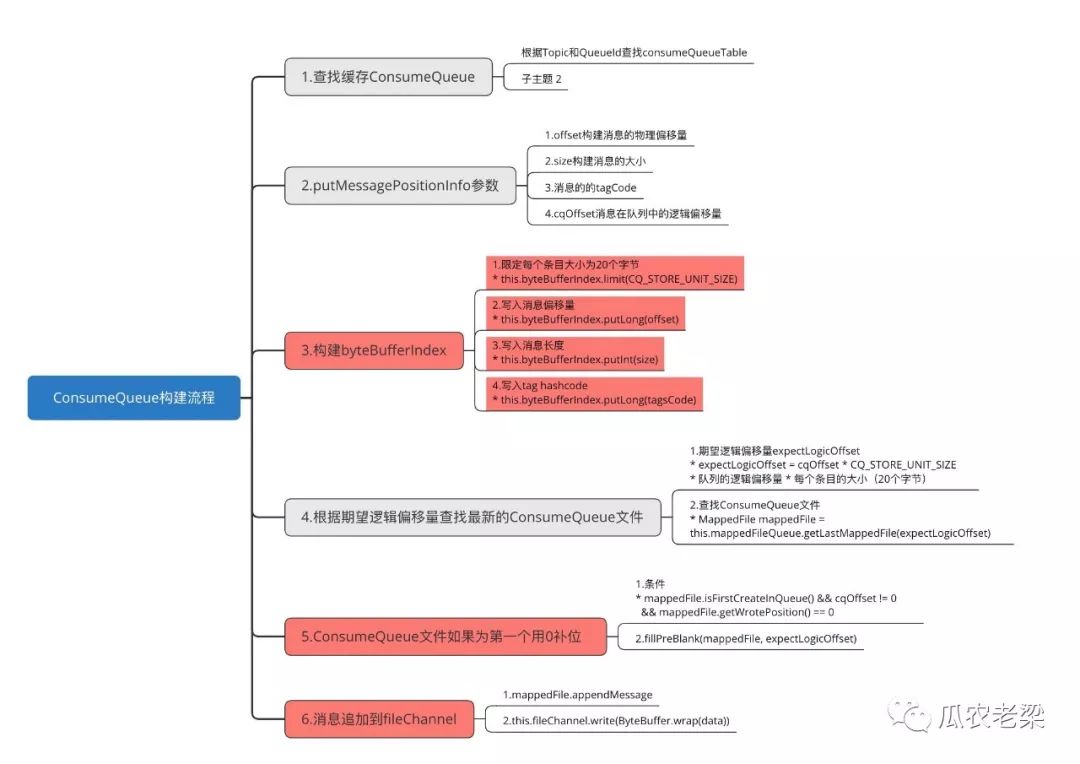
小结:ConsumeQueue构建主要流程为构建ConsumeQueue数据结构并将其写入fileChannel落盘;第一次创建ConsumeQueue文件时进行补位,用0填充,可促使系统实际分配内存起到预热作用。
private void fillPreBlank(final MappedFile mappedFile, final long untilWhere) {ByteBuffer byteBuffer = ByteBuffer.allocate(CQ_STORE_UNIT_SIZE);byteBuffer.putLong(0L);byteBuffer.putInt(Integer.MAX_VALUE);byteBuffer.putLong(0L);int until = (int) (untilWhere % this.mappedFileQueue.getMappedFileSize());for (int i = 0; i < until; i += CQ_STORE_UNIT_SIZE) {mappedFile.appendMessage(byteBuffer.array());}}this.byteBufferIndex.flip();this.byteBufferIndex.limit(CQ_STORE_UNIT_SIZE); //限定每个条目大小this.byteBufferIndex.putLong(offset); //写入消息偏移量this.byteBufferIndex.putInt(size); //写入消息长度this.byteBufferIndex.putLong(tagsCode); //写入tag hashcodeConsumeQueue文件中每个条目占20位。

在Broker启动时初始化了dispatcherList, 添加了分别负责ConsumeQueue文件和Index文件构建类;这部分关注Index构建。
IndexService初始化时初始化两个参数Hash槽数量hashSlotNum=5000000,索引的最大数量maxIndexNum=5000000 * 4=20000000。
this.dispatcherList = new LinkedList<>();//构建ConsumeQueuethis.dispatcherList.addLast(new CommitLogDispatcherBuildConsumeQueue());//构建Indexthis.dispatcherList.addLast(new CommitLogDispatcherBuildIndex());public void doDispatch(DispatchRequest req) {for (CommitLogDispatcher dispatcher : this.dispatcherList) {dispatcher.dispatch(req);}}//IndexService初始化public IndexService(final DefaultMessageStore store) {this.defaultMessageStore = store;this.hashSlotNum = store.getMessageStoreConfig().getMaxHashSlotNum();this.indexNum = store.getMessageStoreConfig().getMaxIndexNum();this.storePath =StorePathConfigHelper.getStorePathIndex(store.getMessageStoreConfig().getStorePathRootDir());}@1 DefaultMessageStore#CommitLogDispatcherBuildIndex#dispatch@2 IdexService#buildIndex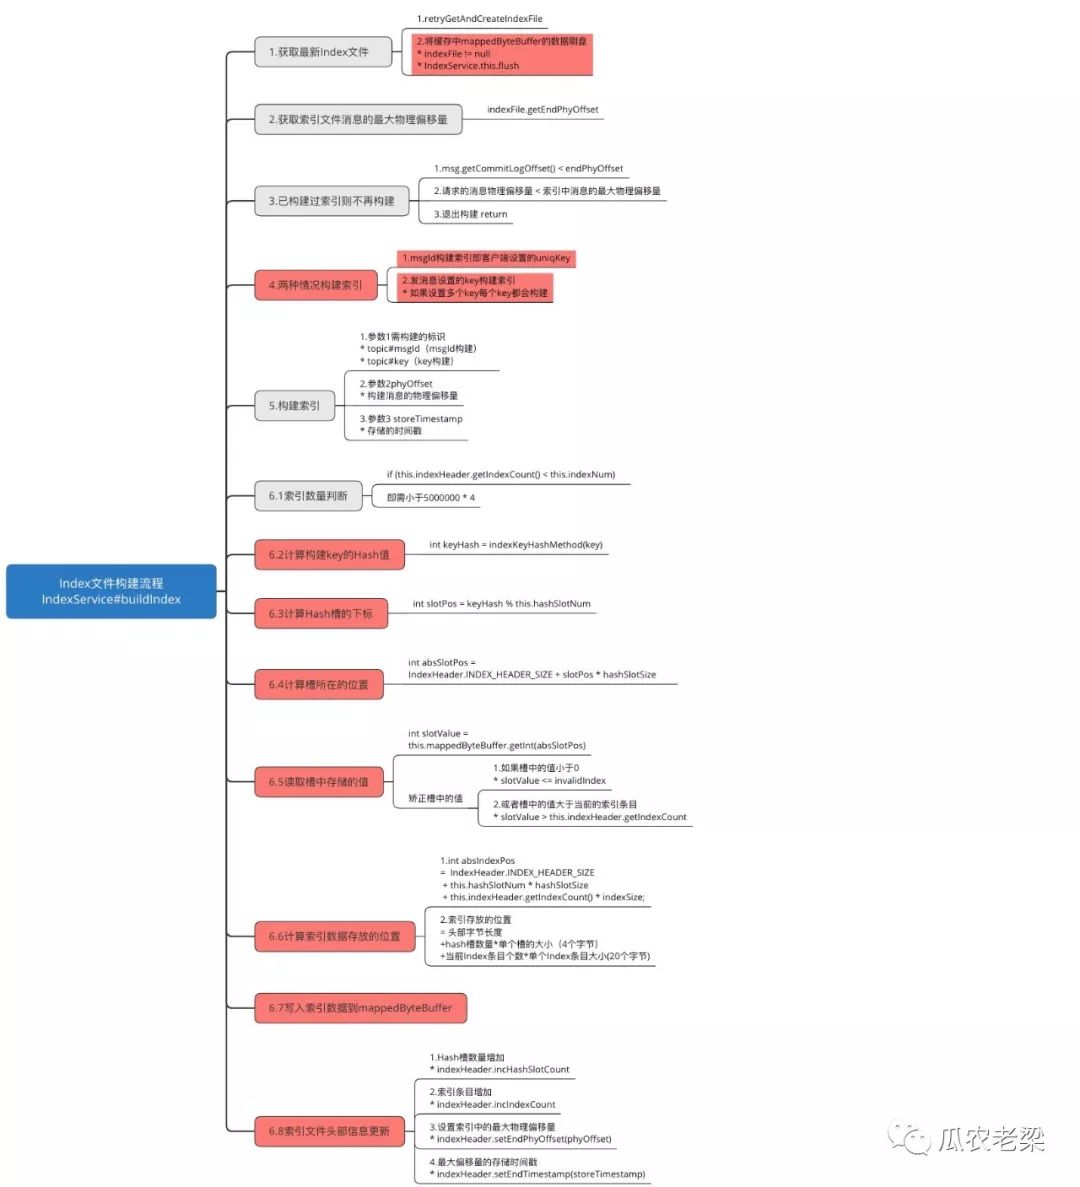
小结:Index文件写入流程概要:先获取索引文件并将未写入文件的内存数据通过守护线程写入磁盘;计算要写入索引所在hash槽的位置取出原来的值;构建索引条目填充数据;最后更新索引文件头部信息。
/计算索引数据需要放在哪个位置int absIndexPos =IndexHeader.INDEX_HEADER_SIZE + this.hashSlotNum * hashSlotSize+ this.indexHeader.getIndexCount() * indexSize;//将hashcode存储在MappedByteBuffer中this.mappedByteBuffer.putInt(absIndexPos, keyHash);//将物理偏移量存储在MappedByteBuffer中this.mappedByteBuffer.putLong(absIndexPos + 4, phyOffset);//落地时间-当前索引的起始时间差值写入MappedByteBufferthis.mappedByteBuffer.putInt(absIndexPos + 4 + 8, (int) timeDiff);//记录前一条hash桶对应的值(Index条目下标);注意此处用于解决Hash冲突this.mappedByteBuffer.putInt(absIndexPos + 4 + 8 + 4, slotValue);//将当前index中包含的条目数量存入到Hash槽中,将覆盖原先的值this.mappedByteBuffer.putInt(absSlotPos,this.indexHeader.getIndexCount());小结:上述代码描述索引条目的构建流程及数据结构,通过记录上一条冲突的槽值形成链表结构。

Index索引有三部分组成IndexHeader、Hash槽位、索引条目;每块内容和所占大小如图所示;如果有Hash冲突,在每个索引条目最后记录了原来Hash槽里的值,从而形成链表结构。
以上是“RocketMQ中ConsumeQueue文件与Index文件是怎么样的”这篇文章的所有内容,感谢各位的阅读!相信大家都有了一定的了解,希望分享的内容对大家有所帮助,如果还想学习更多知识,欢迎关注亿速云行业资讯频道!
免责声明:本站发布的内容(图片、视频和文字)以原创、转载和分享为主,文章观点不代表本网站立场,如果涉及侵权请联系站长邮箱:is@yisu.com进行举报,并提供相关证据,一经查实,将立刻删除涉嫌侵权内容。


 计算
计算 安全
安全 数据库
数据库 网络和加速
网络和加速 企业服务
企业服务


