这篇文章主要介绍“SpringBoot Web开发的工作流程”,在日常操作中,相信很多人在SpringBoot Web开发的工作流程问题上存在疑惑,小编查阅了各式资料,整理出简单好用的操作方法,希望对大家解答”SpringBoot Web开发的工作流程”的疑惑有所帮助!接下来,请跟着小编一起来学习吧!
SpringBoot Web开发
静态资源
定制首页
thymeleaf模板引擎
1、导入依赖
2、controller书写
源码分析
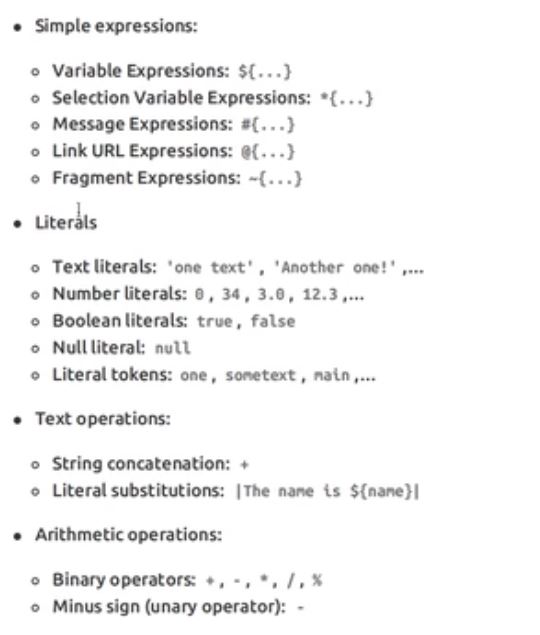
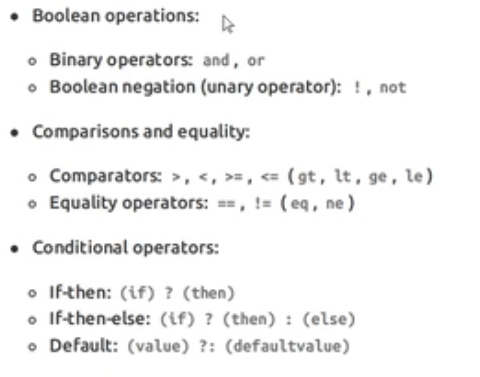
Thymeleaf语法
基本语法:
MVC配置原理
springboot到底帮我们配置了什么?我们能不能修改?能修改那些东西?能不能扩展?
xxxAutoConfiguration: 向容器中自动配置组件
xxxProperties:自动配置类,装配配置文件中自定义的一些内容
要解决的问题:
导入静态资源
首页
jsp, 模板引擎 Thymeleaf
装配扩展SpringMVC
增删改查
拦截器
国际化
总结:
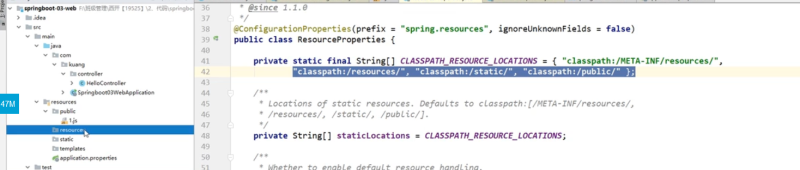
1、在springboot,我们可以使用以下方式处理静态资源
public,static,resources
2、优先级:resources >static(默认) > public
首页放在public、resources、template下面都可

  <!--Thymeleaf-->
        <dependency>
            <groupId>org.thymeleaf</groupId>
            <artifactId>thymeleaf-spring5</artifactId>
        </dependency>
        <dependency>
            <groupId>org.thymeleaf.extras</groupId>
            <artifactId>thymeleaf-extras-java8time</artifactId>
        </dependency>
html写在template文件下里面
package com.kuang.controller;
import org.springframework.stereotype.Controller;
import org.springframework.web.bind.annotation.RequestMapping;
/*
* 这个跳转需要模板引擎的支持
* 在template目录下的所有页面,只能通过controller来跳转*/
@Controller
public class IndexController {
    @RequestMapping("/test")
    public String test(){
        return "test";
    }
}
html中获取显示后台controller传来的数据
1、在html中引入标签
xmlns:th="http://www.thymeleaf.org"
<!DOCTYPE html>
<html lang="en" xmlns:th="http://www.thymeleaf.org">
<head>
    <meta charset="UTF-8">
    <title>Title</title>
</head>
<body>
<!--所有的html元素都可以被thymeleaf替换接管   th:元素名-->
<div th:text="${msg}"></div>
</body>
</html>
2、controller
package com.kuang.controller;
import org.springframework.stereotype.Controller;
import org.springframework.ui.Model;
import org.springframework.web.bind.annotation.RequestMapping;
/*
* 这个跳转需要模板引擎的支持
* 在template目录下的所有页面,只能通过controller来跳转*/
@Controller
public class IndexController {
    @RequestMapping("/test")
    public String test(Model model){
        model.addAttribute("msg","雨势渐大了");
        return "test";
    }
}
遍历一个数据:
1、controller
package com.kuang.controller;
import org.springframework.stereotype.Controller;
import org.springframework.ui.Model;
import org.springframework.web.bind.annotation.RequestMapping;
import java.util.Arrays;
/*
* 这个跳转需要模板引擎的支持
* 在template目录下的所有页面,只能通过controller来跳转*/
@Controller
public class IndexController {
    @RequestMapping("/test")
    public String test(Model model){
        model.addAttribute("msg","雨势渐大了");
        model.addAttribute("users", Arrays.asList("下雨了","下大了"));
        return "test";
    }
}
2、html
<!DOCTYPE html>
<html lang="en" xmlns:th="http://www.thymeleaf.org">
<head>
    <meta charset="UTF-8">
    <title>Title</title>
</head>
<body>
<!--遍历数组 ,将后台的users中的每一个元素赋值给user,并以test显示在页面-->
<h4 th:each="user:${users}" th:text="${user}"></h4>
</body>
</html>扩展视图解析器
package com.kuang.config;
import org.springframework.context.annotation.Bean;
import org.springframework.context.annotation.Configuration;
import org.springframework.web.servlet.View;
import org.springframework.web.servlet.ViewResolver;
import org.springframework.web.servlet.config.annotation.WebMvcConfigurer;
import java.util.Locale;
//如果你想自定义一些定制化的功能,只要写这个组件,然后将它交给springboot,springboot就会自动帮我们配置
@Configuration
public class MyMvcConfig implements WebMvcConfigurer {
    //ViewResolver 实现了视图解析器接口的类,我们可以把它看作视图解析器
    @Bean
    public ViewResolver myViewResolver(){
        return new MyViewResolver();
    }
    //自定义一个视图解析器
    public static class MyViewResolver implements ViewResolver{
        @Override
        public View resolveViewName(String s, Locale locale) throws Exception {
            return null;
        }
    }
}
@EnableWebMvc //它就是导入了一个类:DelegatingWebMvcConfiguration: 从容器中获取所有的webmvcconfig
注意:
在自定义的mvc配置类中不能加这个注解
到此,关于“SpringBoot Web开发的工作流程”的学习就结束了,希望能够解决大家的疑惑。理论与实践的搭配能更好的帮助大家学习,快去试试吧!若想继续学习更多相关知识,请继续关注亿速云网站,小编会继续努力为大家带来更多实用的文章!
免责声明:本站发布的内容(图片、视频和文字)以原创、转载和分享为主,文章观点不代表本网站立场,如果涉及侵权请联系站长邮箱:is@yisu.com进行举报,并提供相关证据,一经查实,将立刻删除涉嫌侵权内容。


