这篇文章主要介绍如何使用React实现菜谱系统,文中介绍的非常详细,具有一定的参考价值,感兴趣的小伙伴们一定要看完!
当下回家吃饭健康饮食的理念正在兴起。据调查显示,有超过九成的都市白领及年轻人其实都倾向于在家里吃饭,尤其是有小孩的家庭意愿会更加强烈, 因为他们普遍都认为在家里吃饭的幸福感会更高; 随着经济的快速发展,人们的生活水平的逐渐提高,对饮食质量要求也越来越高,但都市快节奏的生活让上班族们吃饭的目标性更小,通常只是到了时间随机选择食物塞饱肚子。该美食网站倡导一种全新的健康的生活方式,用户可以根据网站上提供的食谱了解不同菜系的风格、做法及搭配,除了可以查看各种食谱学习做饭, 还可以在线与其他用户一起交流和分享做菜的心得,通过美食来感受生活之美。
使用 React 框架来完成本次项目的实现,使用技术有如下一些:
nodejs 进行 模拟接口数据 ( 代理 )
react react-dom
react-router-dom
redux react-redux redux-thunk immutable redux-immutable
styled-components ( css作用域 ) / sass / less / stylus
antd-mobile ui 组件库 ( 移动端 )
react-transition-group
axios
http-proxy-middleware
配置装饰器 ( costomize-cra react-app-rewired ) 等等
开发环境为:Windows-
开发工具:VSCode / webstorm + jsx 插件
开发调试工具:Chrome 浏览器 react-devtools,redux-devtools
开发运行环境:node 环境
代码管理:git
上线环境:linux + nginx

在本机磁盘中指定位置创建一下 react 项目,命令如下
npx create-react-app cookbook
创建好项目后,进入项目目录先安装常规要使用的三方包,命令如下
npm i -D customize-cra react-app-rewired http-proxy-middleware
npm i -S redux react-redux redux-thunk styled-components immutable redux-immutable react-router-dom react-transition-group axios
清理创建好的项目中不需要的文件及文件夹
1.删除 public 目录下的部份内容
2.删除 src 目录下的部份内容
修改 public / index.html
在 src 目录下创建 根组件 App.jsx 与项目 入口文件 index.js
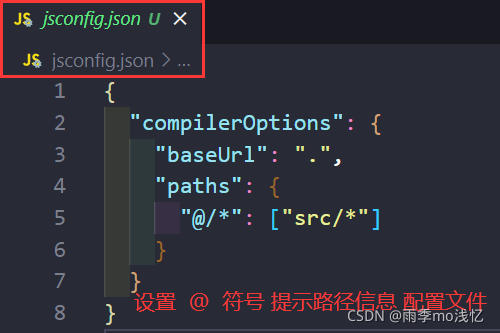
配置 装饰器 支持
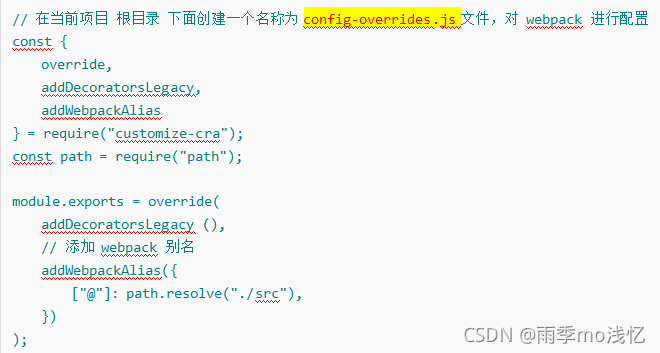
// 此文件就是对于 webpack 进行增量配置  它是运行在 nodejs 中的 commonjs
const { resolve } = require('path')
// 增量对于本项目中的 webpack 配置进行修改 和 添加操作类
const { addDecoratorsLegacy, override } = require('customize-cra')
// 自定义 webpack 配置
const customize = () => config => {
  // 给当前项目添加一个 @ 字符串,来方便写代码时的导入路径
  config.resolve.alias['@'] = resolve('src')
  return config
}
// 导出
module.exports = override(
  // 添加装饰器支持
  addDecoratorsLegacy(),
  // 添加自定义 webpack 配置
  customize()
)
修改package.json中的脚本命令为如下
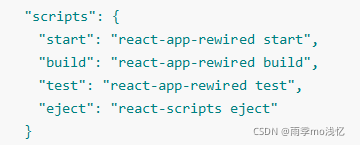
  "scripts": {
    "start": "set BROWSER=NONE && react-app-rewired start",
    "build": "react-app-rewired build",
    "test": "react-scripts test",
    "eject": "react-scripts eject"
}配置 反向代理
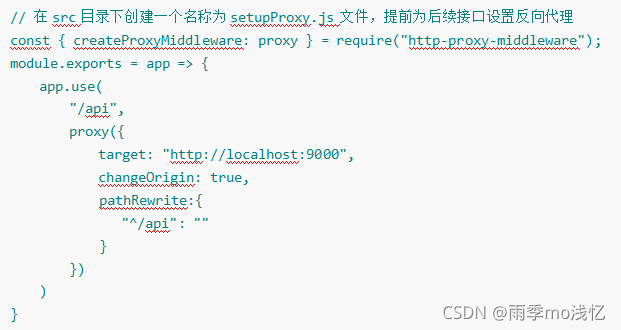
// create-react-app 脚本架工具提供一个专门用来进行代理配置的文件,它是给 nodejs 运行
// 模块化使用 commonjs 规范
// create-react-app 脚本架工具只提供了这个入口,但是代理操作没有帮你完成
// 需要手动去安装第 3 方包来实现 代理
// npm i -D http-proxy-middleware
// 修改此文件后,一定要 => 重启服务
const { createProxyMiddleware: proxy } = require('http-proxy-middleware');
// app 对象就是 express 对象
module.exports = app => {
  app.use(
    '/api',
    proxy({
        target:'https://api.iynn.cn/film',
        changeOrigin:true,
  }))
}项目已在本机中 初始化 完成,需要在 远程 仓库中创建 git 仓库本机把项目初始化一个 git 仓库

提交到远程后,在本机开始用 分支 来进行,不要在 master 中进行开发,切记
在线文档:Ant Design Mobile | A Mobile Design Specification
antd-mobile 是 Ant Design 的移动规范的 React 实现,服务于 蚂蚁金服 及 口碑无线 业务。它支持多平台,组件丰富、能全面覆盖各类场景,UI 样式高度可配置,拓展性更强,轻松适应各类产品风格。
在使用前需要先对包进行安装
npm i -S antd-mobile
按需加载 组件代码 和 样式的 babel 插件
// 按需加载 tree-shaking
npm i -D babel-plugin-import
//  config-overrides.js  用于 修改默认配置
const { override, fixBabelImports } = require('customize-cra')
module.exports = override(
   fixBabelImports('import', {
     libraryName: 'antd-mobile',
     style: 'css',
   })
)使用
import React, { Component } from "react";
// 引入 `antd-mobile` 的 按钮组件
import { Button } from "antd-mobile";
class App extends Component {
    render() {
        return (
            <>
                <Button type="primary">我是一个常规按钮</Button>
            </>
        );
    }
}
export default App;样式重置
移动站点中的样式,单位有两种 rem / vw、vh
参考地址:https://mobile.ant.design/components/tab-bar-cn/
底部导航 可以使用 antd-mobile 中的 tab-bar 组件完成此功能展示。

路由规划
height: .4rem;
line-height: .4rem;
background: #FF6C0C;
font-size: .18rem;
text-align: center;
color:#fff;参考地址:Ant Design Mobile | A Mobile Design Specification
该功能可以使用 antd-mobile 中的 Carousel 组件
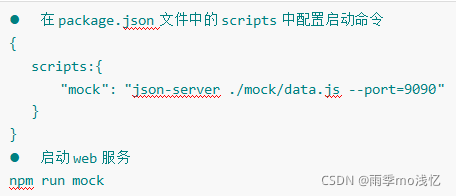
mock数据( faker数据 ),即使用假数据来模拟后台的数据。
为什么要做假数据?因为后端开发接口并产出接口文档没有那么快,此时就需要我们自己来模拟请求数据。模拟的数据字段、格式等,需要和后端工程师沟通。这样,我们可以先通过模拟的数据继续完成前端的工作任务,待后端工程师写好数据接口并提供了接口信息后,我们只需要修改请求地址,前后端就实现了无缝衔接。
安装 json-server 帮助我们快速启动一个 web 服务
npm i -g json-server  ===   yarn add global json-server
// json-server 默认的路由模式
// 支持 get / post / put / delete 而且还支持文件写入  它是跨域的
// data.json
// http 请求地址  http://xxx/data
{
  "data": {
    "id": 1,
    "name": "aaa",
    "age": 20
  }
}
json-server data.jsonmock数据
export const SearchBox = styled.div`
  width: 90vw;
  height: .46rem;
  display: flex;
  border: 1px solid #ff6c0c;
  margin: .15rem auto;
  border-radius: 5px;
  box-shadow: 1px 1px 5px #ccc;
  justify-content: center;
  align-items: center;
  img{
    width: .2rem;
    height: .2rem;
  }
  span{
    color:#555;
    margin-left: .1rem;
  }
`export const HotCateBox = styled.div`
background: #fff;
.title{
padding: .15rem;
color:#949494;
}
`
<Grid data={hotcate}
columnNum={3}
itemStyle={{ height: '.5rem' }}
onClick={(row, index) => {
console.log(index, this.props.history.push)
}}
renderItem={dataItem => (
<div>{dataItem.title}</div>
)}
/>静态布局展示
HTML
<div>
	<h2>精品好菜</h2>
	<div>
		<dl>
			<dt>
				<img src="http://www.mobiletrain.org/images/index/new_logo.png" />
			</dt>
			<dd>
				<h4>青椒香干</h4>
				<p>1000浏览 2000收藏</p>
			</dd>
		</dl>
	</div>
</div>css
div {
	padding-left: .1rem;
	>h2 {
		height: .5rem;
		line-height: .6rem;
		padding-left: .15rem;
		color: #666;
		padding-left: 0;
	}
	>div {
		display: flex;
		flex-wrap: wrap;
		>dl {
			width: calc(50% - 0.1rem);
			background: #fff;
			margin-right: .1rem;
			margin-bottom: .1rem;
			dt {
				img {
					width: 100%;
				}
			}
			dd {
				display: flex;
				flex-direction: column;
				align-items: center;
				padding: .1rem;
				h4 {
					font-size: .16rem;
				}
				p {
					font-size: .12rem;
					color: #666;
				}
			}
		}
}创建需要的组件 和 样式
HTML
<ul>
	<li>分类</li>
	<li className="active">食材</li>
	<li className="slider right"></li>
</ul>CSS
height:.44rem;
background:#ee742f;
display:flex;
align-items:center;
justify-content:center;
ul {
	width: 1.4rem;
	height: .3rem;
	display: flex;
	position: relative;
	border: 1px solid #fff;
	z-index: 0;
	border-radius: .15rem;
	li {
		flex: 1;
		line-height: .3rem;
		text-align: center;
		color: #fff;
		&:last-child {
			position: absolute;
			width: 50%;
			height: .3rem;
			background: #fff;
			z-index: -1;
			border-radius: .15rem;
			transform: translate(0, 0);
			transition: all 0.4s ease-in;
			&.right {
				transform: translate(100%, 0);
			}
		}
		&.active {
			color: #ee742f;
		}
}HTML
<div>
	<div>
		<ul>
			<li class="active"><span>分类</span></li>
		</ul>
	</div>
	<div>
		<ul>
			<li>内容</li>
		</ul>
	</div>
</div>CSS
.div {
	height: 100%;
	display: flex;
	>div:first-child {
		width: .9rem;
		>ul {
			height: 100%;
			overflow-y: scroll;
			li {
				height: .5rem;
				text-align: center;
				line-height: .5rem;
				background: #f3f3f3;
				&.active {
					background: #fff;
					span {
						display: inline-block;
						height: 100%;
						border-bottom: 1px solid #ee742f;
					}
				}
			}
		}
	}
	>div:last-child {
		flex: 1;
		background: #fff;
		padding: .2rem .1rem;
		>ul {
			display: flex;
			flex-wrap: wrap;
			overflow-y: scroll;
			height: 100%;
			align-content: flex-start;
			li {
				width: 33.3333%;
				text-align: center;
				height: .5rem;
				line-height: .5rem;
				color: #666;
			}
		}
}以上是“如何使用React实现菜谱系统”这篇文章的所有内容,感谢各位的阅读!希望分享的内容对大家有帮助,更多相关知识,欢迎关注亿速云行业资讯频道!
亿速云「云服务器」,即开即用、新一代英特尔至强铂金CPU、三副本存储NVMe SSD云盘,价格低至29元/月。点击查看>>
免责声明:本站发布的内容(图片、视频和文字)以原创、转载和分享为主,文章观点不代表本网站立场,如果涉及侵权请联系站长邮箱:is@yisu.com进行举报,并提供相关证据,一经查实,将立刻删除涉嫌侵权内容。