本篇内容介绍了“如何实现ShardingSphere jdbc集成多数据源”的有关知识,在实际案例的操作过程中,不少人都会遇到这样的困境,接下来就让小编带领大家学习一下如何处理这些情况吧!希望大家仔细阅读,能够学有所成!
最近有个项目的几张表,数量级在千万以上,技术栈是SpringBoot+Mybatis-plus+MySQL。如果使用单表,在进行查询操作,非常耗时,经过一番调研,决定使用分表中间件:ShardingSphere。
ShardingSphere今年4月份成为了 Apache 软件基金会的顶级项目,目前支持数据分片、读写分离、多数据副本、数据加密、影子库压测等功能,同时兼容多种数据库,通过可插拔架构,理想情况下,可以做到对业务代码无感知。
ShardingSphere下有两款成熟的产品:sharding jdbc和sharding proxy
sharding jdbc:可理解为增强版的 JDBC 驱动;
sharding proxy:透明化的数据库代理端,可以看做是一个虚拟的数据库服务。
仅是集成sharding jdbc还是很简单的,为了更好的理解,这里以订单表为例。
<properties>

  <sharding-sphere.version>4.1.0</sharding-sphere.version>
</properties>

<!-- 分库分表:https://mvnrepository.com/artifact/org.apache.shardingsphere/sharding-jdbc-spring-boot-starter -->
<dependency>
  <groupId>org.apache.shardingsphere</groupId>
  <artifactId>sharding-jdbc-spring-boot-starter</artifactId>
  <version>${sharding-sphere.version}</version>
</dependency>spring:
shardingsphere:
datasource:
names: sharding-order-system
sharding-order-system:
type: com.alibaba.druid.pool.DruidDataSource
driverClassName: com.mysql.jdbc.Driver
url: jdbc:mysql://127.0.0.1:3306/order_system?useUnicode=true&characterEncoding=utf-8&useSSL=false&serverTimezone=GMT%2B8&useTimezone=true
username: root
password: root
props:
# 日志显示SQL
sql.show: true
sharding:
tables:
# 订单表 分表:20
order:
# 真实表 order_0
actualDataNodes: sharding-order-system.order_$->{0..19}
# 分库策略
databaseStrategy:
none:
# 分表策略
tableStrategy:
inline:
shardingColumn: order_key
# 分片算法行表达式,需符合groovy语法 '& Integer.MAX_VALUE' 位运算使hash值为正数
algorithmExpression: order_$->{(order_key.hashCode() & Integer.MAX_VALUE) % 20}上面虽然完成了对订单表(order)的分表,但是sharding jdbc对一些语法不支持,官方的文档里说的比较笼统,如下图:
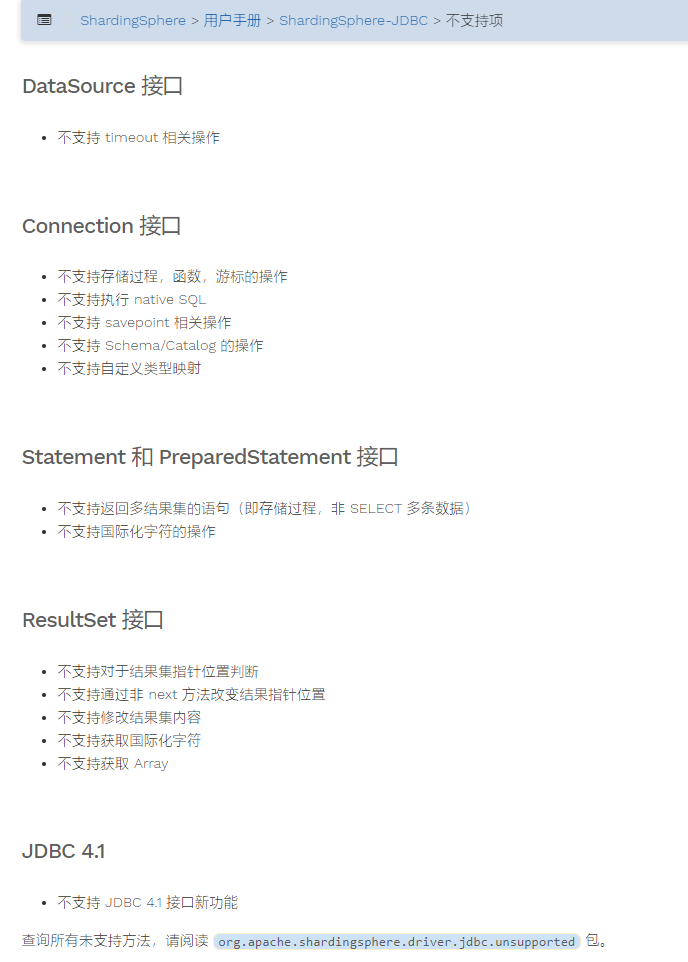
像insert into ... select这些语法是不支持的,**而且对于没有涉及到分表的语句,也有同样的限制。**例如,项目里有个SQL:insert into user_temp select * from user;在集成了sharding jdbc后,即使user表没有配置分表,执行该SQL也会报错。
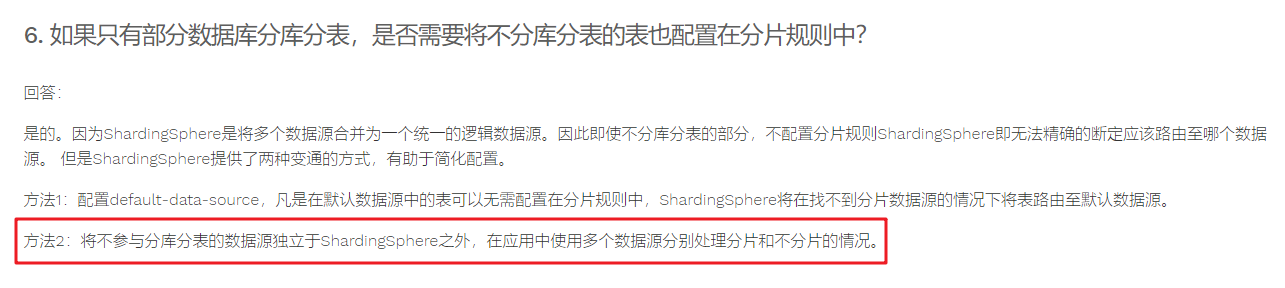
官方的问答中提到,使用多数据源分别处理分片和不分片的情况,对分表的SQL使用sharding jdbc数据源,对不涉及到分表的SQL,使用普通数据源。
我们项目中使用到了baomidou团队开源的mybatis-plus,其团队还开源了一个多数据源的组件:dynamic-datasource-spring-boot-starter,集成后,使用@DS注解就可以切换数据源,非常方便。
<!-- https://mvnrepository.com/artifact/com.baomidou/dynamic-datasource-spring-boot-starter -->
<dependency>
  <groupId>com.baomidou</groupId>
  <artifactId>dynamic-datasource-spring-boot-starter</artifactId>
  <version>3.1.1</version>
</dependency>核心思路是将sharding jdbc数据源,加入到多数据源中。
/**
 * 动态数据源配置:
 *
 * 使用{@link com.baomidou.dynamic.datasource.annotation.DS}注解,切换数据源
 *
 * <code>@DS(DataSourceConfiguration.SHARDING_DATA_SOURCE_NAME)</code>
 *
 * @author songyinyin
 * @date 2020/7/27 15:19
 */
@Configuration
@AutoConfigureBefore({DynamicDataSourceAutoConfiguration.class,
        SpringBootConfiguration.class})
public class DataSourceConfiguration {
	/**
     * 分表数据源名称
     */
    private static final String SHARDING_DATA_SOURCE_NAME = "gits_sharding";
	/**
     * 动态数据源配置项
     */
    @Autowired
    private DynamicDataSourceProperties properties;

    /**
     * shardingjdbc有四种数据源,需要根据业务注入不同的数据源
     *
     * <p>1. 未使用分片, 脱敏的名称(默认): shardingDataSource;
     * <p>2. 主从数据源: masterSlaveDataSource;
     * <p>3. 脱敏数据源:encryptDataSource;
     * <p>4. 影子数据源:shadowDataSource
     *
     */
    @Lazy
    @Resource(name = "shardingDataSource")
    AbstractDataSourceAdapter shardingDataSource;

    @Bean
    public DynamicDataSourceProvider dynamicDataSourceProvider() {
        Map<String, DataSourceProperty> datasourceMap = properties.getDatasource();
        return new AbstractDataSourceProvider() {
            @Override
            public Map<String, DataSource> loadDataSources() {
                Map<String, DataSource> dataSourceMap = createDataSourceMap(datasourceMap);
                // 将 shardingjdbc 管理的数据源也交给动态数据源管理
                dataSourceMap.put(SHARDING_DATA_SOURCE_NAME, shardingDataSource);
                return dataSourceMap;
            }
        };
    }

    /**
     * 将动态数据源设置为首选的
     * 当spring存在多个数据源时, 自动注入的是首选的对象
     * 设置为主要的数据源之后,就可以支持shardingjdbc原生的配置方式了
     *
     * @return
     */
    @Primary
    @Bean
    public DataSource dataSource(DynamicDataSourceProvider dynamicDataSourceProvider) {
        DynamicRoutingDataSource dataSource = new DynamicRoutingDataSource();
        dataSource.setPrimary(properties.getPrimary());
        dataSource.setStrict(properties.getStrict());
        dataSource.setStrategy(properties.getStrategy());
        dataSource.setProvider(dynamicDataSourceProvider);
        dataSource.setP6spy(properties.getP6spy());
        dataSource.setSeata(properties.getSeata());
        return dataSource;
    }
}sharding jdbc有四种数据源:
未使用分片, 脱敏的名称(默认):shardingDataSource;
主从数据源: masterSlaveDataSource;
脱敏数据源:encryptDataSource;
影子数据源:shadowDataSource
需要需要根据不同的场景,注入不同的数据源,本文以分表举例,所以将shardingDataSource放到了多数据源(dataSourceMap)中。
在第2步,我们指定了shardingsphere数据源的名称为:gits_sharding
spring:
  datasource:
    # 动态数据源配置
    dynamic:
      datasource:
        master:
          type: com.alibaba.druid.pool.DruidDataSource
          driver-class-name: com.mysql.jdbc.Driver
          url: jdbc:mysql://127.0.0.1:3306/gits?useUnicode=true&characterEncoding=utf-8&useSSL=false&rewriteBatchedStatements=true
          username: root
          password: root
      # 指定默认数据源名称
      primary: master
  # 分表配置
  shardingsphere:
    datasource:
      names: sharding-order-system
      sharding-order-system:
        type: com.alibaba.druid.pool.DruidDataSource
        driverClassName: com.mysql.jdbc.Driver
        url: jdbc:mysql://172.20.20.19:3306/order_system?useUnicode=true&characterEncoding=utf-8&useSSL=false&serverTimezone=GMT%2B8&useTimezone=true
        username: root
        password: root
    props:
      # 日志显示SQL
      sql.show: true
    sharding:
      tables:
        # 订单表 分表:20
        order:
          # 真实表 order_0
          actualDataNodes: sharding-order-system.order_$->{0..19}
          # 分库策略
          databaseStrategy:
            none:
          # 分表策略
          tableStrategy:
            inline:
              shardingColumn: order_key
              # 分片算法行表达式,需符合groovy语法 '& Integer.MAX_VALUE' 位运算使hash值为正数
algorithmExpression: order_$->{(order_key.hashCode() & Integer.MAX_VALUE) % 20}这里将默认数据源指定为了普通数据源。
在需要分表的service方法上加上@DS("gits_sharding"),即可切换为sharding jdbc数据源。
@Service
@Slf4j
public class OrderServiceImpl extends OrderService {

    @Override
    @DS("gits_sharding")
    public List<Order> getOrderByUser(OrderQueryDTO dto) throws Exception {
        // 省略若干业务代码
        ...
    }
}“如何实现ShardingSphere jdbc集成多数据源”的内容就介绍到这里了,感谢大家的阅读。如果想了解更多行业相关的知识可以关注亿速云网站,小编将为大家输出更多高质量的实用文章!
亿速云「云服务器」,即开即用、新一代英特尔至强铂金CPU、三副本存储NVMe SSD云盘,价格低至29元/月。点击查看>>
免责声明:本站发布的内容(图片、视频和文字)以原创、转载和分享为主,文章观点不代表本网站立场,如果涉及侵权请联系站长邮箱:is@yisu.com进行举报,并提供相关证据,一经查实,将立刻删除涉嫌侵权内容。


 计算
计算 安全
安全 数据库
数据库 网络和加速
网络和加速 企业服务
企业服务


