本篇内容主要讲解“spring boot动态生成接口怎么实现”,感兴趣的朋友不妨来看看。本文介绍的方法操作简单快捷,实用性强。下面就让小编来带大家学习“spring boot动态生成接口怎么实现”吧!
在某些业务场景中,我们只需要业务代码中定义相应的接口或者相应的注解,并不需要实现对应的逻辑。
比如 mybatis和feign: 在 mybatis 中,我们只需要定义对应的mapper接口;在 feign 中,我们只需要定义对应业务系统中的接口即可。
那么在这种场景下,具体的业务逻辑时怎么执行的呢,其实原理都是动态代理。
我们这里不具体介绍动态代理,主要看一下它在springboot项目中的实际应用,下面我们模仿feign来实现一个调用三方接口的 httpclient。
package com.mysgk.blogdemo.annotation;

public @interface MyHttpClient {
}package com.mysgk.blogdemo.proxy;
import org.springframework.beans.factory.FactoryBean;
import java.lang.reflect.InvocationHandler;
import java.lang.reflect.Method;
import java.lang.reflect.Proxy;
public class RibbonAopProxyFactory<T> implements FactoryBean<T>, InvocationHandler {
private Class<T> interfaceClass;
public Class<T> getInterfaceClass() {
return interfaceClass;
}
public void setInterfaceClass(Class<T> interfaceClass) {
this.interfaceClass = interfaceClass;
}
@Override
public T getObject() throws Exception {
return (T) Proxy.newProxyInstance(this.getClass().getClassLoader(), new Class[]{interfaceClass}, this);
}
@Override
public Class<?> getObjectType() {
return interfaceClass;
}
@Override
public boolean isSingleton() {
return true;
}
/**
真正执行的方法
*/
@Override
public Object invoke(Object proxy, Method method, Object[] args) throws Throwable {
return "invoke " + proxy.getClass().getName() + "." + method.getName() + " , do anything ..";
}
}package com.mysgk.blogdemo.start;
import cn.hutool.core.util.ClassUtil;
import cn.hutool.core.util.StrUtil;
import com.mysgk.blogdemo.annotation.MyHttpClient;
import com.mysgk.blogdemo.proxy.RibbonAopProxyFactory;
import org.slf4j.Logger;
import org.slf4j.LoggerFactory;
import org.springframework.beans.BeansException;
import org.springframework.beans.factory.config.ConfigurableListableBeanFactory;
import org.springframework.beans.factory.support.BeanDefinitionBuilder;
import org.springframework.beans.factory.support.BeanDefinitionRegistry;
import org.springframework.beans.factory.support.BeanDefinitionRegistryPostProcessor;
import org.springframework.beans.factory.support.GenericBeanDefinition;
import org.springframework.context.ApplicationContext;
import org.springframework.context.ApplicationContextAware;
import org.springframework.stereotype.Component;
import java.util.Set;
@Component
public class ScanHttpClients implements BeanDefinitionRegistryPostProcessor, ApplicationContextAware {
private final Logger logger = LoggerFactory.getLogger(ScanHttpClients.class);
private ApplicationContext ctx;
public void run(BeanDefinitionRegistry registry) {
Set<Class<?>> scanPackage = ClassUtil.scanPackageByAnnotation("com.mysgk", MyHttpClient.class);
for (Class<?> cls : scanPackage) {
BeanDefinitionBuilder builder = BeanDefinitionBuilder.genericBeanDefinition(cls);
GenericBeanDefinition definition = (GenericBeanDefinition) builder.getRawBeanDefinition();
definition.getPropertyValues().add("interfaceClass", definition.getBeanClassName());
definition.setBeanClass(RibbonAopProxyFactory.class);
definition.setAutowireMode(GenericBeanDefinition.AUTOWIRE_BY_TYPE);
String beanName = StrUtil.removePreAndLowerFirst(cls.getSimpleName(), 0) + "RibbonClient";
registry.registerBeanDefinition(beanName, definition);
}
}
@Override
public void postProcessBeanDefinitionRegistry(BeanDefinitionRegistry registry) throws BeansException {
run(registry);
}
@Override
public void postProcessBeanFactory(ConfigurableListableBeanFactory beanFactory) throws BeansException {
}
@Override
public void setApplicationContext(ApplicationContext applicationContext) throws BeansException {
this.ctx = ctx;
}
}package com.mysgk.blogdemo.aop;
import org.aspectj.lang.ProceedingJoinPoint;
import org.aspectj.lang.annotation.Around;
import org.aspectj.lang.annotation.Aspect;
import org.aspectj.lang.annotation.Pointcut;
import org.springframework.beans.factory.annotation.Autowired;
import org.springframework.http.HttpEntity;
import org.springframework.http.HttpMethod;
import org.springframework.http.ResponseEntity;
import org.springframework.stereotype.Component;
import org.springframework.web.client.RestTemplate;
@Component
@Aspect
public class InterceptAnnotation {
@Autowired
private RestTemplate ribbonLoadBalanced;
@Pointcut("@annotation(com.mysgk.blogdemo.annotation.MyHttpClient)")
public void execute() {
}
@Around("execute()")
public Object interceptAnnotation(ProceedingJoinPoint joinPoint) throws Throwable {
/**
* 此处省略 获取 url, httpMethod, requestEntity, responseType 等参数的处理过程
*/
ResponseEntity<?> exchange = ribbonLoadBalanced.exchange("url", HttpMethod.GET, HttpEntity.EMPTY, Object.class);
return exchange.getBody();
}
}package com.mysgk.blogdemo.client;
import com.mysgk.blogdemo.annotation.MyHttpClient;
import org.springframework.web.bind.annotation.PostMapping;
import org.springframework.web.bind.annotation.RequestBody;
@MyHttpClient
public interface MyHttpClientTest {
@PostMapping(value = "test/t1")
Object test(String param);
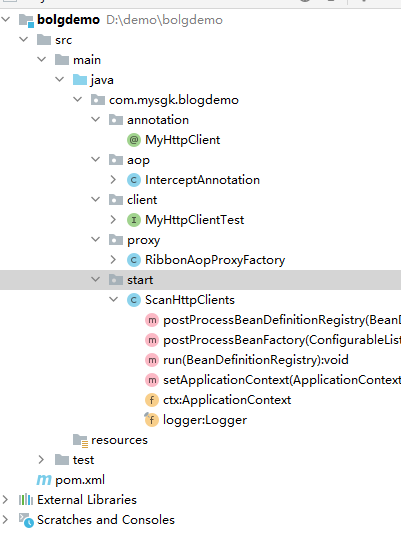
}项目结构:

到此,相信大家对“spring boot动态生成接口怎么实现”有了更深的了解,不妨来实际操作一番吧!这里是亿速云网站,更多相关内容可以进入相关频道进行查询,关注我们,继续学习!
亿速云「云服务器」,即开即用、新一代英特尔至强铂金CPU、三副本存储NVMe SSD云盘,价格低至29元/月。点击查看>>
免责声明:本站发布的内容(图片、视频和文字)以原创、转载和分享为主,文章观点不代表本网站立场,如果涉及侵权请联系站长邮箱:is@yisu.com进行举报,并提供相关证据,一经查实,将立刻删除涉嫌侵权内容。