C++ OpenCV如何进行图像全景拼接,相信很多没有经验的人对此束手无策,为此本文总结了问题出现的原因和解决方法,通过这篇文章希望你能解决这个问题。
下面将使用OpenCV C++ 进行图像全景拼接。目前使用OpenCV对两幅图像进行拼接大致可以分为两类。
一、使用OpenCV内置API Stitcher 进行拼接。
二、使用特征检测算法匹配两幅图中相似的点、计算变换矩阵、最后对其进行透视变换就可以了。
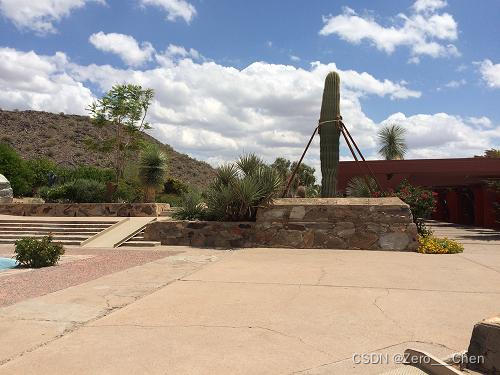
imageA
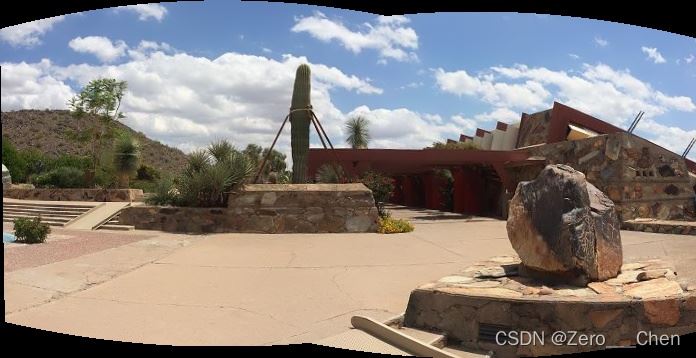
imageB

原图如图所示。本案例的需求是将上述两幅图片拼接成一幅图像。首先使用OpenCV提供的Stitcher进行拼接。关于Stitcher的具体原理请大家自行查找相关资料。
bool OpenCV_Stitching(Mat imageA, Mat imageB)
{
	vector<Mat>images;
	images.push_back(imageA);
	images.push_back(imageB);

	Ptr<Stitcher>stitcher = Stitcher::create();

	Mat result;
	Stitcher::Status status = stitcher->stitch(images, result);// 使用stitch函数进行拼接

	if (status != Stitcher::OK) return false;

	imshow("OpenCV图像全景拼接", result);

	return true;
}
这就是使用OpenCV 内置Stitcher拼接出来的效果。
使用方法二进行图像全景拼接。目前网上教程大致流程归为:
1、使用特征检测算子提取两幅图像的关键点,然后进行特征描述子匹配。我这里使用的是SURF算子。当然SIFT等其他特征检测算子也可以。
	//创建SURF特征检测器
	int Hessian = 800;
	Ptr<SURF>detector = SURF::create(Hessian);

	//进行图像特征检测、特征描述
	vector<KeyPoint>keypointA, keypointB;
	Mat descriptorA, descriptorB;
	detector->detectAndCompute(imageA, Mat(), keypointA, descriptorA);
	detector->detectAndCompute(imageB, Mat(), keypointB, descriptorB);

	//使用FLANN算法进行特征描述子的匹配
	FlannBasedMatcher matcher;
	vector<DMatch>matches;
	matcher.match(descriptorA, descriptorB, matches);
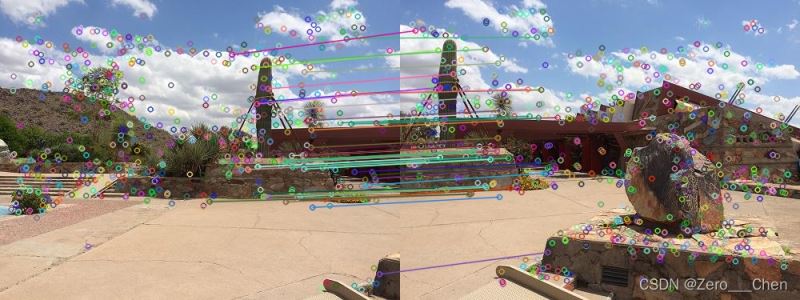
如图为使用FLANN算法进行特征描述子匹配的结果。我们需要把那些匹配程度高的关键点筛选出来用以下面计算两幅图像的单应性矩阵。
2、筛选出匹配程度高的关键点
double Max = 0.0;
for (int i = 0; i < matches.size(); i++)
{
//float distance –>代表这一对匹配的特征点描述符(本质是向量)的欧氏距离,数值越小也就说明两个特征点越相像。
double dis = matches[i].distance;
if (dis > Max)
{
Max = dis;
}
}
//筛选出匹配程度高的关键点
vector<DMatch>goodmatches;
vector<Point2f>goodkeypointA, goodkeypointB;
for (int i = 0; i < matches.size(); i++)
{
double dis = matches[i].distance;
if (dis < 0.15*Max)
{
//int queryIdx –>是测试图像的特征点描述符(descriptor)的下标,同时也是描述符对应特征点(keypoint)的下标。
goodkeypointA.push_back(keypointA[matches[i].queryIdx].pt);
//int trainIdx –> 是样本图像的特征点描述符的下标,同样也是相应的特征点的下标。
goodkeypointB.push_back(keypointB[matches[i].trainIdx].pt);
goodmatches.push_back(matches[i]);
}
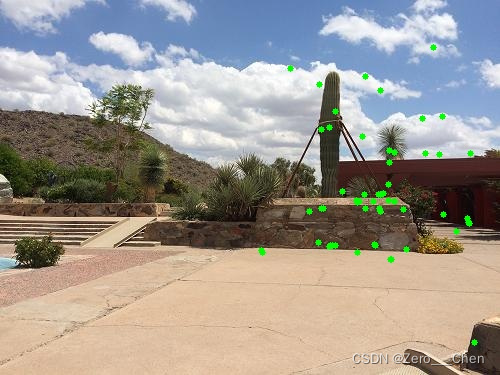
}如图为imageA筛选出来的关键点。
如图为imageB筛选出来的关键点。

从上图可以看出,我们已经筛选出imageA,imageB共有的关键点部分。接下来,我们需要使用这两个点集计算两幅图的单应性矩阵。
计算单应性变换矩阵
    //获取图像A到图像B的投影映射矩阵,尺寸为3*3
    Mat H = findHomography(goodkeypointA, goodkeypointB, RANSAC);
    Mat M = (Mat_<double>(3, 3) << 1.0, 0, imageA.cols, 0, 1.0, 0, 0, 0, 1.0);
    Mat Homo = M * H;
根据计算出来的单应性矩阵对imageA进行透视变换
    //进行透视变换
    Mat DstImg;
    warpPerspective(imageA, DstImg, Homo, Size(imageB.cols + imageA.cols, imageB.rows));
    imshow("透视变换", DstImg);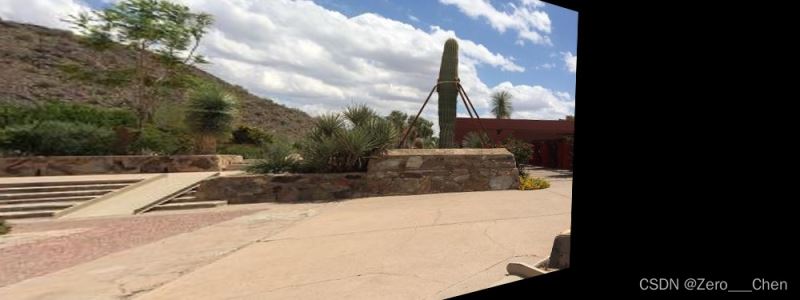
如图所示为imageA进行透视变换得到的结果。
根据上述操作,我们已经得到了经透视变换的imageA,接下来只需将imageA与imageB拼接起来就可以了。
    imageB.copyTo(DstImg(Rect(imageA.cols, 0, imageB.cols, imageB.rows)));
imshow("图像全景拼接", DstImg);bool Image_Stitching(Mat imageA, Mat imageB, bool draw)
{
//创建SURF特征检测器
int Hessian = 800;
Ptr<SURF>detector = SURF::create(Hessian);
//进行图像特征检测、特征描述
vector<KeyPoint>keypointA, keypointB;
Mat descriptorA, descriptorB;
detector->detectAndCompute(imageA, Mat(), keypointA, descriptorA);
detector->detectAndCompute(imageB, Mat(), keypointB, descriptorB);
//使用FLANN算法进行特征描述子的匹配
FlannBasedMatcher matcher;
vector<DMatch>matches;
matcher.match(descriptorA, descriptorB, matches);
double Max = 0.0;
for (int i = 0; i < matches.size(); i++)
{
//float distance –>代表这一对匹配的特征点描述符(本质是向量)的欧氏距离,数值越小也就说明两个特征点越相像。
double dis = matches[i].distance;
if (dis > Max)
{
Max = dis;
}
}
//筛选出匹配程度高的关键点
vector<DMatch>goodmatches;
vector<Point2f>goodkeypointA, goodkeypointB;
for (int i = 0; i < matches.size(); i++)
{
double dis = matches[i].distance;
if (dis < 0.15*Max)
{
//int queryIdx –>是测试图像的特征点描述符(descriptor)的下标,同时也是描述符对应特征点(keypoint)的下标。
goodkeypointA.push_back(keypointA[matches[i].queryIdx].pt);
//int trainIdx –> 是样本图像的特征点描述符的下标,同样也是相应的特征点的下标。
goodkeypointB.push_back(keypointB[matches[i].trainIdx].pt);
goodmatches.push_back(matches[i]);
}
}
if (draw)
{
Mat result;
drawMatches(imageA, keypointA, imageB, keypointB, goodmatches, result);
imshow("特征匹配", result);
Mat temp_A = imageA.clone();
for (int i = 0; i < goodkeypointA.size(); i++)
{
circle(temp_A, goodkeypointA[i], 3, Scalar(0, 255, 0), -1);
}
imshow("goodkeypointA", temp_A);
Mat temp_B = imageB.clone();
for (int i = 0; i < goodkeypointB.size(); i++)
{
circle(temp_B, goodkeypointB[i], 3, Scalar(0, 255, 0), -1);
}
imshow("goodkeypointB", temp_B);
}
//findHomography计算单应性矩阵至少需要4个点
/*
计算多个二维点对之间的最优单映射变换矩阵H(3x3),使用MSE或RANSAC方法,找到两平面之间的变换矩阵
*/
if (goodkeypointA.size() < 4 || goodkeypointB.size() < 4) return false;
//获取图像A到图像B的投影映射矩阵,尺寸为3*3
Mat H = findHomography(goodkeypointA, goodkeypointB, RANSAC);
Mat M = (Mat_<double>(3, 3) << 1.0, 0, imageA.cols, 0, 1.0, 0, 0, 0, 1.0);
Mat Homo = M * H;
//进行透视变换
Mat DstImg;
warpPerspective(imageA, DstImg, Homo, Size(imageB.cols + imageA.cols, imageB.rows));
imshow("透视变换", DstImg);
imageB.copyTo(DstImg(Rect(imageA.cols, 0, imageB.cols, imageB.rows)));
imshow("图像全景拼接", DstImg);
return true;
}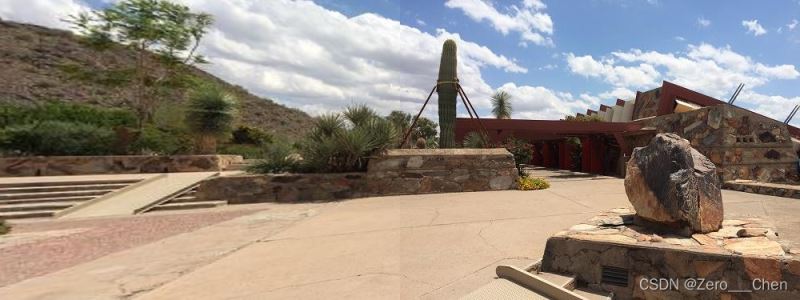
最终拼接效果如图所示。
#include<iostream>
#include<opencv2/opencv.hpp>
#include<opencv2/xfeatures2d.hpp>
#include<opencv2/stitching.hpp>
using namespace std;
using namespace cv;
using namespace cv::xfeatures2d;
//1、使用特征检测算法找到两张图像中相似的点,计算变换矩阵
//2、将A透视变换后得到的图片与B拼接
bool Image_Stitching(Mat imageA, Mat imageB, bool draw)
{
	//创建SURF特征检测器
	int Hessian = 800;
	Ptr<SURF>detector = SURF::create(Hessian);

	//进行图像特征检测、特征描述
	vector<KeyPoint>keypointA, keypointB;
	Mat descriptorA, descriptorB;
	detector->detectAndCompute(imageA, Mat(), keypointA, descriptorA);
	detector->detectAndCompute(imageB, Mat(), keypointB, descriptorB);

	//使用FLANN算法进行特征描述子的匹配
	FlannBasedMatcher matcher;
	vector<DMatch>matches;
	matcher.match(descriptorA, descriptorB, matches);

	double Max = 0.0;
	for (int i = 0; i < matches.size(); i++)
	{
		//float distance –>代表这一对匹配的特征点描述符(本质是向量)的欧氏距离,数值越小也就说明两个特征点越相像。
		double dis = matches[i].distance;
		if (dis > Max)
		{
			Max = dis;
		}
	}

	//筛选出匹配程度高的关键点
	vector<DMatch>goodmatches;
	vector<Point2f>goodkeypointA, goodkeypointB;
	for (int i = 0; i < matches.size(); i++)
	{
		double dis = matches[i].distance;
		if (dis < 0.15*Max)
		{
			//int queryIdx –>是测试图像的特征点描述符(descriptor)的下标,同时也是描述符对应特征点(keypoint)的下标。
			goodkeypointA.push_back(keypointA[matches[i].queryIdx].pt);
			//int trainIdx –> 是样本图像的特征点描述符的下标,同样也是相应的特征点的下标。
			goodkeypointB.push_back(keypointB[matches[i].trainIdx].pt);
			goodmatches.push_back(matches[i]);
		}
	}

	if (draw)
	{
		Mat result;
		drawMatches(imageA, keypointA, imageB, keypointB, goodmatches, result);
		imshow("特征匹配", result);

		Mat temp_A = imageA.clone();
		for (int i = 0; i < goodkeypointA.size(); i++)
		{
			circle(temp_A, goodkeypointA[i], 3, Scalar(0, 255, 0), -1);
		}
		imshow("goodkeypointA", temp_A);

		Mat temp_B = imageB.clone();
		for (int i = 0; i < goodkeypointB.size(); i++)
		{
			circle(temp_B, goodkeypointB[i], 3, Scalar(0, 255, 0), -1);
		}
		imshow("goodkeypointB", temp_B);
	}

	//findHomography计算单应性矩阵至少需要4个点
	/*
	计算多个二维点对之间的最优单映射变换矩阵H(3x3),使用MSE或RANSAC方法,找到两平面之间的变换矩阵
	*/
	if (goodkeypointA.size() < 4 || goodkeypointB.size() < 4) return false;


	//获取图像A到图像B的投影映射矩阵,尺寸为3*3
	Mat H = findHomography(goodkeypointA, goodkeypointB, RANSAC);
	Mat M = (Mat_<double>(3, 3) << 1.0, 0, imageA.cols, 0, 1.0, 0, 0, 0, 1.0);
	Mat Homo = M * H;


	//进行透视变换
	Mat DstImg;
	warpPerspective(imageA, DstImg, Homo, Size(imageB.cols + imageA.cols, imageB.rows));
	imshow("透视变换", DstImg);

	imageB.copyTo(DstImg(Rect(imageA.cols, 0, imageB.cols, imageB.rows)));
	imshow("图像全景拼接", DstImg);

	return true;
}
bool OpenCV_Stitching(Mat imageA, Mat imageB)
{
vector<Mat>images;
images.push_back(imageA);
images.push_back(imageB);
Ptr<Stitcher>stitcher = Stitcher::create();
Mat result;
Stitcher::Status status = stitcher->stitch(images, result);// 使用stitch函数进行拼接
if (status != Stitcher::OK) return false;
imshow("OpenCV图像全景拼接", result);
return true;
}
int main()
{
Mat imageA = imread("image1.jpg");
Mat imageB = imread("image2.jpg");
if (imageA.empty() || imageB.empty())
{
cout << "No Image!" << endl;
system("pause");
return -1;
}
if (!Image_Stitching(imageA, imageB, true))
{
cout << "can not stitching the image!" << endl;
}
if (!OpenCV_Stitching(imageA, imageB))
{
cout << "can not stitching the image!" << endl;
}
waitKey(0);
system("pause");
return 0;
}小编使用OpenCV C++进行图像全景拼接,关键步骤有以下几点。
1、使用特征检测算子提取两幅图像的关键点,然后进行特征描述子匹配。
2、筛选出匹配程度高的关键点计算两幅图的单应性矩阵。
3、利用计算出来的单应性矩阵对其中一张图片进行透视变换。
4、将透视变换的图片与另一张图片进行拼接。
看完上述内容,你们掌握C++ OpenCV如何进行图像全景拼接的方法了吗?如果还想学到更多技能或想了解更多相关内容,欢迎关注亿速云行业资讯频道,感谢各位的阅读!
免责声明:本站发布的内容(图片、视频和文字)以原创、转载和分享为主,文章观点不代表本网站立场,如果涉及侵权请联系站长邮箱:is@yisu.com进行举报,并提供相关证据,一经查实,将立刻删除涉嫌侵权内容。


