这篇文章主要讲解了“Android如何实现微信小程序滑块验证”,文中的讲解内容简单清晰,易于学习与理解,下面请大家跟着小编的思路慢慢深入,一起来研究和学习“Android如何实现微信小程序滑块验证”吧!
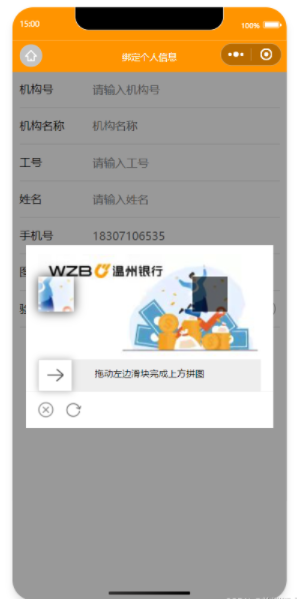
如图:
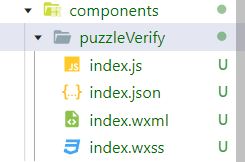
puzzleVerify目录
index.wxml
<!-- 滑动验证弹窗 -->
<view class="slide_model" wx:if="{{slidebel}}">
	<view class="slide_wrapper">
		<!-- 拼图图片部分 -->
		<view class="canvas_img" id="canvas_img">
			<!-- 背景图片 -->
			<canvas  canvas-id="firstCanvas" id="firstCanvas"></canvas>
			<!-- 被抠方块 -->
			<cover-view class="canvas_view" ></cover-view>
			<!-- 可移动空格 -->
			<cover-image class="canfile_image"

				src="{{canfile_image}}"></cover-image>
		</view>
		<!-- 滑块 -->
		<view class="canvas_slide">
			<view class="canvas_width"
				>
			</view>
			<view class="canvas_kus" bindtouchstart="slide_start" bindtouchmove="slide_hmove" bindtouchend="slide_chend"
				>
				<view wx:if="{{slide_status < 2}}"
					>
				</view>
				<view wx:if="{{slide_status == 2}}">
					<image src="/imgs/puzzle-checked.png" mode="aspectFit"
						>
					</image>
				</view>
				<view wx:if="{{slide_status == 3}}">
					<image src="/imgs/puzzle-fail.png" mode="aspectFit"
						>
					</image>
				</view>
			</view>
			<view wx:if="{{slide_status == 0 || slide_status == 1}}">拖动左边滑块完成上方拼图</view>
		</view>
		<!-- 底部按钮 -->
		<view class="canvas_guil">
			<image bindtap="visidlisd" class="footer-icon" src="/imgs/puzzle-close.png"
				></image>
			<image bindtap="slide_tap" class="footer-icon" src="/imgs/puzzle-fresh.png"
				></image>
		</view>
	</view>
</view>
index.wxss
/* 拼图滑动验证 */
.slide_model {
  width: 100%;
  height: 100vh;
  z-index: 999;
  position: fixed;
  left: 0;
  top: 0;
  background: rgba(0, 0, 0, 0.4);
  display: flex;
  align-items: center;
  justify-content: center;
}
.slide_wrapper {
  float: left;
  z-index: 1;
  position: relative;
  width: 90%;
  background-color: #fff;
}
.canvas_img {
  width: 90%;
  min-height: 150px;
  position: relative;
  margin: 25rpx auto 0;
}
#firstCanvas {
  z-index: 1 !important;
  width: 100%;
  height: 100%;
}
/* 被抠的空格 */
.canvas_view {
  width: 50px;
  height: 50px;
  position: absolute;
  background: rgba(0, 0, 0, 0.6);
  z-index: 2;
  box-shadow: 0 0 5px 2px rgba(255, 255, 255, 0.5);
}
/* 移动的空格 */
.canfile_image {
  width: 50px;
  height: 50px;
  position: absolute;
  left: 0;
  z-index: 3;
  box-shadow: 0px 0px 15px rgba(0, 0, 0, 0.8);
  box-sizing: border-box;
}
.canfile_image::before {
  content: "";
  position: absolute;
  width: 100%;
  height: 100%;
  box-shadow: 0 0 8px 5px rgba(255, 255, 255, 0.8) inset;
}
.canvas_slide {
  width: 90%;
  height: 45px;
  background: #eee;
  text-align: center;
  line-height: 80rpx;
  margin: 0 auto;
  position: relative;
  font-size: 26rpx;
}
/* 滑条上滑块经过的部分 */
.canvas_width {
  position: absolute;
  left: 0;
  top: 0;
  height: 45px;
  background-color: #1991FA;
  width: 0;
  border-top: 1px solid #ddd;
  border-bottom: 1px solid #ddd;
}
/* 滑块 */
.canvas_kus {
  width: 48px;
  height: 45px;
  background-color: #fff;
  font-size: 36rpx;
  font-weight: 700;
  position: absolute;
  left: 0;
  top: 0;
  border: 1px solid #ddd;
  color: #fff;
  box-shadow: 0 0 10px rgba(0, 0, 0, 0.3);
}
.canvas_kus>view {
  width: 100%;
  height: 100%;
  background-position: center;
  background-size: 50% 40%;
  background-repeat: no-repeat;
}
/* 底部按钮位置 */
.canvas_guil {
  width: 100%;
  border-top: 1px solid #f4f4f4;
  height: 100rpx;
  display: flex;
  align-items: center;
  float: left;
  font-size: 30rpx;
  color: #666;
}
.canvas_guil>image {
  margin-left: 30rpx;
}
index.js
Component({
	/**
	 * 组件的属性列表
	 */
	properties: {
		sildeBlockCont: {   //接受父组件值
			type: String
		}
	},
	/**
	 * 组件的初始数据
	 */
	data: {
		canvas_width: 0,
		slidebel: false, //滑动弹窗
		canfile_image: '', //裁剪图片
		canfile_x: '', //被抠方块的水平位置
		canfile_y: '', //被抠方块的垂直位置
		slide_clientX: 0, //移动位置
		slide_status: 0, //0 停止操作   1 触发长按   2 正确   3 错误
	},
	/**
	 * 组件的方法列表
	 */
	methods: {
		// 弹窗
		visidlisd(e) {
			var that = this
			this.setData({
				slidebel: !this.data.slidebel
			})
			if (this.data.slidebel) {
				if (this.data.canvas_width != 0) {
					this.slide_tap()
					return
				}
				wx.nextTick(() => {
					let query = this.createSelectorQuery()
					query.select('#canvas_img').boundingClientRect(function (rect) {
						that.setData({
							canvas_width: rect.width
						})
						that.slide_tap()
					}).exec()
				})
			}
		},
		// 画布
		slide_tap(e) {
			var that = this
			var imgIndex = Math.round(Math.random() * 13 + 1)
			that.setData({
				canfile_x: Math.round(Math.random() * (this.data.canvas_width - 120) + 60),
				canfile_y: Math.round(Math.random() * (this.data.canvas_width * 13 / 28 - 60)),
				canfile_image: ''
			})
			setTimeout(function () {
				var context = wx.createCanvasContext('firstCanvas', that)
				context.width = that.data.canvas_width
				context.height = that.data.canvas_width * 13 / 28

				//  /imgs/puzzle-bg-${imgIndex}.jpg  为滑块背景图 从静态资源获取  如从接口获取可从that.properties.properties拿
				context.drawImage(`/imgs/puzzle-bg-${imgIndex}.jpg`, 0, 0, context.width, context.height)
				context.draw(false, (() => {
					wx.canvasToTempFilePath({
						x: that.data.canfile_x,
						y: that.data.canfile_y,
						width: 50,
						height: 50,
						canvasId: 'firstCanvas',
						success: function (res) {
							that.setData({
								canfile_image: res.tempFilePath
							})
						}
					}, that);
				}))
			}, 50)
		},
		// 滑动开始
		slide_start(e) {
			this.setData({
				slide_status: 1
			})
		},
		// 滑动中
		slide_hmove(e) {
			this.setData({
				slide_clientX: (e.touches[0].clientX - 60) < 1 ? 0 : (e.touches[0].clientX - 60)
			})
		},
		//滑动结束
		slide_chend(e) {
			var that = this
			var cliextX;
			var maxX = this.data.canvas_width - 60
			if (that.data.slide_clientX < 1) {
				that.data.slide_status = 0
				return false
			}
			if (that.data.slide_clientX > maxX) {
				cliextX = maxX
			} else {
				cliextX = that.data.slide_clientX
			}
			if (((that.data.canfile_x + 5) > cliextX) && ((that.data.canfile_x - 5) < cliextX)) {
				that.setData({
					slide_status: 2,
					slide_clientX: that.data.canfile_x,
				})
				setTimeout(function () {
					that.setData({
						slidebel: false,
					})
				}, 500)
				wx.showToast({
					icon: 'success',
					title: '验证成功',
				})
				that.triggerEvent('puzzleVerify')
			} else {
				that.setData({
					slide_status: 3,
				})
			}
			setTimeout(function () {
				that.setData({
					slide_status: 0,
					slide_clientX: 0,
				})
			}, 500)
		},
	},
	lifetimes: {
		created() {
			// 在组件实例刚刚被创建时执行
		},
		ready() {
			// 在组件在视图层布局完成后执行
			// console.log(this.properties.sildeBlockCont);
		},
	}
})
index.json
{
  "component": true,
  "usingComponents": {}
}
json
"usingComponents": {
    "puzzleVerify": "/components/puzzleVerify/index"
  }
wxml
<button  bindtap="getCode"></button>
<puzzleVerify id="puzzleVerify" bind:puzzleVerify="countDown" sildeBlockCont="{{sildeBlockCont}}"></puzzleVerify>
js
	data: {
		sildeBlockCont: '', //滑块背景图
	},
	onReady: function () {
		this.puzzleVerify = this.selectComponent("#puzzleVerify")
	},
	getCode() {
		this.puzzleVerify.visidlisd()
	},
	// 滑块验证成功操作
	countDown() {}
感谢各位的阅读,以上就是“Android如何实现微信小程序滑块验证”的内容了,经过本文的学习后,相信大家对Android如何实现微信小程序滑块验证这一问题有了更深刻的体会,具体使用情况还需要大家实践验证。这里是亿速云,小编将为大家推送更多相关知识点的文章,欢迎关注!
免责声明:本站发布的内容(图片、视频和文字)以原创、转载和分享为主,文章观点不代表本网站立场,如果涉及侵权请联系站长邮箱:is@yisu.com进行举报,并提供相关证据,一经查实,将立刻删除涉嫌侵权内容。


