鲁春利的工作笔记,好记性不如烂笔头
Solr is the popular, blazing-fast, open source enterprise search platform built on Apache Lucene.
Lucene官网地址为:http://lucene.apache.org/
Solr官网地址为:http://lucene.apache.org/solr/
Lucene与Solr的最新版本都为5.4.0,这里学习时采用的是5.3.0版本。
说明:Solr解压后docs目录为其帮助信息,也可以通过http://wiki.apache.org/solr/查看帮助。
1、解压
tar -xzv -f solr-5.3.0.tgz

# 解压后目录结构:
[hadoop@nnode solr-5.3.0]$ ll
总用量 1160
drwxr-xr-x  3 hadoop hadoop   4096 8月  12 17:16 bin
-rw-r--r--  1 hadoop hadoop 502443 8月  17 18:23 CHANGES.txt
drwxr-xr-x 13 hadoop hadoop   4096 8月  17 19:42 contrib
drwxrwxr-x  4 hadoop hadoop   4096 1月  21 12:28 dist
drwxrwxr-x 19 hadoop hadoop   4096 1月  21 12:28 docs
drwxr-xr-x  7 hadoop hadoop   4096 1月  21 12:28 example
drwxr-xr-x  2 hadoop hadoop  36864 1月  21 12:28 licenses
-rw-r--r--  1 hadoop hadoop  12646 8月  12 17:16 LICENSE.txt
-rw-r--r--  1 hadoop hadoop 565851 8月  17 18:23 LUCENE_CHANGES.txt
-rw-r--r--  1 hadoop hadoop  26529 8月  12 17:16 NOTICE.txt
-rw-r--r--  1 hadoop hadoop   7167 8月  12 17:16 README.txt
drwxr-xr-x 11 hadoop hadoop   4096 1月  21 12:28 server   #Solr5开始使用的服务端程序目录
[hadoop@nnode solr-5.3.0]$
说明:Solr需要依赖于Jvava,这里使用的jdk版本为1.7。
java version "1.7.0_80"
Java(TM) SE Runtime Environment (build 1.7.0_80-b15)
Java HotSpot(TM) 64-Bit Server VM (build 24.80-b11, mixed mode)
2、启动Solr
[hadoop@nnode solr-5.3.0]$ bin/solr -V
Using Solr root directory: /lucl/solr-5.3.0
Using Java: /lucl/jdk1.7.0_80/bin/java
java version "1.7.0_80"
Java(TM) SE Runtime Environment (build 1.7.0_80-b15)
Java HotSpot(TM) 64-Bit Server VM (build 24.80-b11, mixed mode)

Solr home directory /lucl/solr-5.3.0 must contain a solr.xml file!

[hadoop@nnode solr-5.3.0]$
说明:SOLR_HOME变量暂时无需配置,否则在通过bin/solr start启动的时候会在SOLR_HOME目录下查找solr.xml文件,而该目录下是没有solr.xml文件的。
# 通过如下命令启动solr
[hadoop@nnode solr-5.3.0]$ bin/solr start
Waiting up to 30 seconds to see Solr running on port 8983 [/]
Started Solr server on port 8983 (pid=3608). Happy searching!

[hadoop@nnode solr-5.3.0]$
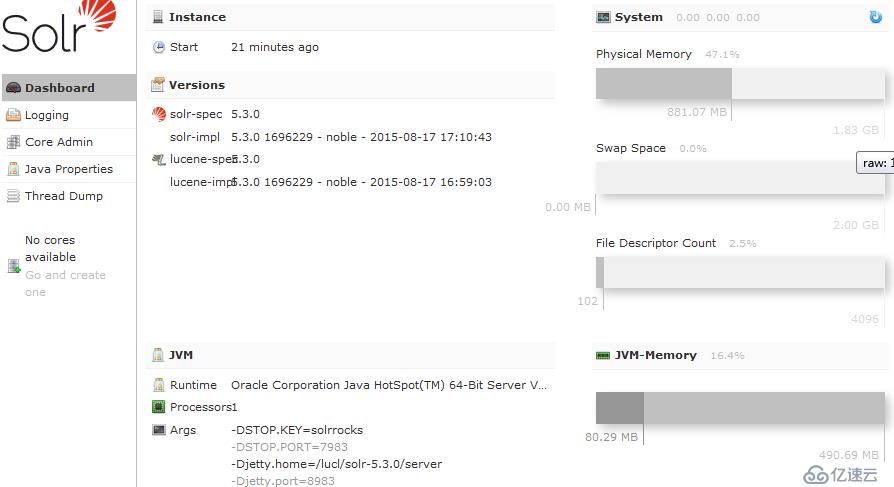
查看Web UI

3、脚本介绍
[hadoop@nnode solr-5.3.0]$ bin/solr -help

Usage: solr COMMAND OPTIONS
       where COMMAND is one of: start, stop, restart, status, healthcheck, create,
                                create_core, create_collection, delete

  Standalone server example (start Solr running in the background on port 8984):

    ./solr start -p 8984

  SolrCloud example (start Solr running in SolrCloud mode using localhost:2181 to
                      connect to ZooKeeper, with 1g max heap size and remote Java
                      debug options enabled
                     ):

    ./solr start -c -m 1g -z localhost:2181 -a "-Xdebug -Xrunjdwp:transport=dt_socket,
                                                server=y,suspend=n,address=1044"

Pass -help after any COMMAND to see command-specific usage information,
  such as:    ./solr start -help or ./solr stop -help

[hadoop@nnode solr-5.3.0]$
说明:Solr有两种运行模式,一个是单机模式,一个是集群模式(即SolrCloud)。
[hadoop@nnode solr-5.3.0]$ bin/solr start -help

Usage: solr start [-f] [-c] [-h hostname] [-p port] [-d directory]
                  [-z zkHost] [-m memory] [-e example] [-s solr.solr.home]
                  [-a "additional-options"] [-V]

  -f            Start Solr in foreground; default starts Solr in the background
                  and sends stdout / stderr to solr-PORT-console.log

  -c or -cloud  Start Solr in SolrCloud mode; if -z not supplied, an embedded ZooKeeper
                  instance is started on Solr port+1000, such as 9983 if Solr is bound to 8983

  -h <host>     Specify the hostname for this Solr instance

  -p <port>     Specify the port to start the Solr HTTP listener on; default is 8983
                  The specified port (SOLR_PORT) will also be used to determine the stop port
                  STOP_PORT=($SOLR_PORT-1000) and JMX RMI listen port RMI_PORT=(1$SOLR_PORT).
                  For instance, if you set -p 8985, then the STOP_PORT=7985 and RMI_PORT=18985

  -d <dir>      Specify the Solr server directory; defaults to server

  -z <zkHost>   ZooKeeper connection string; only used when running in SolrCloud mode using -c
                   To launch an embedded ZooKeeper instance, don't pass this parameter.

  -m <memory>   Sets the min (-Xms) and max (-Xmx) heap size for the JVM, such as: -m 4g
                  results in: -Xms4g -Xmx4g; by default, this script sets the heap size to 512m

  -s <dir>      Sets the solr.solr.home system property, the default value is server/solr。
                  Solr will create core directories under this directory. This allows you to
                  run multiple Solr instances on the same host while reusing the same server
                  directory set using the -d parameter.
                  If set, the specified directory should contain a solr.xml file, unless solr.xml
                  exists in ZooKeeper.This parameter is ignored when running examples (-e), as the
                  solr.solr.home depends on which example is run.

  -e <example>  Name of the example to run; available examples:
      cloud:         SolrCloud example
      techproducts:  Comprehensive example illustrating many of Solr's core capabilities
      dih:           Data Import Handler
      schemaless:    Schema-less example

  -a            Additional parameters to pass to the JVM when starting Solr, such as to setup
                  Java debug options. For example, to enable a Java debugger to attach to the Solr JVM
                  you could pass: -a "-agentlib:jdwp=transport=dt_socket,server=y,suspend=n,address=18983"
                  In most cases, you should wrap the additional parameters in double quotes.

  -noprompt     Don't prompt for input; accept all defaults when running examples that accept user input

  -V            Verbose messages from this script

[hadoop@nnode solr-5.3.0]$
4、Start Solr with a Specific Example Configuration

[hadoop@nnode solr-5.3.0]$ bin/solr -f -e techproducts

WARNING: Foreground mode (-f) not supported when running examples.

Creating Solr home directory /lucl/solr-5.3.0/example/techproducts/solr

Starting up Solr on port 8983 using command:
bin/solr start -p 8983 -s "example/techproducts/solr"

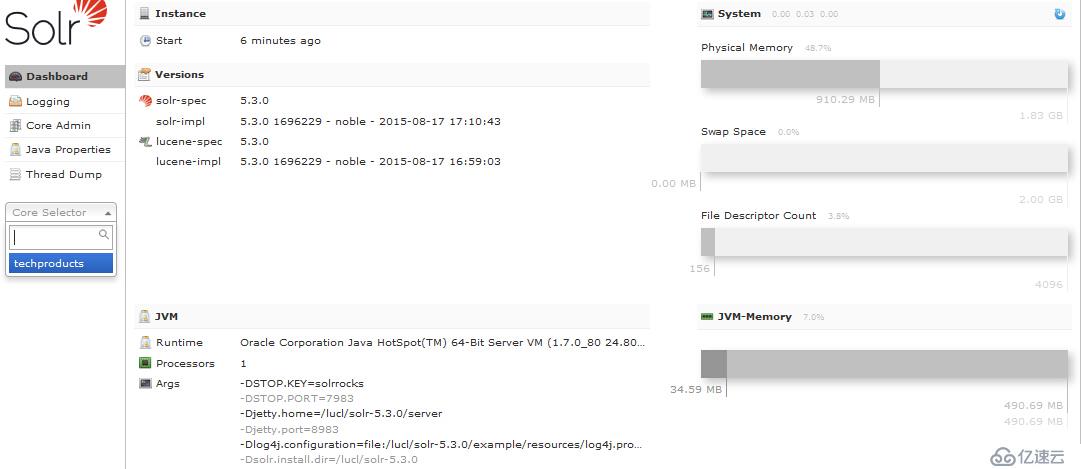
Waiting up to 30 seconds to see Solr running on port 8983 [/]
Started Solr server on port 8983 (pid=4436). Happy searching!


Setup new core instance directory:
/lucl/solr-5.3.0/example/techproducts/solr/techproducts

// 略
查看状态
[hadoop@nnode solr-5.3.0]$ bin/solr status

Found 1 Solr nodes:

Solr process 4436 running on port 8983
{
  "solr_home":"/lucl/solr-5.3.0/example/techproducts/solr/",
  "version":"5.3.0 1696229 - noble - 2015-08-17 17:10:43",
  "startTime":"2016-01-24T13:44:41.338Z",
  "uptime":"0 days, 0 hours, 3 minutes, 3 seconds",
  "memory":"34.6 MB (%7) of 490.7 MB"}

[hadoop@nnode solr-5.3.0]$
5、Web访问
http://nnode:8983/solr

6、Create a Core
[hadoop@nnode solr-5.3.0]$ bin/solr create -help

Usage: solr create [-c name] [-d confdir] [-n configName]
                   [-shards #] [-replicationFactor #] [-p port]

  Create a core or collection depending on whether Solr is running in standalone (core)
  or SolrCloud mode (collection).
  In other words, this action detects which mode Solr is running in, and then takes
  the appropriate action (either create_core or create_collection).

  For detailed usage instructions, do:

    bin/solr create_core -help

       or

    bin/solr create_collection -help

[hadoop@nnode solr-5.3.0]$
说明:
Core: 也就是Solr Core,一个Solr中包含一个或者多个Solr Core,每个Solr Core可以独立提供索引和查询功能,每个Solr Core对应一个索引或者Collection的Shard,Solr Core的提出是为了增加管理灵活性和共用资源。在SolrCloud中有个不同点是它使用的配置是在Zookeeper中的,传统的Solr core的配置文件是在磁盘上的配置目录中。
Collection:在SolrCloud集群中逻辑 意义上的完整的索引。它常常被划分为一个或多个Shard,它们使用相同的Config Set。如果Shard数超过一个,它就是分布式索引,SolrCloud让你通过Collection名称引用它,而不需要关心分布式检索时需要使用的 和Shard相关参数。
Shard: Collection的逻辑分片。每个Shard被化成一个或者多个replicas,通过选举确定哪个是Leader。
Replica: Shard的一个拷贝。每个Replica存在于Solr的一个Core中。
[hadoop@nnode solr-5.3.0]$ bin/solr create -c testcore

7、添加数据
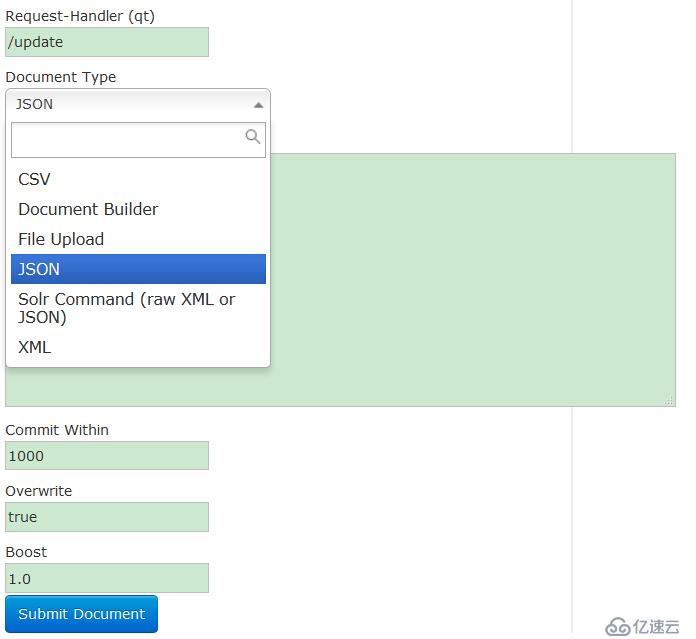
Solr支持上传很多种数据格式,如CSV、JSON、XML等,选中testcore下面的Documents。

8、数据查询
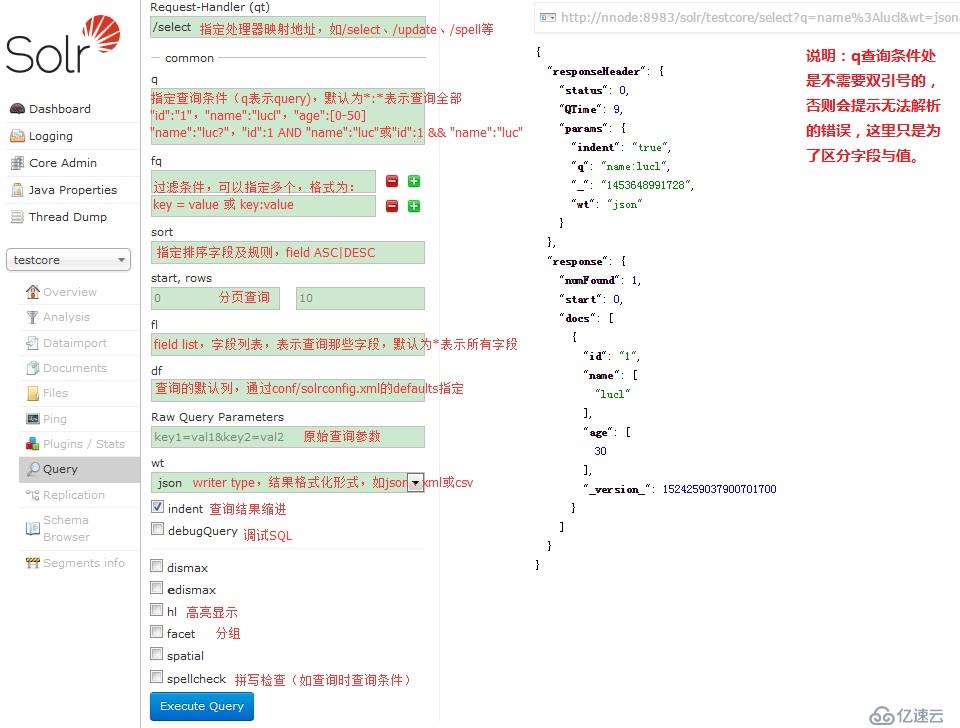
通过Solr的Web页面可以执行多种条件的数据查询,选中testcore下面的Query。

9、停止服务
[hadoop@nnode solr-5.3.0]$ bin/solr stop -help

Usage: solr stop [-k key] [-p port] [-V]

  -k <key>      Stop key; default is solrrocks

  -p <port>     Specify the port the Solr HTTP listener is bound to

  -all          Find and stop all running Solr servers on this host

  NOTE: To see if any Solr servers are running, do: solr status

[hadoop@nnode solr-5.3.0]$
免责声明:本站发布的内容(图片、视频和文字)以原创、转载和分享为主,文章观点不代表本网站立场,如果涉及侵权请联系站长邮箱:is@yisu.com进行举报,并提供相关证据,一经查实,将立刻删除涉嫌侵权内容。