这篇文章主要介绍了Fedora 23如何安装LAMP服务器,具有一定借鉴价值,感兴趣的朋友可以参考下,希望大家阅读完这篇文章之后大有收获,下面让小编带着大家一起了解一下。
LAMP其实就是Linux+Apache+PHP+MySQL环境,

Apache 是一款开源的 web 服务框架。完全支持 CGI, SSL。
切换到 root 账户:

su

Fedora 23/22 输入以下命令来安装Apache:

dnf install httpd -y

Fedora 21 及更早的版本:

yum install httpd -y

启动httpd服务,以在每次系统启动服务:

systemctl enable httpd

使用以下命令来启动httpd服务:

systemctl start httpd如果您遇到以下错误:
Job for httpd.service failed. See ‘systemctl status httpd.service’ and ‘journalctl -xn’ for details.
删除所有内容在/etc/hostname,并加上“localhost”。同时,在/etc/httpd/conf/httpd.conf文件中的“Servername”的值设定为“localhost”,并再次尝试启动httpd服务。
并调整防火墙以允许httpd服务,从远程客户端访问。
firewall-cmd --permanent --add-service=http

firewall-cmd --permanent --add-service=https重新启动firewalld服务:
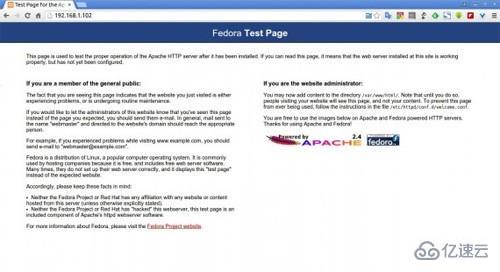
firewall-cmd --reload打开浏览器,输入服务器IP访问:
Fedora 23/22 用户安装命令:
dnf install mariadb mariadb-server -y
Fedora 21 及早前版本命令:
yum install mariadb mariadb-server -y
随系统自动启动命令:
systemctl enable mariadb启动数据库服务器:
systemctl start mariadb设置 MariaDB root 账户密码,默认情况下MySQL root用户的密码为空。因此,以防止未经授权的访问MySQL数据库,我们设置需要root用户密码:
mysql_secure_installation
NOTE: RUNNING ALL PARTS OF THIS SCRIPT IS RECOMMENDED FOR ALL MariaDB
SERVERS IN PRODUCTION USE! PLEASE READ EACH STEP CAREFULLY!
In order to log into MariaDB to secure it, we’ll need the current
password for the root user. If you’ve just installed MariaDB, and
you haven’t set the root password yet, the password will be blank,
so you should just press enter here.
Enter current password for root (enter for none):
OK, successfully used password, moving on…
Setting the root password ensures that nobody can log into the MariaDB
root user without the proper authorisation.
You already have a root password set, so you can safely answer ‘n’.
Change the root password? [Y/n] y ## Enter ‘y’ and press enter ##
New password: ## Enter password ##
Re-enter new password: ## Re-enter password ##
Password updated successfully!
Reloading privilege tables..
… Success!
By default, a MariaDB installation has an anonymous user, allowing anyone
to log into MariaDB without having to have a user account created for
them. This is intended only for testing, and to make the installation
go a bit smoother. You should remove them before moving into a
production environment.
Remove anonymous users? [Y/n] ## Press Enter ##
… Success!
Normally, root should only be allowed to connect from ‘localhost’. This
ensures that someone cannot guess at the root password from the network.
Disallow root login remotely? [Y/n] ## Press Enter ##
… Success!
By default, MariaDB comes with a database named ‘test’ that anyone can
access. This is also intended only for testing, and should be removed
before moving into a production environment.
Remove test database and access to it? [Y/n] ## Press Enter ##
– Dropping test database…
ERROR 1008 (HY000) at line 1: Can’t drop database ‘test’; database doesn’t exist
… Failed! Not critical, keep moving…
– Removing privileges on test database…
… Success!
Reloading the privilege tables will ensure that all changes made so far
will take effect immediately.
Reload privilege tables now? [Y/n] ## Press Enter ##
… Success!
Cleaning up…
All done! If you’ve completed all of the above steps, your MariaDB
installation should now be secure.
Thanks for using MariaDB!
Fedora 23/22 用户命令:
dnf install php -y
Fedora 21 及早期版本:
yum install php -y
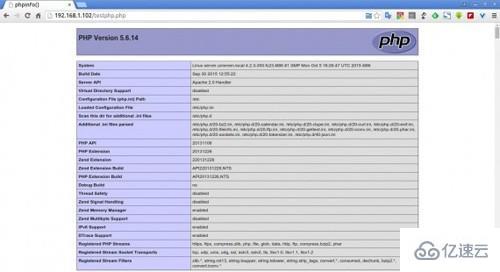
测试PHP是否运行:
vi /var/www/html/testphp.php输入以下内容:
重启 Http 服务:
systemctl restart httpd
浏览器输入看看:
搜索模块并安装:
Fedora 23/22 用户:
dnf search phpFedora 22及早期版本:
yum search php现在安装你所选择所需模块,例如php-mysql,使用以下命令:
Fedora 23/22 用户:
dnf install php-mysql -y
Fedora 22及早期版本:
yum install php-mysql -y
重启 HTTP 服务:
systemctl restart httpd
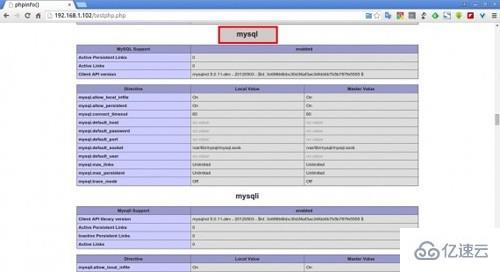
浏览器查看模块安装是否成功:
phpmyadmin 用于管理数据库:
Fedora 23/22 用户:
dnf install phpmyadmin -y
Fedora 22及早期版本:
yum install phpmyadmin -y
缺省情况下,phpMyAdmin 只能从本地主机进行访问。若要从远程系统访问您的网络中,请执行下列操作步骤。
vi /etc/httpd/conf.d/phpMyAdmin.conf查找并注释掉127.0.0.1 和请求 ip ::1 lines。然后添加一个额外的行要求所有授予略低于为注释行。
这是我的更改后的 phpMyAdmin.conf 文件。这些变化以粗体标记。
[...]

Alias /phpMyAdmin /usr/share/phpMyAdmin

Alias /phpmyadmin /usr/share/phpMyAdmin  AddDefaultCharset UTF-8

      # Apache 2.4    #       Require ip 127.0.0.1#       Require ip ::1       Require all granted

            # Apache 2.2    Order Deny,Allow

    Deny from All

    Allow from 127.0.0.1

    Allow from ::1

        # Apache 2.4    #       Require ip 127.0.0.1#       Require ip ::1       Require all granted

[...]重要提示:不过让localhost以外的人访问数据库,应视为危险,除非通过SSL适当保护。做到这一点需要您自担风险。
保存并关闭文件。重新启动httpd服务。
systemctl restart httpd
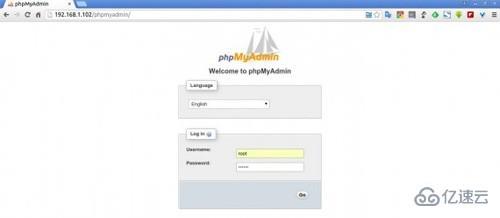
OK,打开 phpmyadmin 测试一下:
好了,安装完毕!
感谢你能够认真阅读完这篇文章,希望小编分享的“Fedora 23如何安装LAMP服务器”这篇文章对大家有帮助,同时也希望大家多多支持亿速云,关注亿速云行业资讯频道,更多相关知识等着你来学习!
亿速云「云服务器」,即开即用、新一代英特尔至强铂金CPU、三副本存储NVMe SSD云盘,价格低至29元/月。点击查看>>
免责声明:本站发布的内容(图片、视频和文字)以原创、转载和分享为主,文章观点不代表本网站立场,如果涉及侵权请联系站长邮箱:is@yisu.com进行举报,并提供相关证据,一经查实,将立刻删除涉嫌侵权内容。