这篇文章主要讲解了“Android线性布局与相对布局如何实现”,文中的讲解内容简单清晰,易于学习与理解,下面请大家跟着小编的思路慢慢深入,一起来研究和学习“Android线性布局与相对布局如何实现”吧!
| 名字 | 含义 |
|---|---|
| android:id | 设置一个id方便使用 |
| android:layout_width | 宽度 |
| android:layout_height | 高度 |
| android:background | 设置背景颜色 |
| android:layout_margin | 设置外边距 |
| android:layout_padding | 设置内边距 |
| android:orientation | 设置方向(水平或者垂直) |
练习代码
<?xml version="1.0" encoding="utf-8"?>
<LinearLayout xmlns:android="http://schemas.android.com/apk/res/android"
    android:layout_width="match_parent"
    android:orientation="vertical"
    android:layout_height="match_parent">

    <LinearLayout
        android:id="@+id/ll_1"
        android:layout_width="200dp"
        android:layout_height="200dp"
        android:orientation="vertical"
        android:background="#000000"
        android:paddingLeft="20dp"
        android:paddingRight="20dp"
        android:paddingTop="50dp"
        android:paddingBottom="10dp">

        <View
            android:layout_width="match_parent"
            android:layout_height="match_parent"
            android:background="#FF0033"/>

    </LinearLayout>

    <LinearLayout
        android:layout_width="match_parent"
        android:layout_height="200dp"
        android:orientation="horizontal"
        android:background="#0066FF"
        android:layout_marginTop="20dp"
        android:layout_marginLeft="15dp"
        android:layout_marginRight="15dp">

        <View
            android:layout_width="0dp"
            android:layout_height="match_parent"
            android:background="#000000"
            android:layout_weight="1"/>
        <View
            android:layout_width="0dp"
            android:layout_height="match_parent"
            android:background="#FF0033"
            android:layout_weight="1"/>
        <View
            android:layout_width="0dp"
            android:layout_height="match_parent"
            android:background="#55AA99"
            android:layout_weight="1"/>


    </LinearLayout>

</LinearLayout>实现效果

最常用属性
| 名字 | 含义 |
|---|---|
| android:layout_toLeftOf | 在什么的左边 |
| android:layout_toRightOf | 在什么的右边 |
| android:layout_alignBottom | 跟什么底部对齐 |
| android:layout_alignParentBottom | 与父控件底部对齐 |
| android:layout_below | 在什么的底部 |
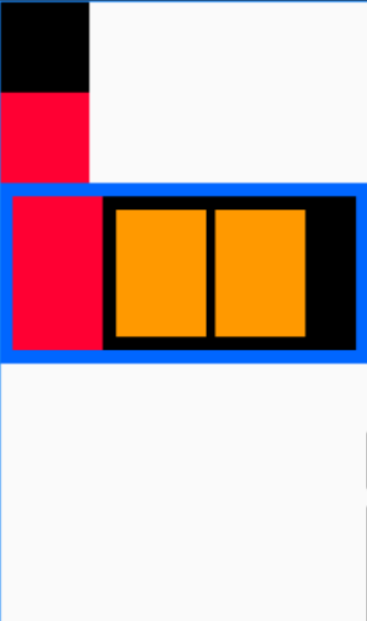
样例效果
<?xml version="1.0" encoding="utf-8"?>
<RelativeLayout xmlns:android="http://schemas.android.com/apk/res/android"
    android:layout_width="match_parent"
    android:layout_height="match_parent">

    <View
        android:id="@+id/view_1"
        android:layout_width="100dp"
        android:layout_height="100dp"
        android:background="#000000" />

    <View
        android:id="@+id/view_2"
        android:layout_width="100dp"
        android:layout_height="100dp"
        android:layout_below="@id/view_1"
        android:background="#FF0033" />

    <LinearLayout
        android:id="@+id/ll_1"
        android:layout_width="match_parent"
        android:layout_height="200dp"
        android:layout_below="@id/view_2"
        android:background="#0066FF"
        android:orientation="horizontal"
        android:padding="15dp">

        <View
            android:layout_width="100dp"
            android:layout_height="match_parent"
            android:background="#FF0033" />

        <RelativeLayout
            android:layout_width="match_parent"
            android:layout_height="match_parent"
            android:background="#000000"
            android:padding="15dp">

            <View
                android:id="@+id/view_3"
                android:layout_width="100dp"
                android:layout_height="match_parent"
                android:background="#FF9900"/>
            <View
                android:id="@+id/view_4"
                android:layout_width="100dp"
                android:layout_height="match_parent"
                android:background="#FF9900"
                android:layout_toRightOf="@id/view_3"
                android:layout_marginLeft="10dp"/>

        </RelativeLayout>
    </LinearLayout>


</RelativeLayout>实现效果

感谢各位的阅读,以上就是“Android线性布局与相对布局如何实现”的内容了,经过本文的学习后,相信大家对Android线性布局与相对布局如何实现这一问题有了更深刻的体会,具体使用情况还需要大家实践验证。这里是亿速云,小编将为大家推送更多相关知识点的文章,欢迎关注!
亿速云「云服务器」,即开即用、新一代英特尔至强铂金CPU、三副本存储NVMe SSD云盘,价格低至29元/月。点击查看>>
免责声明:本站发布的内容(图片、视频和文字)以原创、转载和分享为主,文章观点不代表本网站立场,如果涉及侵权请联系站长邮箱:is@yisu.com进行举报,并提供相关证据,一经查实,将立刻删除涉嫌侵权内容。