这篇“vue怎么自定义和使用开关组件”文章的知识点大部分人都不太理解,所以小编给大家总结了以下内容,内容详细,步骤清晰,具有一定的借鉴价值,希望大家阅读完这篇文章能有所收获,下面我们一起来看看这篇“vue怎么自定义和使用开关组件”文章吧。
switch.vue:
<template>
  <div class="disLB">
    <div class="switch disLB" @click="toggleSwitch" :class="isOpen?'switch-on':''">
      <span class="disB switch-circle" :class="isOpen?'on':''"></span>
    </div>

  </div>
</template>

<script>
export default {
  data() {
    return {
      // isOpen: false
    }
  },
  props: ["isOpen"],
  methods: {
    toggleSwitch() {
      // 子组件不能直接修改父组件的数据,要通过$emit
      this.$emit('changeSwitch')
    }
  }

}
</script>

<style lang="less" scoped>
  .switch {
    position: relative;
    border-radius: 20px;
    border: 1px solid #dfdfdf;
    width: 45px;
    height: 23px;
    .switch-circle {
      position: absolute;
      width: 21px;
      height: 21px;
      background-color: #fff;
      border-radius: 50%;
      border: 1px solid #dfdfdf;
      box-shadow: 0 1px 1px #ccc;
    }
    .on {
      right: 0;
      // background-color: #64bd63;
      border-color: #64bd63;
      transform: translate(X);
      transition: transform 0.5s, right 0.5s;
    }
  }
  .switch-on {
    background-color: #64bd63;
  }
</style>在父组件中引入并传值使用:
<template>
    <toggle-switch :isOpen="systemConfig.enable_email" @changeSwitch="changeSwitch" v-model="systemConfig.enable_email"></toggle-switch>
</template>

<script>
import toggleSwitch from '../../components/switch.vue';
export default {
    data() {
        return {}
    },
    components: {
        toggleSwitch
    },
    methods: {
        changeSwitch() {
          this.systemConfig.enable_email = !this.systemConfig.enable_email;
        }
    }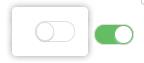
}效果图:
注:
父组件向子组件传值,可以直接通过:isOpen="systemConfig.enable_email"传递数据,子组件通过 prop 接收数据:props: ["isOpen"],;
但子组件不能直接修改父组件的数据,可以通过 $emit 调用父组件的方法来修改父组件的数据,$emit 的第一个参数要与父组件 @ 后的名称保持一致。
以上就是关于“vue怎么自定义和使用开关组件”这篇文章的内容,相信大家都有了一定的了解,希望小编分享的内容对大家有帮助,若想了解更多相关的知识内容,请关注亿速云行业资讯频道。
免责声明:本站发布的内容(图片、视频和文字)以原创、转载和分享为主,文章观点不代表本网站立场,如果涉及侵权请联系站长邮箱:is@yisu.com进行举报,并提供相关证据,一经查实,将立刻删除涉嫌侵权内容。


 计算
计算 安全
安全 数据库
数据库 网络和加速
网络和加速 企业服务
企业服务


