这篇文章主要介绍了Vue怎么实现时间轴功能的相关知识,内容详细易懂,操作简单快捷,具有一定借鉴价值,相信大家阅读完这篇Vue怎么实现时间轴功能文章都会有所收获,下面我们一起来看看吧。
<template>
  <div class="container">
    <div class="content">
      <div class="coin" v-for="(item,index1) in Math.ceil((list.length+1)/4)" :key="index1" v-show="isShow==index1">
        <div class="xs_one"></div>
        <div
          class="coinAll"
          v-for="(item, index) in list"
          :key="index"
          :class="{ one: index%4==0 }"
          v-show="index<(index1+1)*4 && index+1>(index1)*4"
        >
          <span
            :class="{
              two: (index + 1) % 2 == 0,
              text_active: index == isIndex,
            }"
          >
            {{ item }}
          </span>
          <div class="xs" :class="{ xs_active: index == isIndex }"></div>
          <img src="../assets/img/coin1.png" alt="" v-show="index == isIndex" />
          <img src="../assets/img/coin2.png" alt="" v-show="index != isIndex" />
        </div>
      </div>
      <div class="paging" :>
        <div class="pagings" v-for="(item,index1) in Math.ceil((list.length+1)/4)" :key="index1" @click="tabList(index1)" :class="{is_activ:isShow==index1}">{{index}}</div>
      </div>
    </div>
  </div>
</template>


<script>
export default {
  data() {
    return {
      list: ["实施方案", "任务书", "中期检查", "项目验收", "分页功能1","分页功能1","分页功能1","分页功能1","分页功能2"], //列表
      isIndex: 0, //高亮显示
      isShow: 1, //显示
    };
  },
  methods:{
    tabList(idx){
      this.isShow=idx
    }
  }
};
</script>


<style scoped>
.content {
  width: 400px;
  height: 120px;
  background: rgb(9, 27, 70);
  position: relative;
}
.paging{
  height: 20px;
  position: absolute;
  bottom: 10px;
  left: 50%;
  transform: translate(-50%);
}
.paging div{
  width: 15px;
  height: 15px;
  border-radius: 50%;
  background: rgb(120, 120, 120);
  float: left;
  margin-left: 5px;
}
.coin {
  width: 100%;
  height: 80px;
  background: rgb(9, 27, 70);
  position: relative;
  overflow-x: hidden;
}
.xs_one {
  width: 100%;
  height: 5px;
  background: rgb(61, 183, 270);
  position: absolute;
  top: 50%;
  left: 0;
  transform: translate(0, -50%);
}
.coin .coinAll {
  width: 100px;
  height: 100%;
  float: left;
  position: relative;
}

.coin .one {
  margin-left: -50px;
}
.coin .coinAll img {
  position: absolute;
  top: 50%;
  right: 0;
  transform: translate(0, -50%);
}
.coin .coinAll .xs {
  width: 100%;
  height: 5px;
  background: rgb(61, 183, 270);
  position: absolute;
  top: 50%;
  left: 0;
  transform: translate(0, -50%);
}

.coin .coinAll span {
  width: 100%;
  color: #fff;
  font-size: 16px;
  position: absolute;
  top: 5px;
}
.coin .coinAll .two {
  width: 100%;
  color: #fff;
  font-size: 16px;
  position: absolute;
  top: 55px;
}

/* 文字高亮 */
.coin .coinAll .text_active {
  color: rgb(245, 189, 39);
}

/* 线条高亮 */
.coin .coinAll .xs_active {
  background: rgb(245, 189, 39);
}
.paging .is_activ{
  background: rgb(26, 82, 229);
}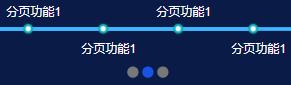
</style>效果如图

新增分页
关于“Vue怎么实现时间轴功能”这篇文章的内容就介绍到这里,感谢各位的阅读!相信大家对“Vue怎么实现时间轴功能”知识都有一定的了解,大家如果还想学习更多知识,欢迎关注亿速云行业资讯频道。
亿速云「云服务器」,即开即用、新一代英特尔至强铂金CPU、三副本存储NVMe SSD云盘,价格低至29元/月。点击查看>>
免责声明:本站发布的内容(图片、视频和文字)以原创、转载和分享为主,文章观点不代表本网站立场,如果涉及侵权请联系站长邮箱:is@yisu.com进行举报,并提供相关证据,一经查实,将立刻删除涉嫌侵权内容。


 计算
计算 安全
安全 数据库
数据库 网络和加速
网络和加速 企业服务
企业服务


