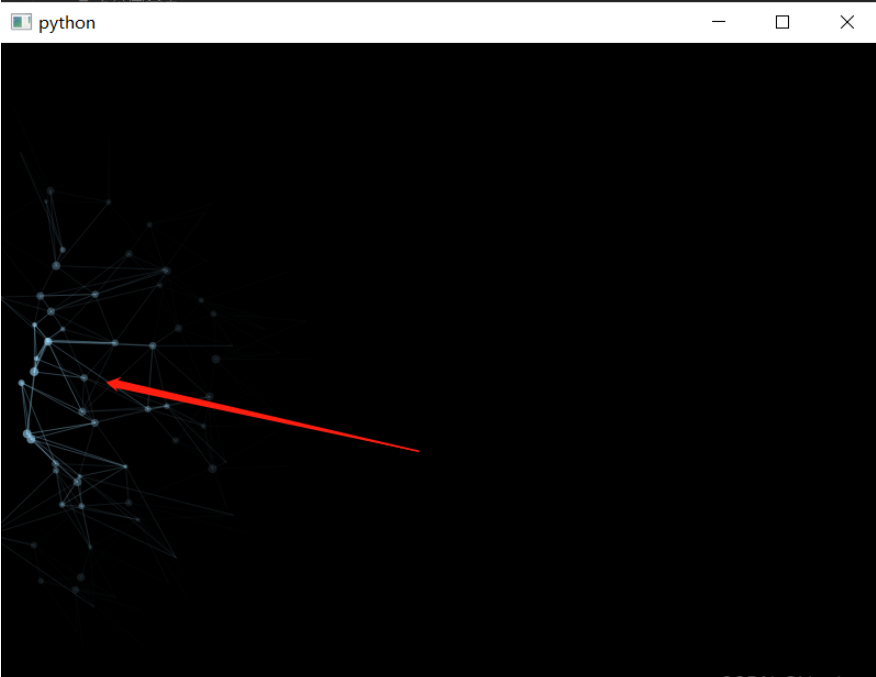
这篇“如何用PyQt5模拟实现网页鼠标移动特效”文章的知识点大部分人都不太理解,所以小编给大家总结了以下内容,内容详细,步骤清晰,具有一定的借鉴价值,希望大家阅读完这篇文章能有所收获,下面我们一起来看看这篇“如何用PyQt5模拟实现网页鼠标移动特效”文章吧。
核心代码:
from random import random
from time import time
from PyQt5.QtCore import QPropertyAnimation, QObject, pyqtProperty, QEasingCurve,\
    Qt, QRectF, pyqtSignal
from PyQt5.QtGui import QColor, QPainterPath, QPainter
from PyQt5.QtWidgets import QWidget
__Author__ = """By: Irony
QQ: 892768447
Email: 892768447@qq.com"""
__Copyright__ = 'Copyright (c) 2018 Irony'
__Version__ = 1.0
try:
    import pointtool  # @UnusedImport @UnresolvedImport
    getDistance = pointtool.getDistance
    findClose = pointtool.findClose
except:
    import math
    def getDistance(p1, p2):
        return math.pow(p1.x - p2.x, 2) + math.pow(p1.y - p2.y, 2)
    def findClose(points):
        plen = len(points)
        for i in range(plen):
            closest = [None, None, None, None, None]
            p1 = points[i]
            for j in range(plen):
                p2 = points[j]
                dte1 = getDistance(p1, p2)
                if p1 != p2:
                    placed = False
                    for k in range(5):
                        if not placed:
                            if not closest[k]:
                                closest[k] = p2
                                placed = True
                    for k in range(5):
                        if not placed:
                            if dte1 < getDistance(p1, closest[k]):
                                closest[k] = p2
                                placed = True
            p1.closest = closest
class Target:
    def __init__(self, x, y):
        self.x = x
        self.y = y
class Point(QObject):
    valueChanged = pyqtSignal()
    def __init__(self, x, ox, y, oy, *args, **kwargs):
        super(Point, self).__init__(*args, **kwargs)
        self.__x = x
        self._x = x
        self.originX = ox
        self._y = y
        self.__y = y
        self.originY = oy
        # 5个闭合点
        self.closest = [0, 0, 0, 0, 0]
        # 圆半径
        self.radius = 2 + random() * 2
        # 连线颜色
        self.lineColor = QColor(156, 217, 249)
        # 圆颜色
        self.circleColor = QColor(156, 217, 249)
    def initAnimation(self):
        # 属性动画
        if not hasattr(self, 'xanimation'):
            self.xanimation = QPropertyAnimation(
                self, b'x', self, valueChanged=self.valueChanged.emit,
                easingCurve=QEasingCurve.InOutSine)
            self.yanimation = QPropertyAnimation(
                self, b'y', self, valueChanged=self.valueChanged.emit,
                easingCurve=QEasingCurve.InOutSine,
                finished=self.updateAnimation)
            self.updateAnimation()
    def updateAnimation(self):
        self.xanimation.stop()
        self.yanimation.stop()
        duration = (1 + random()) * 1000
        self.xanimation.setDuration(duration)
        self.yanimation.setDuration(duration)
        self.xanimation.setStartValue(self.__x)
        self.xanimation.setEndValue(self.originX - 50 + random() * 100)
        self.yanimation.setStartValue(self.__y)
        self.yanimation.setEndValue(self.originY - 50 + random() * 100)
        self.xanimation.start()
        self.yanimation.start()
    @pyqtProperty(float)
    def x(self):
        return self._x
    @x.setter
    def x(self, x):
        self._x = x
    @pyqtProperty(float)
    def y(self):
        return self._y
    @y.setter
    def y(self, y):
        self._y = y
class Window(QWidget):
    def __init__(self, *args, **kwargs):
        super(Window, self).__init__(*args, **kwargs)
        self.setMouseTracking(True)
        self.resize(800, 600)
        self.points = []
        self.target = Target(self.width() / 2, self.height() / 2)
        self.initPoints()
    def paintEvent(self, event):
        super(Window, self).paintEvent(event)
        painter = QPainter()
        painter.begin(self)
        painter.setRenderHint(QPainter.Antialiasing)
        painter.fillRect(self.rect(), Qt.black)
        self.animate(painter)
        painter.end()
    def mouseMoveEvent(self, event):
        super(Window, self).mouseMoveEvent(event)
        # 鼠标移动时更新xy坐标
        self.target.x = event.x()
        self.target.y = event.y()
        self.update()
    def initPoints(self):
        t = time()
        self.points.clear()
        # 创建点
        stepX = self.width() / 20
        stepY = self.height() / 20
        for x in range(0, self.width(), int(stepX)):
            for y in range(0, self.height(), int(stepY)):
                ox = x + random() * stepX
                oy = y + random() * stepY
                point = Point(ox, ox, oy, oy)
                point.valueChanged.connect(self.update)
                self.points.append(point)
        print(time() - t)
        t = time()
        # 每个点寻找5个闭合点
        findClose(self.points)
        print(time() - t)
    def animate(self, painter):
        for p in self.points:
            # 检测点的范围
            value = abs(getDistance(self.target, p))
            if value < 4000:
                # 其实就是修改颜色透明度
                p.lineColor.setAlphaF(0.3)
                p.circleColor.setAlphaF(0.6)
            elif value < 20000:
                p.lineColor.setAlphaF(0.1)
                p.circleColor.setAlphaF(0.3)
            elif value < 40000:
                p.lineColor.setAlphaF(0.02)
                p.circleColor.setAlphaF(0.1)
            else:
                p.lineColor.setAlphaF(0)
                p.circleColor.setAlphaF(0)
            # 画线条
            if p.lineColor.alpha():
                for pc in p.closest:
                    if not pc:
                        continue
                    path = QPainterPath()
                    path.moveTo(p.x, p.y)
                    path.lineTo(pc.x, pc.y)
                    painter.save()
                    painter.setPen(p.lineColor)
                    painter.drawPath(path)
                    painter.restore()
            # 画圆
            painter.save()
            painter.setPen(Qt.NoPen)
            painter.setBrush(p.circleColor)
            painter.drawRoundedRect(QRectF(
                p.x - p.radius, p.y - p.radius, 2 * p.radius, 2 * p.radius), p.radius, p.radius)
            painter.restore()
            # 开启动画
            p.initAnimation()
if __name__ == '__main__':
    import sys
    import cgitb
    sys.excepthook = cgitb.enable(1, None, 5, '')
    from PyQt5.QtWidgets import QApplication
    app = QApplication(sys.argv)
    w = Window()
    w.show()
sys.exit(app.exec_())运行结果如下:

以上就是关于“如何用PyQt5模拟实现网页鼠标移动特效”这篇文章的内容,相信大家都有了一定的了解,希望小编分享的内容对大家有帮助,若想了解更多相关的知识内容,请关注亿速云行业资讯频道。
亿速云「云服务器」,即开即用、新一代英特尔至强铂金CPU、三副本存储NVMe SSD云盘,价格低至29元/月。点击查看>>
免责声明:本站发布的内容(图片、视频和文字)以原创、转载和分享为主,文章观点不代表本网站立场,如果涉及侵权请联系站长邮箱:is@yisu.com进行举报,并提供相关证据,一经查实,将立刻删除涉嫌侵权内容。