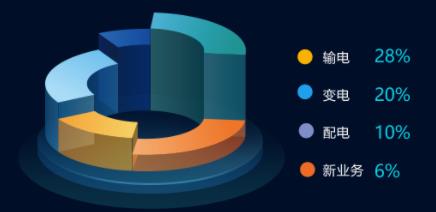
这篇文章给大家分享的是有关vue+highcharts如何实现3D饼图效果的内容。小编觉得挺实用的,因此分享给大家做个参考,一起跟随小编过来看看吧。
这是最终效果

<template>
<div class="big-box">
  <div class="com-container" ref="container" >
  </div>
  <div class="tulibox">
    <div v-for="(item,index) in peiData" :key="index" class="tuliboxitem">
      <span class="name">{{item.name}}</span>   <span class="value">{{item.y}}%</span>
    </div>
  </div>
</div>
</template>

<script>
import HighCharts from 'highcharts'

export default {
  props: {},
  data () {
    return {
      peiData: [
        { name: '输电', y: 28, h: 60 },
        { name: '变电', y: 20, h: 20 },
        { name: '配电', y: 10, h: 32 },
        { name: '新业务', y: 6, h: 45 }
      ]
    }
  },
  computed: {},
  updated () {},
  created () {},
  mounted () {
    this.initChart()
    const that = this
    window.onresize = function () { that.initChart() }
  },
  methods: {
    initChart () {
      // 修改3d饼图绘制过程
      const each = HighCharts.each
      const round = Math.round
      const cos = Math.cos
      const sin = Math.sin
      const deg2rad = Math.deg2rad
      HighCharts.wrap(HighCharts.seriesTypes.pie.prototype, 'translate', function (proceed) {
        proceed.apply(this, [].slice.call(arguments, 1))
        // Do not do this if the chart is not 3D
        if (!this.chart.is3d()) {
          return
        }
        const series = this
        const chart = series.chart
        const options = chart.options
        const seriesOptions = series.options
        const depth = seriesOptions.depth || 0
        const options3d = options.chart.options3d
        const alpha = options3d.alpha
        const beta = options3d.beta
        var z = seriesOptions.stacking ? (seriesOptions.stack || 0) * depth : series._i * depth
        z += depth / 2
        if (seriesOptions.grouping !== false) {
          z = 0
        }
        each(series.data, function (point) {
          const shapeArgs = point.shapeArgs
          var angle
          point.shapeType = 'arc3d'
          var ran = point.options.h
          shapeArgs.z = z
          shapeArgs.depth = depth * 0.75 + ran
          shapeArgs.alpha = alpha
          shapeArgs.beta = beta
          shapeArgs.center = series.center
          shapeArgs.ran = ran
          angle = (shapeArgs.end + shapeArgs.start) / 2
          point.slicedTranslation = {
            translateX: round(cos(angle) * seriesOptions.slicedOffset * cos(alpha * deg2rad)),
            translateY: round(sin(angle) * seriesOptions.slicedOffset * cos(alpha * deg2rad))
          }
        })
      });
      (function (H) {
        H.wrap(HighCharts.SVGRenderer.prototype, 'arc3dPath', function (proceed) {
        // Run original proceed method
          const ret = proceed.apply(this, [].slice.call(arguments, 1))
          ret.zTop = (ret.zOut + 0.5) / 100
          return ret
        })
      }(HighCharts))
      // 生成不同高度的3d饼图
      const highEcharts = this.$refs.container
      HighCharts.chart(highEcharts, {
        chart: {
          type: 'pie',
          animation: false,
          backgroundColor: 'rgba(0,0,0,0)',

          events: {
            load: function () {
              const each = HighCharts.each
              const points = this.series[0].points
              each(points, function (p, i) {
                p.graphic.attr({
                  translateY: -p.shapeArgs.ran
                })
                p.graphic.side1.attr({
                  translateY: -p.shapeArgs.ran
                })
                p.graphic.side2.attr({
                  translateY: -p.shapeArgs.ran
                })
              })
            }
          },
          options3d: {
            enabled: true,
            alpha: 65
          }
        },
        title: {
          show: 'false',
          text: null
        },
        subtitle: {
          text: null
        },
        credits: {
          enabled: false
        },
        legend: { // 【图例】位置样式
          backgroundColor: 'rgba(0,0,0,0)',
          shadow: false,
          layout: 'vertical',
          align: 'right', // 水平方向位置
          verticalAlign: 'top', // 垂直方向位置
          x: 0, // 距离x轴的距离
          y: 100, // 距离Y轴的距离
          symbolPadding: 10,
          symbolHeight: 14,
          itemStyle: {
            lineHeight: '24px',
            fontSize: '16px',
            color: '#fff'
          },
          labelFormatter: function () {
            /*
            *  格式化函数可用的变量:this, 可以用 console.log(this) 来查看包含的详细信息
            *  this 代表当前数据列对象,所以默认的实现是 return this.name
            */
            return this.name + this.h + '%'
          }
        },
        plotOptions: {
          pie: {
            allowPointSelect: true,
            cursor: 'pointer',
            depth: 35,
            innerSize: 180,
            dataLabels: {
              enabled: false
            },
            // 显示图例
            showInLegend: false
          }
        },
        series: [{
          type: 'pie',
          name: '占比',
          // h 是高度  y是占的圆环长度
          colorByPoint: true,
          colors: [
            { // 注意!!!如果是柱状图请使用color,如果是面积图请使用fillColor
              linearGradient: {
                x1: 0,
                y1: 1,
                x2: 1,
                y2: 0
              },
              stops: [
                [0, '#19596d'],
                [1, '#2ea1b2']
              ]
            }, { // 注意!!!如果是柱状图请使用color,如果是面积图请使用fillColor
              linearGradient: {
                x1: 0,
                y1: 1,
                x2: 1,
                y2: 0
              },
              stops: [
                [0, '#ee7529'],
                [1, '#f5a86c']
              ]
            }, { // 注意!!!如果是柱状图请使用color,如果是面积图请使用fillColor
              linearGradient: {
                x1: 0,
                y1: 1,
                x2: 1,
                y2: 0
              },
              stops: [
                [0, '#f5c055'],
                [1, '#967b3d']
              ]
            }, { // 注意!!!如果是柱状图请使用color,如果是面积图请使用fillColor
              linearGradient: {
                x1: 0,
                y1: 1,
                x2: 1,
                y2: 0
              },
              stops: [
                [0, '#2d7bb5'],
                [1, '#1a5784']
              ]
            }],
          data: this.peiData
        }]
      })
    }
  },
  components: {}
}
</script>

<style scoped lang="less">
.com-container{
    width: 380px;
    height: 300px;
    padding-right: 20px;
}
.big-box{
    display: flex;
    background-image: url('../img/dizuo.png');
    background-repeat: no-repeat;
    background-position: 25px 144px;
    padding-top: 20px;
}
.tulibox{
  padding-top: 65px;
  .tuliboxitem{
    position: relative;
    margin: 10px 0;
    .name{
      font-size: 18px;
      color: #FEFEFF;
      padding-right: 20px;
    }
    .value{
      font-size: 22px;
      color: #0CD2EA;
    }
  }
  .tuliboxitem::before{
     content: "";
     position: absolute;
     width: 16px;
    height: 16px;
    top: 7px;
    border-radius: 50%;
    left: -33px;
  }
  .tuliboxitem:nth-child(1)::before{
      background-color: #fff600;
  }
  .tuliboxitem:nth-child(2)::before{
      background-color: #209FED;
  }
  .tuliboxitem:nth-child(3)::before{
      background-color: #808EC7;
  }
  .tuliboxitem:nth-child(4)::before{
      background-color: #EE6B26;
  }
}
</style>感谢各位的阅读!关于“vue+highcharts如何实现3D饼图效果”这篇文章就分享到这里了,希望以上内容可以对大家有一定的帮助,让大家可以学到更多知识,如果觉得文章不错,可以把它分享出去让更多的人看到吧!
亿速云「云服务器」,即开即用、新一代英特尔至强铂金CPU、三副本存储NVMe SSD云盘,价格低至29元/月。点击查看>>
免责声明:本站发布的内容(图片、视频和文字)以原创、转载和分享为主,文章观点不代表本网站立场,如果涉及侵权请联系站长邮箱:is@yisu.com进行举报,并提供相关证据,一经查实,将立刻删除涉嫌侵权内容。