这篇“怎么用Three.js实现雪糕地球”文章的知识点大部分人都不太理解,所以小编给大家总结了以下内容,内容详细,步骤清晰,具有一定的借鉴价值,希望大家阅读完这篇文章能有所收获,下面我们一起来看看这篇“怎么用Three.js实现雪糕地球”文章吧。
style
* {
    -webkit-user-select: none;
       -moz-user-select: none;
        -ms-user-select: none;
            user-select: none;
  }
  body {
    height: 100vh;
    background-color: hotpink;
    margin: 0;
    padding: 0;
    overflow: hidden;
  }
  .loader {
    display: flex;
    color: white;
    display: flex;
    justify-content: center;
    align-items: center;
    font-size: 5em;
    width: 100%;
    height: 100%;
    font-family: "Baloo Bhaijaan", cursive;
  }
  .loader span {
    text-shadow: 0 1px #bbb, 0 2px #bbb, 0 3px #bbb, 0 4px #bbb, 0 5px #bbb,
      0 6px transparent, 0 7px transparent, 0 8px transparent,
      0 9px transparent, 0 10px 10px rgba(0, 0, 0, 0.4);
    text-shadow: 0 1px #bbb, 0 2px #bbb, 0 3px #bbb, 0 4px #bbb,
        0 5px #bbb, 0 6px #bbb, 0 7px #bbb, 0 8px #bbb, 0 9px #bbb,
        0 50px 25px rgba(0, 0, 0, 0.2);
      transform: translateY(-20px);
}script
/*
 * 基础配置
 */
let isLoaded = false; // 纹理资源是否加载完毕
const loadingScreen = {
  scene: new THREE.Scene(),
  camera: new THREE.PerspectiveCamera(
    75,
    window.innerWidth / window.innerHeight,
    0.1,
    1000
  ),
  // 移除加载标志的函数
  removeText() {
    const loadingText = document.querySelector("#canvas-loader");
    if (loadingText.parentNode) {
      loadingText.parentNode.removeChild(loadingText);
    }
  },
};
// 初始化加载器
let loadingManager = new THREE.LoadingManager();
// 监听加载器 onLoad 事件
loadingManager.onLoad = () => {
  loadingScreen.removeText();
  isLoaded = true;
};
// 创建场景
const scene = new THREE.Scene();
// 创建渲染器
const renderer = new THREE.WebGLRenderer({ antialias: true });
// 渲染器基本设置
renderer.setClearColor("hotpink");
renderer.setPixelRatio(window.devicePixelRatio);
renderer.setSize(window.innerWidth, window.innerHeight);
// canvas 外部容器
const canvasWrapper = document.querySelector("#canvas-wrapper");
// 创建透视相机
const camera = new THREE.PerspectiveCamera(
  75,
  window.innerWidth / window.innerHeight,
  0.1,
  1000
);
// 设置相机位置
camera.position.set(0, 0, 220);
// 创建平行光源
const light = new THREE.DirectionalLight();
light.position.set(0, 0, 1);
scene.add(light);
// 创建点光源
const point = new THREE.PointLight(0xeeeeee);
point.position.set(400, 200, 300); //点光源位置
scene.add(point); //点光源添加到场景中
// 创建球体
const cRadius = 100;
const geometry = new THREE.SphereBufferGeometry(
  cRadius,
  cRadius * 6.4,
  cRadius * 6.4
);
// 纹理图
const textureLoader = new THREE.TextureLoader(loadingManager);
const textureSurface = textureLoader.load(
  "https://s3-us-west-2.amazonaws.com/s.cdpn.io/249663/world-surface.jpg"
);
const textureElevation = textureLoader.load(
  "https://s3-us-west-2.amazonaws.com/s.cdpn.io/249663/world-elevation.jpg"
);
const textureSpecular = textureLoader.load(
  "https://s3-us-west-2.amazonaws.com/s.cdpn.io/249663/world-specular.jpg"
);
// 材质信息
const materialOpt = {
  map: textureSurface,
  normalMap: textureElevation,
  specularMap: textureSpecular,
  shininess: 80,
};
const material = new THREE.MeshPhongMaterial(materialOpt);
// 创建网格体
const sphere = new THREE.Mesh(geometry, material);
// 设置环境贴图的颜色深浅
sphere.material.normalScale.set(0.5, 0.5);
// 将模型添加到场景中
scene.add(sphere);
// 将 canvas 元素添加到页面中
canvasWrapper.appendChild(renderer.domElement);
/*
 * 事件监听实现动效
 */
let mouseX = 0;
let mouseY = 0;
const moveAnimate = {
  coordinates(clientX, clientY) {
    const limit = 270;
    const limitNeg = limit * -1;
    mouseX = clientX - window.innerWidth / 2;
    mouseY = clientY - window.innerHeight / 2;
    mouseX = mouseX >= limit ? limit : mouseX;
    mouseX = mouseX <= limitNeg ? limitNeg : mouseX;
    mouseY = mouseY >= limit ? limit : mouseY;
    mouseY = mouseY <= limitNeg ? limitNeg : mouseY;
  },
  onMouseMove(e) {
    moveAnimate.coordinates(e.clientX, e.clientY);
  },
  onTouchMove(e) {
    const touchX = e.changedTouches[0].clientX;
    const touchY = e.changedTouches[0].clientY;
    moveAnimate.coordinates(touchX, touchY);
  },
};
document.addEventListener("mousemove", moveAnimate.onMouseMove);
document.addEventListener("touchmove", moveAnimate.onTouchMove);
const onWindowResize = () => {
  const w = window.innerWidth;
  const h = window.innerHeight;
  camera.aspect = w / h;
  camera.updateProjectionMatrix();
  renderer.setSize(w, h);
};
window.addEventListener("resize", onWindowResize);
const createAnimRotation = () => {
  const speed = 0.005;
  sphere.rotation.z += speed / 2;
  sphere.rotation.y += speed;
};
// 渲染函数
const render = () => {
  if (!isLoaded) {
    renderer.render(loadingScreen.scene, loadingScreen.camera);
    requestAnimationFrame(render);
    return;
  }
  camera.position.x += (mouseX * -1 - camera.position.x) * 0.05;
  camera.position.y += (mouseY - camera.position.y) * 0.05;
  camera.lookAt(scene.position);
  createAnimRotation();
  renderer.render(scene, camera);
  requestAnimationFrame(render);
};
render();在线体验(支持PC与移动端): 雪糕地球线上预览
源码仓库: 雪糕地球
Three.js 是一款运行在浏览器中的 3D 引擎,你可以用它创建各种三维场景,包括了摄影机、光影、材质等各种对象,大家或多或少应该都见识过 Three 的传说。这是小包第一次使用 Three,因此小包会围绕雪糕地球实现的各种细节讲起。
下面首先来看一下 Three 框架的基本组成要素
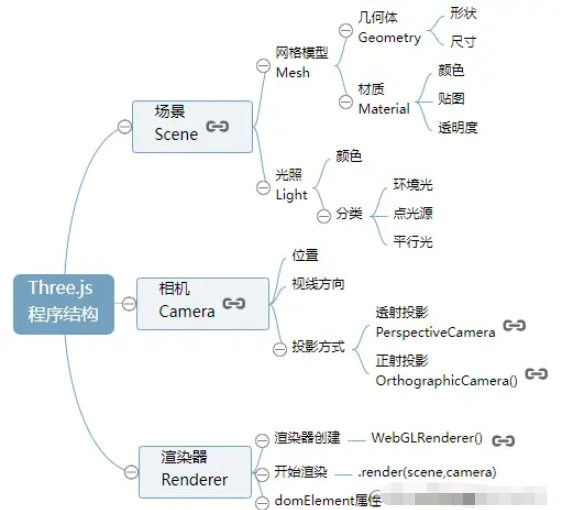
Three 中最重要的三个对象即场景、相机和渲染器。场景即放置模型、光照的场地;相机设置以何种方式何种角度来观看场景,渲染器将效果渲染到网页中。这三个概念都不难理解,下面我们用代码实现这三个对象。
// 场景
const scene = new THREE.Scene();
// 透视相机
const camera = new THREE.PerspectiveCamera(
  75,
  window.innerWidth / window.innerHeight,
  0.1,
  1000
);
// 渲染器
const renderer = new THREE.WebGLRenderer();
// 设置渲染区域尺寸
renderer.setSize(window.innerWidth, window.innerHeight);
// body元素中插入canvas对象
document.body.appendChild(renderer.domElement);
// 设置背景颜色
renderer.setClearColor("hotpink");
// 执行渲染操作   指定场景、相机作为参数
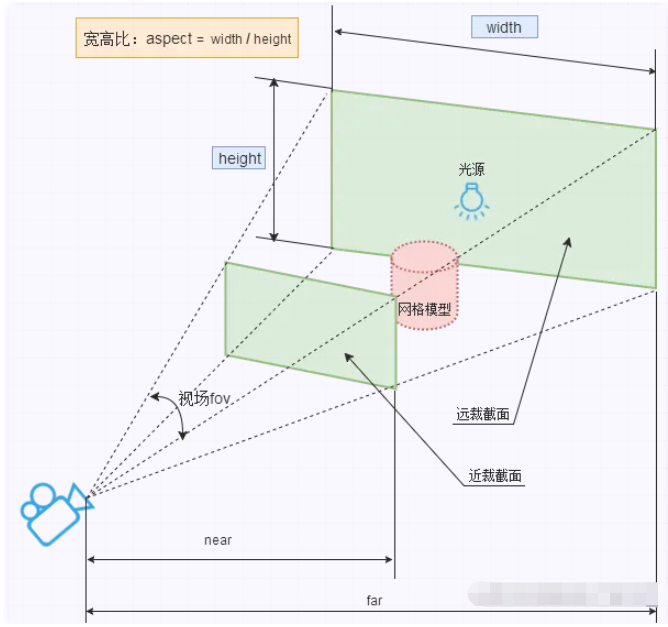
renderer.render(scene, camera);Three 中有多种相机,本文章主要使用透视相机(PerspectiveCamera),其原理与人眼所看的景象类似,共有四个参数:
PerspectiveCamera( fov : Number, aspect : Number, near : Number, far : Number )fov: 表示能看到的角度范围,值为角度,类似于人的视角。
aspect: 表示渲染窗口的长宽比,如果网页中只有一个 canvas,其值通常设置为网页视口的宽高比
near/far: near/far 分别代表摄像机的近剪切面和远剪切面
文字有些难以理解,可以参考一下下图:
打开浏览器,看一下会渲染出什么?目前只能看到全粉色的网页,这是因为目前的场景中并没有添加 3D 模型对象。
接下来我们来添加一个球体模型,作为地球的基底。
const cRadius = 100;
const geometry = new THREE.SphereBufferGeometry(
  cRadius,
  cRadius * 6.4,
  cRadius * 6.4
);SphereBufferGeometry 是 Three 中实现球体的 API,参数非常多,这里只介绍前三个参数
radius: 球体半径
widthSegments: 沿经线方向分段数
heightSegments: 沿纬线方向分段数
为球体添加材质 Material,目前我们只添加一个颜色属性。
// 材质对象Material
const material = new THREE.MeshLambertMaterial({
  color: 0x0000ff,
});渲染网格体 Mesh,并将其添加到场景 Scene 中。
// 网格体 Mesh,两个参数分别为几何体和材质
const sphere = new THREE.Mesh(geometry, material);
scene.add(sphere);重新打开网站,并没有看到球体,还是一片粉茫茫的寂寥,天理何在?
Three 相机的初始位置默认为 (0,0,0),相机焦点默认为 Z 轴负半轴方向,球体的半径是 100,也就是说目前相机位于球体内部,因此我们需要调整相机位置。
// 设置相机的位置
camera.position.set(0, 0, 220);
// 设置相机焦点的方向
camera.lookAt(scene.position);当当当当,网页中就可以成功看到一个黑色球体了,额有点奇怪,我们明明设置的是 0x0000ff 颜色,怎么会显示一个黑色模型?
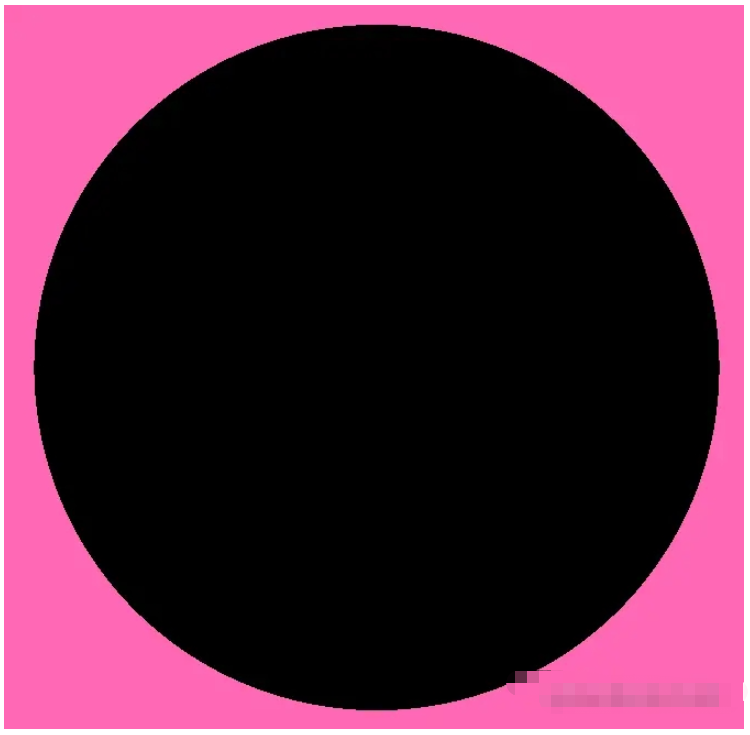
小包苦思冥想: 万物本没有颜色,颜色是光的反射。在整个场景中,目前是没有光源的,因此下面分别添加平行光(DirectionalLight)和点光源(PointLight)
平行光是沿着特定方向发射的光,其表现类似无限远的阳光,文章使用它来模拟太阳光。点光源是从一个点向各个方向发射的光源,使用它来增加整体的亮度。
// 声明平行光
const light = new THREE.DirectionalLight();
// 设置平行光源位置
light.position.set(0, 0, 1);
// 将平行光源添加到场景中
scene.add(light);
// 声明点光源
const point = new THREE.PointLight(0xeeeeee);
// 设置点光源位置
point.position.set(400, 200, 300);
// 点光源添加到场景中
scene.add(point);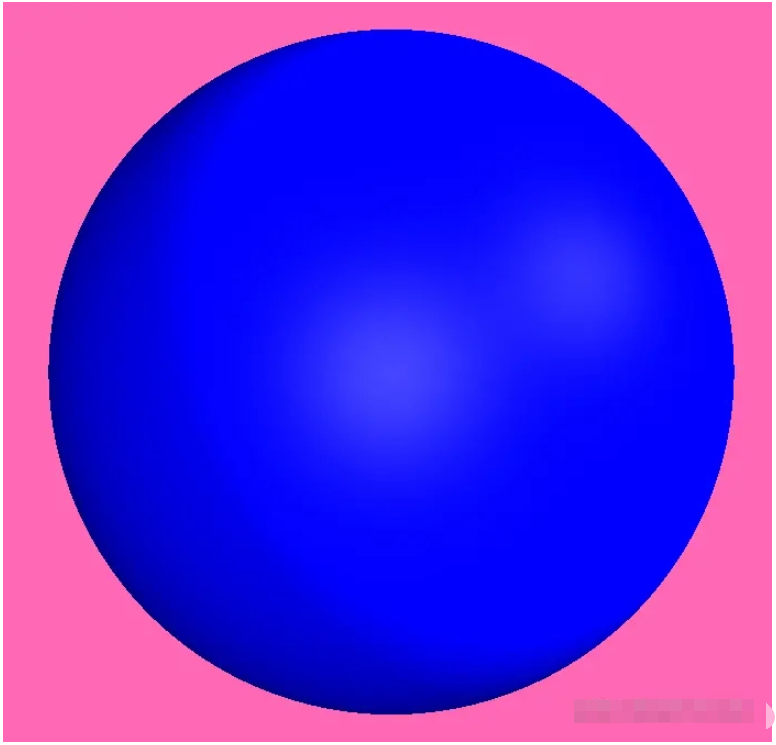
立体效果看起来不明显,没事,接下来我们让球体动起来。接下来,给球体添加一个 z 轴和 y 轴的转动。
const createAnimRotation = () => {
  const speed = 0.005;
  sphere.rotation.z += speed / 2;
  sphere.rotation.y += speed;
};
const render = () => {
  createAnimRotation();
  renderer.render(scene, camera);
  requestAnimationFrame(render);
};
render();由于球体是对称的,转动看起来并不明显,如果你特别想看到转动效果,可以将 SphereBufferGeometry 暂时更换为 BoxBufferGeometry。
上文已经成功实现地球,接下来我们来为地球披上衣服。本文实现的是雪糕地球,因此小包直接为其披上雪糕外衣。
Three 可以将一张纹理图映射到几何体上,具体的映射原理我们不做探究,映射的思想可以参考下图。
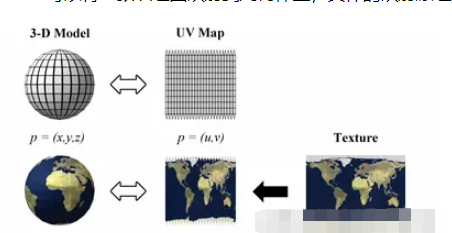
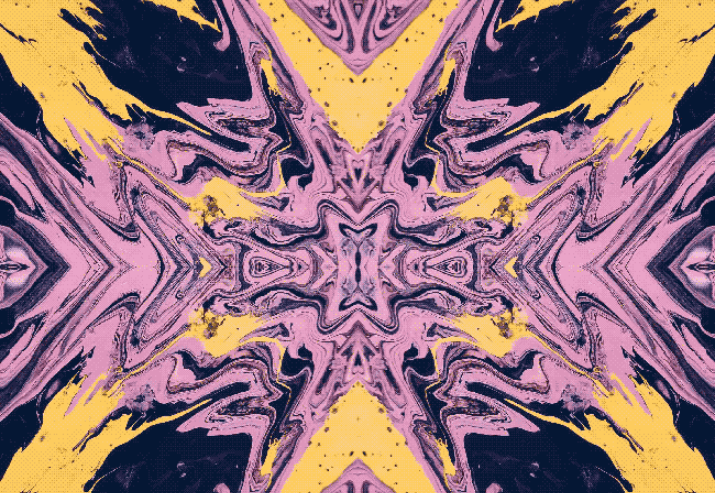
选取一张雪糕地球的纹理图,使用下面的代码实现纹理贴图效果。
// 纹理加载器对象
const textureLoader = new THREE.TextureLoader();
const textureSurface = textureLoader.load(
  "https://s3-us-west-2.amazonaws.com/s.cdpn.io/249663/world-surface.jpg"
);
// 设置纹理贴图
const material = new THREE.MeshLambertMaterial({ map: textureSurface });只使用普通贴图的雪糕地球看起来已经非常不错了,但还有进一步美化的空间,Three 提供了高光贴图,使用高光贴图,会有高亮部分显示。
const textureSpecular = textureLoader.load(
  "https://s3-us-west-2.amazonaws.com/s.cdpn.io/249663/world-specular.jpg"
);
const material = new THREE.MeshPhongMaterial({
  map: textureSurface,
  specularMap: textureSpecular,
  shininess: 80, // 高光部分的亮度
});虽然动图录制的帧数太低,还是依稀可以看到一些高亮区域。
Three 还提供了环境贴图,环境贴图可以增加表面的细节,使三维模型更加立体。
const textureElevation = textureLoader.load(
  "https://s3-us-west-2.amazonaws.com/s.cdpn.io/249663/world-elevation.jpg"
);
const material = new THREE.MeshPhongMaterial({
  map: textureSurface,
  normalMap: textureElevation,
  specularMap: textureSpecular,
  shininess: 80,
});立体效果是有了,但是具体看起来一言难尽,颜色有些许暗淡,不符合雪糕的风格。
小包继续开始查看文档,环境贴图中有 normalScale 属性,可以设置颜色的深浅程度,减少对应属性值为 0.5,0.5。
sphere.material.normalScale.set(0.5, 0.5);给地球加一些交互效果:
当鼠标靠近,地球放大;鼠标远离时,地球缩小
地球随鼠标方向转动
上述动效我们可以通过移动相机位置实现。首先设定地球旋转的最大正负角度为 270。
// 定义动效对象
let mouseX = 0;
let mouseY = 0;
const moveAnimate = {
  coordinates(clientX, clientY) {
    const limit = 270;
    const limitNeg = limit * -1;
    mouseX = clientX - window.innerWidth / 2;
    mouseY = clientY - window.innerHeight / 2;
    mouseX = mouseX >= limit ? limit : mouseX;
    mouseX = mouseX <= limitNeg ? limitNeg : mouseX;
    mouseY = mouseY >= limit ? limit : mouseY;
    mouseY = mouseY <= limitNeg ? limitNeg : mouseY;
  },
  onMouseMove(e) {
    moveAnimate.coordinates(e.clientX, e.clientY);
  },
};
document.addEventListener("mousemove", moveAnimate.onMouseMove);通过上述事件计算出 mouseX 与 mouseY 的值,在 render 函数中,修改 camera 的位置。
camera.position.x += (mouseX * -1 - camera.position.x) * 0.05;
camera.position.y += (mouseY - camera.position.y) * 0.05;
camera.lookAt(scene.position);
移动端同步监听 touchmove 事件,手机也可以看到雪糕地球的动态效果。
const moveAnimate = {
  onTouchMove(e) {
    const touchX = e.changedTouches[0].clientX;
    const touchY = e.changedTouches[0].clientY;
    moveAnimate.coordinates(touchX, touchY);
  },
};
document.addEventListener("touchmove", moveAnimate.onTouchMove);纹理的加载需要一定的时间,因此添加一个转场 loading 效果。
loading 效果使用小包前面的实现跃动的文字中的效果。
.loader {
  display: flex;
  color: white;
  display: flex;
  justify-content: center;
  align-items: center;
  font-size: 5em;
  width: 100%;
  height: 100%;
  font-family: "Baloo Bhaijaan", cursive;
}
.loader span {
  text-shadow: 0 1px #bbb, 0 2px #bbb, 0 3px #bbb, 0 4px #bbb, 0 5px #bbb, 0 6px
      transparent, 0 7px transparent, 0 8px transparent, 0 9px transparent, 0
      10px 10px rgba(0, 0, 0, 0.4);
  text-shadow: 0 1px #bbb, 0 2px #bbb, 0 3px #bbb, 0 4px #bbb, 0 5px #bbb, 0 6px
      #bbb, 0 7px #bbb, 0 8px #bbb, 0 9px #bbb, 0 50px 25px rgba(0, 0, 0, 0.2);
  transform: translateY(-20px);
}Three 提供了 LoadingManager,其功能是处理并跟踪已加载和待处理的数据。当所有加载器加载完成后,会调用 LoadingManager 上的 onLoad 事件。
因此我们定义一个 LoadingManager,当触发 onLoad 事件后,将页面中的加载标志移除。
const loadingScreen = {
  scene: new THREE.Scene(),
  camera: new THREE.PerspectiveCamera(
    75,
    window.innerWidth / window.innerHeight,
    0.1,
    1000
  ),
  // 移除加载标志的函数
  removeText() {
    const loadingText = document.querySelector("#canvas-loader");
    if (loadingText.parentNode) {
      loadingText.parentNode.removeChild(loadingText);
    }
  },
};
// 初始化加载器
let loadingManager = new THREE.LoadingManager();
// 监听加载器 onLoad 事件
loadingManager.onLoad = () => {
  loadingScreen.removeText();
  isLoaded = true;
};
// 纹理图加载器传入 loadingManager
const textureLoader = new THREE.TextureLoader(loadingManager);以上就是关于“怎么用Three.js实现雪糕地球”这篇文章的内容,相信大家都有了一定的了解,希望小编分享的内容对大家有帮助,若想了解更多相关的知识内容,请关注亿速云行业资讯频道。
亿速云「云服务器」,即开即用、新一代英特尔至强铂金CPU、三副本存储NVMe SSD云盘,价格低至29元/月。点击查看>>
免责声明:本站发布的内容(图片、视频和文字)以原创、转载和分享为主,文章观点不代表本网站立场,如果涉及侵权请联系站长邮箱:is@yisu.com进行举报,并提供相关证据,一经查实,将立刻删除涉嫌侵权内容。