这篇文章主要介绍“MyBatisPlus逻辑删除和字段自动填充怎么实现”,在日常操作中,相信很多人在MyBatisPlus逻辑删除和字段自动填充怎么实现问题上存在疑惑,小编查阅了各式资料,整理出简单好用的操作方法,希望对大家解答”MyBatisPlus逻辑删除和字段自动填充怎么实现”的疑惑有所帮助!接下来,请跟着小编一起来学习吧!
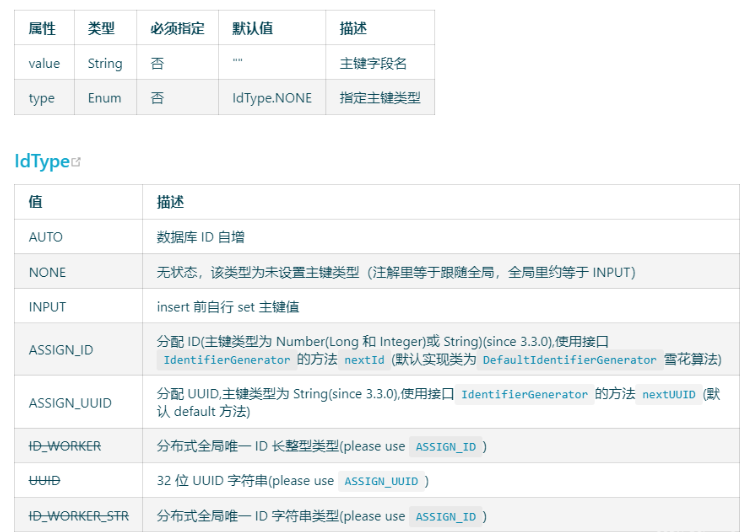
@TableId注解:主键注解
使用位置:实体类主键字段。
@Data
@ToString
@TableName("t_user")
public class UserDO {

	@TableId(value = "id", type = IdType.AUTO)
	private Long id;
    ...
}
使用注解是针对一个POJO的。如果我们全局使用同样的 ID生成策略。那我们可以在全局配置文件中配置。就不需要在每个 POJO上使用 主键@TableId注解了。
mybatis-plus:
  global-config:
    db-config:
id-type: auto逻辑删除: 通常会在表里添加一个逻辑删除的字段,比如 enabled(1默认有效,0无效)。
MyBatis-Plus会在用户调用删除操作时将数据修改 UPDATE set enabled = 0, 在查询的时候会自动拼接只查 where enabled=1的数据。
在YAML配置文件中添加全局配置
mybatis-plus:
  global-config:
    db-config:
      logic-delete-field: flag # 全局逻辑删除的实体字段名(since 3.3.0,配置后可以忽略不配置步骤2)
      logic-delete-value: 1 # 逻辑已删除值(默认为 1)
logic-not-delete-value: 0 # 逻辑未删除值(默认为 0)不推荐使用全局配置,使用 @TableLogic注解见名知意。
@TableLogic注解:表字段逻辑处理注解(逻辑删除)。
1)表中添加 enabled字段
ALTER TABLE `t_user`
ADD COLUMN `enabled` tinyint(1) NOT NULL DEFAULT 1 COMMENT '是否有效(1-有效,0-无效)';2)在POJO实体类字段上加上 @TableLogic注解。
	/**
	 * 代表逻辑删除
	 * 	value:逻辑未删除值
	 * 	delval:逻辑删除值
	 */
	//@TableLogic
	@TableLogic(value = "1", delval = "0")
private Integer enabled;到此,逻辑删除就配置好了,接下来测试一下删除和查询。
	@Test
	public void testRemoveById() {
		System.out.println(("----- removeById method test ------"));
		boolean remove = userService.removeById(12L);

		System.out.println("remove = " + remove);
	}
	@Test
	public void testGetById() {
		System.out.println(("----- getById method test ------"));
		UserDO userDO = userService.getById(12L);

		System.out.println("userDO = " + userDO);
	}
在项目中,一般我们都会定义 create_time和update_time字段。针对这两个字段,每次CRUD操作时,我们都需要手动赋值或者数据库默认值。MyBatis-Plus提供了给字段自动填充数据的功能。
`create_time` timestamp NOT NULL DEFAULT CURRENT_TIMESTAMP COMMENT '创建时间',
`update_time` timestamp NOT NULL DEFAULT CURRENT_TIMESTAMP ON UPDATE CURRENT_TIMESTAMP COMMENT '修改时间',使用 MyBatis-Plus的自动填充功能,需要指定 fill类型,并且指定 自定义填充信息 MetaObjectHandler。
在POJO中,指定 create_time和update_time字段为自动填充。
	 @TableField(value = "create_time", fill = FieldFill.INSERT)
	//@TableField(value = "create_time")
	private Date createTime;

	 @TableField(value = "update_time", fill = FieldFill.INSERT_UPDATE)
	//@TableField(value = "update_time")
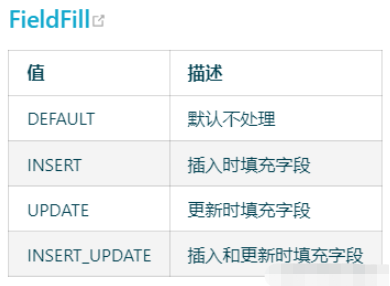
private Date updateTime;fill类型的值如下:

注意:如果指定了 fill为后面三个时,必须显示设置值。否则为报错:Column 'create_time' cannot be null。如果我们不显示指定设置值,我们必须定义 MetaObjectHandler。
@Slf4j
@Component
public class MyMetaObjectHandler implements MetaObjectHandler {

    @Override
    public void insertFill(MetaObject metaObject) {
        log.info("start insert fill ....");
        /**
         *方法的四个个参数:<br/>
         *      MetaObject metaObject: metaObject对象 <br/>
         *      String fieldName:POJO字段 <br/>
         *      Class<T> fieldType:字段类型 <br/>
         *      E fieldVal:自动填充的字段值 <br/>
         */
        this.strictInsertFill(metaObject, "createTime", Date.class, new Date());
		//this.setFieldValByName("createTime", new Date(),metaObject);
        // 或者
        this.strictInsertFill(metaObject, "updateTime", () -> new Date(), Date.class);
    }

    @Override
    public void updateFill(MetaObject metaObject) {
        log.info("start update fill ....");
        this.strictInsertFill(metaObject, "updateTime", () -> new Date(), Date.class);
    }
}1)测试保存
	@Test
	public void testSave() {
		System.out.println(("----- save method test ------"));
		UserDO userDO = new UserDO();
		userDO.setUserName("赵云save fill");
		userDO.setAge(20);
		userDO.setHeight(1.88);
		userDO.setEmail("zhaoyun@123.com");
		boolean save = userService.save(userDO);

		System.out.println("save = " + save);
		System.out.println("userDO = " + userDO);
	}
2)测试删除
	@Test
	public void testRemoveById() {
		System.out.println(("----- removeById method test ------"));
		boolean remove = userService.removeById(111L);
		System.out.println("remove = " + remove);
	}
生产环境不推荐使用,开发环境可以使用。
引入 p6spy依赖:
    <!-- https://mvnrepository.com/artifact/p6spy/p6spy -->
    <dependency>
      <groupId>p6spy</groupId>
      <artifactId>p6spy</artifactId>
      <version>3.9.1</version>
</dependency>#3.2.1以上使用
modulelist=com.baomidou.mybatisplus.extension.p6spy.MybatisPlusLogFactory,com.p6spy.engine.outage.P6OutageFactory
#3.2.1以下使用或者不配置
#modulelist=com.p6spy.engine.logging.P6LogFactory,com.p6spy.engine.outage.P6OutageFactory
# 自定义日志打印
logMessageFormat=com.baomidou.mybatisplus.extension.p6spy.P6SpyLogger
#日志输出到控制台
appender=com.baomidou.mybatisplus.extension.p6spy.StdoutLogger
# 使用日志系统记录 sql
#appender=com.p6spy.engine.spy.appender.Slf4JLogger
# 设置 p6spy driver 代理
deregisterdrivers=true
# 取消JDBC URL前缀
useprefix=true
# 配置记录 Log 例外,可去掉的结果集有error,info,batch,debug,statement,commit,rollback,result,resultset.
excludecategories=info,debug,result,commit,resultset
# 日期格式
dateformat=yyyy-MM-dd HH:mm:ss
# 实际驱动可多个
#driverlist=org.h3.Driver
# 是否开启慢SQL记录
outagedetection=true
# 慢SQL记录标准 2 秒
outagedetectioninterval=2
修改驱动类和 url的前缀。
spring:
  ## 数据源配置
  datasource:
    driver-class-name: com.p6spy.engine.spy.P6SpyDriver # com.mysql.cj.jdbc.Driver
    # url: jdbc:mysql://localhost:3306/mybatis_db?useUnicode=true&characterEncoding=utf8&useSSL=true&serverTimezone=GMT
    url: jdbc:p6spy:mysql://localhost:3306/mybatis_db?useUnicode=true&characterEncoding=utf8&useSSL=true&serverTimezone=GMT
    username: root
    password: 123456
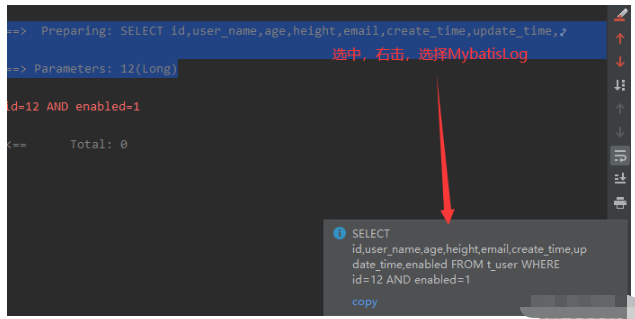
多了红色的部分,其实我们使用 MyBatisLogFormat插件也是可以得到真实执行的SQL语句。

到此,关于“MyBatisPlus逻辑删除和字段自动填充怎么实现”的学习就结束了,希望能够解决大家的疑惑。理论与实践的搭配能更好的帮助大家学习,快去试试吧!若想继续学习更多相关知识,请继续关注亿速云网站,小编会继续努力为大家带来更多实用的文章!
亿速云「云服务器」,即开即用、新一代英特尔至强铂金CPU、三副本存储NVMe SSD云盘,价格低至29元/月。点击查看>>
免责声明:本站发布的内容(图片、视频和文字)以原创、转载和分享为主,文章观点不代表本网站立场,如果涉及侵权请联系站长邮箱:is@yisu.com进行举报,并提供相关证据,一经查实,将立刻删除涉嫌侵权内容。