LinearLayout android中常用的线性布局
可以根据屏幕的大小自动调节控件
下面对LinearLayout的几个属性做简单的介绍
1、android:orientation属性:
即排列方式,可以选择横排或竖排(horizontal,vertical)
vertical:垂直排列
horizontal:水平排列
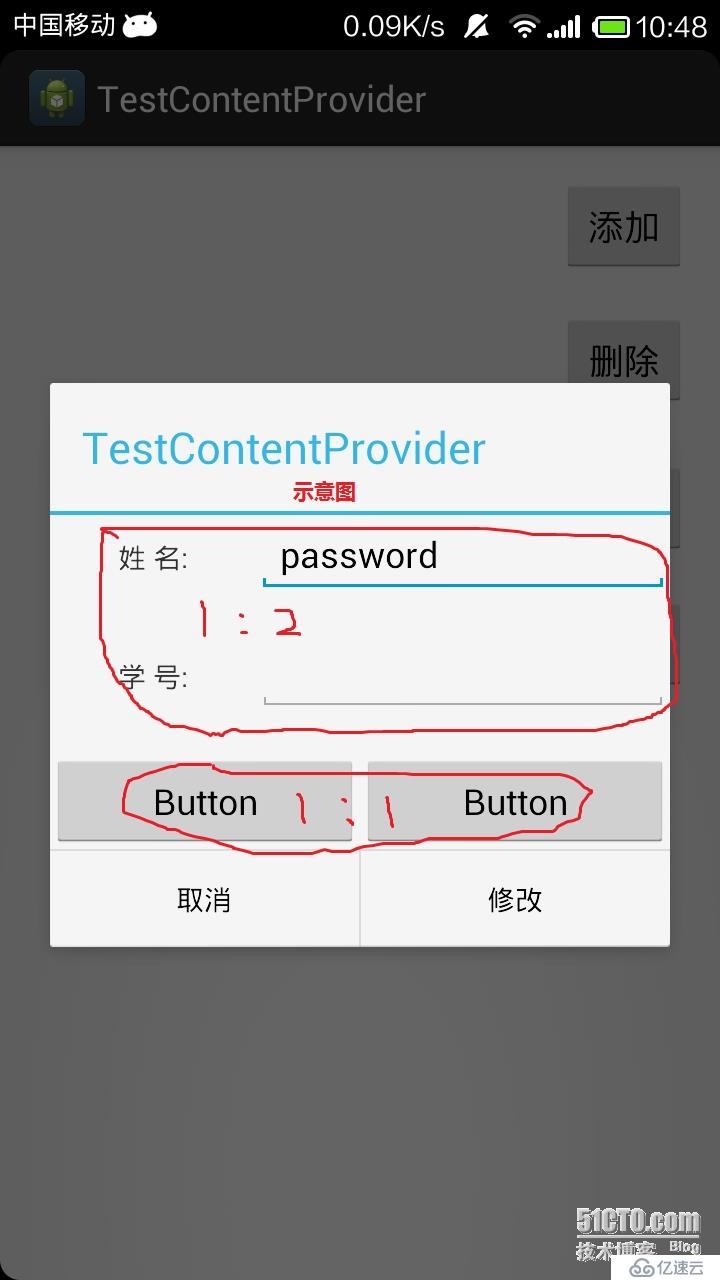
举个例子:
比如我们要在一个界面中做一个3x3
即3行3列的按钮
那么在主LinearLayout中我们通常用垂直布局即(android:orientation="vertical")
在主框架中我们再添加三个子框架,子框架中采用水平布局(android:orientation="horizontal")
2、控制子框架之间的距离
通常用 android:layout_margin..(包括上下左右)
如android:layout_marginTop="20dp"即距离上个控件20dp
3、控件按比例排列
有些时候,对于某些空间我们不想让其占据太多位置,当然对于固定的机型屏幕可以设置给它固定的
大小,但是屏幕适配是不合格的
在这里我们就需要用到了android:layout_weight=""属性
如在一行显示两个控件一个TextView、另一个EditText
我们需要让EditText占据更多的空间这里我们选择1:2
于是在TextView的属性中我们设置为(android:layout_weight="1")
同样在EditText中设置属性为(android:layout_weight="2")
前提是该子框架中只有这两个控件。
以上即是LZ对LinearLayout的简单理解
如有不懂或错误之处,欢迎给出建议!!!
贴出主要布局代码
<?xml version="1.0" encoding="utf-8"?>
<LinearLayout xmlns:android="http://schemas.android.com/apk/res/android"
    android:layout_width="match_parent"
    android:layout_height="match_parent"
    android:orientation="vertical" >
    <LinearLayout
        android:layout_width="fill_parent"
        android:layout_height="wrap_content"
        android:orientation="horizontal" >
        <TextView
            android:id="@+id/textView1"
            android:layout_width="0dp"
            android:layout_height="wrap_content"
            android:layout_weight="1"
            android:gravity="center"
            android:text="@string/name" />
        <EditText
            android:id="@+id/editText1"
            android:layout_width="0dp"
            android:layout_height="wrap_content"
            android:layout_weight="2" >
        </EditText>
    </LinearLayout>
    <LinearLayout
        android:layout_width="fill_parent"
        android:layout_height="wrap_content"
        android:layout_marginTop="20dp"
        android:orientation="horizontal" >
        <TextView
            android:id="@+id/textView2"
            android:layout_width="0dp"
            android:layout_height="wrap_content"
            android:layout_weight="1"
            android:gravity="center"
            android:text="@string/num" />
        <EditText
            android:id="@+id/editText2"
            android:layout_width="0dp"
            android:layout_height="wrap_content"
            android:layout_weight="2"
            android:ems="10" />
    </LinearLayout>
    <LinearLayout
        android:layout_width="fill_parent"
        android:layout_height="wrap_content"
        android:layout_marginTop="20dp"
        android:orientation="horizontal" >
        <Button
            android:id="@+id/button2"
            android:layout_width="0dp"
            android:layout_height="wrap_content"
            android:layout_weight="1"
            android:text="Button" />
        <Button
            android:id="@+id/button1"
            android:layout_width="0dp"
            android:layout_height="wrap_content"
            android:layout_weight="1"
            android:text="Button" />
    </LinearLayout>
</LinearLayout>
免责声明:本站发布的内容(图片、视频和文字)以原创、转载和分享为主,文章观点不代表本网站立场,如果涉及侵权请联系站长邮箱:is@yisu.com进行举报,并提供相关证据,一经查实,将立刻删除涉嫌侵权内容。


