本篇内容主要讲解“SpringBoot yml配置文件如何读取”,感兴趣的朋友不妨来看看。本文介绍的方法操作简单快捷,实用性强。下面就让小编来带大家学习“SpringBoot yml配置文件如何读取”吧!
YAML(YAML Ain't Markup Language),一种数据序列化格式
优点:
容易阅读
容易与脚本语言交互
以数据为核心,重数据轻格式
YANL文件扩展名
.yml(主流)
.yaml
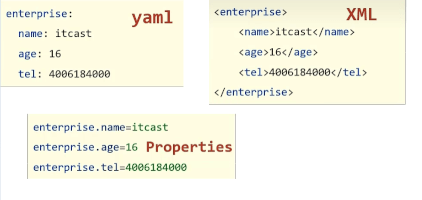
几种数据格式比较

大小写敏感
属性层级关系使用多行描述,每行结尾使用冒号结束
使用缩进表示层级关系,同层级左侧对齐,只允许使用空格(不允许使用Tab键)
属性值前面添加空格(属性名与属性值之间使用冒号+空格作为分隔)
#表示注释
示例:
user:
name: zhangsan
age: 12
users:
-
name: lisi
age: 13
-
name: wangwu
age: 18
likes: [game,play,having]
users1: [{name:zhangsan,age:12},{name:lisi,age:12}]
字面值表示方式

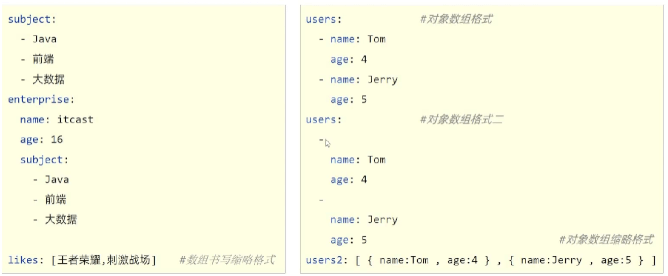
数组表示方式:在属性名书写位置的下方使用减号作为数据开始符号,每行书写一个数据,减号与数据键空格分隔

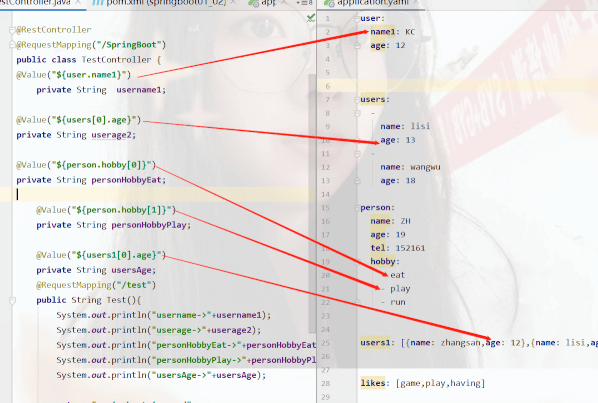
使用@Value读取单个数据,属性名引用方式:${一级属性名.二级属性名}

controller下
package com.springboot01_02.controller;
import org.springframework.beans.factory.annotation.Value;
import org.springframework.web.bind.annotation.RequestMapping;
import org.springframework.web.bind.annotation.RestController;
@RestController
@RequestMapping("/SpringBoot")
public class TestController {
@Value("${user.name1}")
    private String  username1;
@Value("${users[0].age}")
private String userage2;
@Value("${person.hobby[0]}")
private String personHobbyEat;
    @Value("${person.hobby[1]}")
    private String personHobbyPlay;
    @Value("${users1[0].age}")
    private String usersAge;
    @RequestMapping("/test")
    public String Test(){
        System.out.println("username->"+username1);
        System.out.println("userage->"+userage2);
        System.out.println("personHobbyEat->"+personHobbyEat);
        System.out.println("personHobbyPlay->"+personHobbyPlay);
        System.out.println("usersAge->"+usersAge);
        return "springboot is good";
    }
}
yml配置文件
user:
name1: KC
age: 12
users:
-
name: lisi
age: 13
-
name: wangwu
age: 18
person:
name: ZH
age: 19
tel: 152161
hobby:
- eat
- play
- run
users1: [{name: zhangsan,age: 12},{name: lisi,age: 12}]
likes: [game,play,having]
运行结果:

yaml数据读取
在配置文件中可以使用属性名引用方式引用属性
在配置文件中

package com.springboot01_02.controller;
import org.springframework.beans.factory.annotation.Value;
import org.springframework.web.bind.annotation.RequestMapping;
import org.springframework.web.bind.annotation.RestController;
@RestController
@RequestMapping("/SpringBoot")
public class TestController {
    @Value("${nowDir}")
    private String nowDir1;
    @Value("${tewDir}")
    private String tewDir1;
    @RequestMapping("/test")
    public String Test(){
        System.out.println("nowDir->"+nowDir1);
        System.out.println("towDir->"+tewDir1);
        return "springboot is good";
    }
}
运行结果:

可以发现,要想让转义字符生效,就得加上双引号不然还是以字符串的形式打印出
package com.springboot01_02.controller;import org.springframework.beans.factory.annotation.Autowired;import org.springframework.beans.factory.annotation.Value;import org.springframework.core.env.Environment;import org.springframework.web.bind.annotation.RequestMapping;import org.springframework.web.bind.annotation.RestController;@RestController@RequestMapping("/SpringBoot")public class TestController {//使用自动装配将所有数据封装到一个Environment中 @Autowired private Environment evn; @RequestMapping("/test") public String Test(){ System.out.println("----------------"); System.out.println(evn.getProperty("nowDir")); System.out.println(evn.getProperty("users1[0].age")); return "springboot is good"; }}运行结果:

小结:
使用Environment对象封装全部配置信息
使用@Autowired自动装配数据到Environment对象中
application.yaml配置文件中的信息
#创建类,用于封装下面的数据#有spring带我们去加载数据到对象中,且告诉spring加载这组信息#使用时从spring中直接获取信息使用datasource: driver: com.mysql.jdbc.Driver url: jdbc:mysql://localhost/love username: kongchao password: zenghui
自定义一个类
package com.springboot01_02.datesource;import lombok.Data;import org.springframework.boot.context.properties.ConfigurationProperties;import org.springframework.stereotype.Component;//1、定义数据类型模型封装yaml文件中对应的数据//2、定义为spring管控的bean@Component//3、指定加载的数据@ConfigurationProperties("datasource")//4、设置getSet方法等@Datapublic class MyDateSource { private String driver; private String url; private String username; private String password;}使用了@Date,在pom.xml中导入lombok
<dependency> <groupId>org.projectlombok</groupId> <artifactId>lombok</artifactId> <version>1.16.10</version> </dependency>
测试类下
package com.springboot01_02.controller;import com.springboot01_02.datesource.MyDateSource;import org.springframework.beans.factory.annotation.Autowired;import org.springframework.web.bind.annotation.RequestMapping;import org.springframework.web.bind.annotation.RestController;@RestController@RequestMapping("/SpringBoot")public class TestController {@Autowired private MyDateSource dateSource; @RequestMapping("/test") public String Test(){ System.out.println(dateSource); return "springboot is good"; }}运行访问localhost/SpringBoot/test即可得到:

小结:
使用@ConfigurationProperties注解绑定配置信息到封装类中
封装类需要定义为Spring管理的bean(使用注解@Component),否则无法进行属性注入
到此,相信大家对“SpringBoot yml配置文件如何读取”有了更深的了解,不妨来实际操作一番吧!这里是亿速云网站,更多相关内容可以进入相关频道进行查询,关注我们,继续学习!
免责声明:本站发布的内容(图片、视频和文字)以原创、转载和分享为主,文章观点不代表本网站立场,如果涉及侵权请联系站长邮箱:is@yisu.com进行举报,并提供相关证据,一经查实,将立刻删除涉嫌侵权内容。