本文小编为大家详细介绍“怎么使用webpack在日志中记录文件行号”,内容详细,步骤清晰,细节处理妥当,希望这篇“怎么使用webpack在日志中记录文件行号”文章能帮助大家解决疑惑,下面跟着小编的思路慢慢深入,一起来学习新知识吧。
在做前端项目时,会在各个关键节点打印日志,方便后续数据分析和问题排查。当日志越来越多之后,又会遇到通过日志反查代码所在文件和所在行的场景,于是一个很自然的需求就出来了:
在打印日志的时候,自动注入当前文件名、行号、列号。
举个例子,有个 logger 函数,我们在 index.js 的业务代码某一行添加打印逻辑:
const { logLine } = require('./utils')

function getJuejinArticles() {
  const author = 'keliq'
  const level = 'LV.5'
  // ... 业务代码省略,获取文章列表
  logLine(author, level)
  // ...
}

getJuejinArticles()正常情况下会输出:
keliq LV.5
但是希望能够输出带文件名和行号,即:
[index.js:7:3] keliq LV.5表明当前这次打印输出来源于 index.js 文件中的第 7 行第 3 列代码,也就是 logLine 函数所在的具体位置。那如何实现这个需求呢?我的脑海中浮现了两个思路:
因为 error 错误栈里面天然带有此类信息,可以人工制造了一个 Error,然后捕获它:
exports.logLine = (...args) => {
  try {
    throw new Error()
  } catch (e) {
    console.log(e.stack)
  }
}仔细观察打印的结果:
Error
at logLine (/test/src/utils.js:3:11)
at getJuejinArticles (/test/src/index.js:7:3)
at Object.<anonymous> (/test/src/index.js:11:1)
at Module._compile (node:internal/modules/cjs/loader:1105:14)
at Object.Module._extensions..js (node:internal/modules/cjs/loader:1159:10)
at Module.load (node:internal/modules/cjs/loader:981:32)
at Function.Module._load (node:internal/modules/cjs/loader:822:12)
at Function.executeUserEntryPoint [as runMain] (node:internal/modules/run_main:77:12)
at node:internal/main/run_main_module:17:47
第三行的内容不正是我们想要的结果吗?只需要把这一行的字符串进行格式化一下,提取出 index.js:7:3 即可:
at getJuejinArticles (/test/src/index.js:7:3)
由于代码结构是这样的:
.
└── src
├── index.js
└── utils.js
只需要改成下面的代码即可:
exports.logLine = (...args) => {
  try {
    throw new Error()
  } catch (e) {
    const lines = e.stack.split('\n')
    const fileLine = lines[2].split('/src/').pop().slice(0, -1)
    console.log(`[${fileLine}]`, ...args)
  }
}命令行试一试:
$ test node src/index.js
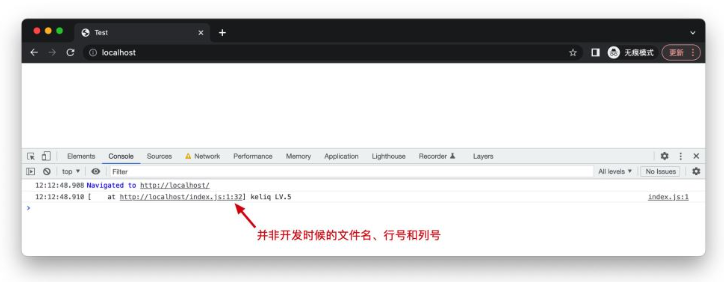
[index.js:7:3] keliq LV.5问题似乎完美解决,然而还是想的太简单了,上述场景仅限于 node.js 环境,而在 web 环境,所有的产物都会被 webpack 打到一个或多个 js 文件里面,而且做了压缩混淆处理,由于 error 是在运行时被捕获到的 ,所以我没根本无法拿到开发状态下的文件名、行号和列号,如下图所示:

那怎么办呢?解铃还须系铃人,既然 webpack 对代码进行了加工处理,那就只能在预处理最开始的阶段介入进来,写一个自定义的 loader 来解析源码文件,拿到文件名、行号和列号。说干就干,创建一个 inject-line.loader.js,写下模板代码:
module.exports = function (content) {
  content = content.toString('utf-8')
  if (this.cacheable) this.cacheable()
  console.log(this.resourcePath) // 打印文件路径
  console.log(content) // 打印文件内容
  return content
}
module.exports.raw = true然后在 webpack.config.js 中做配置:
module.exports = {
  entry: './src/index.js',
  output: {
    filename: 'index.js',
  },
  module: {
    rules: [
      {
        test: /.js$/,
        exclude: [/node_modules/],
        use: [
          {
            loader: require.resolve('./loaders/inject-line.loader'),
          },
        ],
      },
    ],
  },
}一切准备就绪,先运行一下看看输出:

可以看到,index.js 和 utils.js 被自定义的 inject-line.loader.js 给加载到了,通过 this.resourcePath 能够拿到文件名称,行号和列号的话只能通过分析 content 字符串进行提取了,处理的代码如下:
// 拿到文件路径
const fileName = this.resourcePath.split('/src/').pop()
// 文本内容按行处理后再拼接起来
content = content
  .split('\n')
  .map((line, row) => {
    const re = /logLine((.*?))/g
    let result
    let newLine = ''
    let cursor = 0
    while ((result = re.exec(line))) {
      const col = result.index
      newLine += line.slice(cursor, result.index) + `logLine('${fileName}:${row + 1}:${col + 1}', ` + result[1] + ')'
      cursor += col + result[0].length
    }
    newLine += line.slice(cursor)
    return newLine
  })
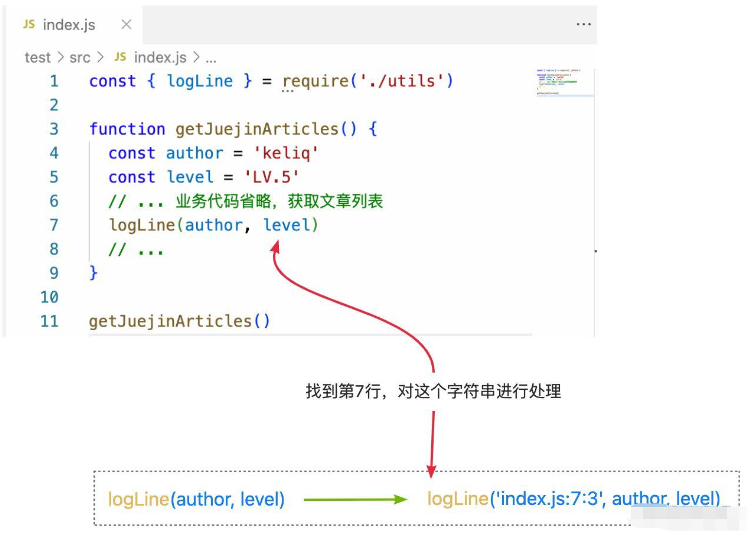
.join('\n')这里面的逻辑,如果光看代码的话可能会云里雾里,其实思路很简单,就是下面这样的:

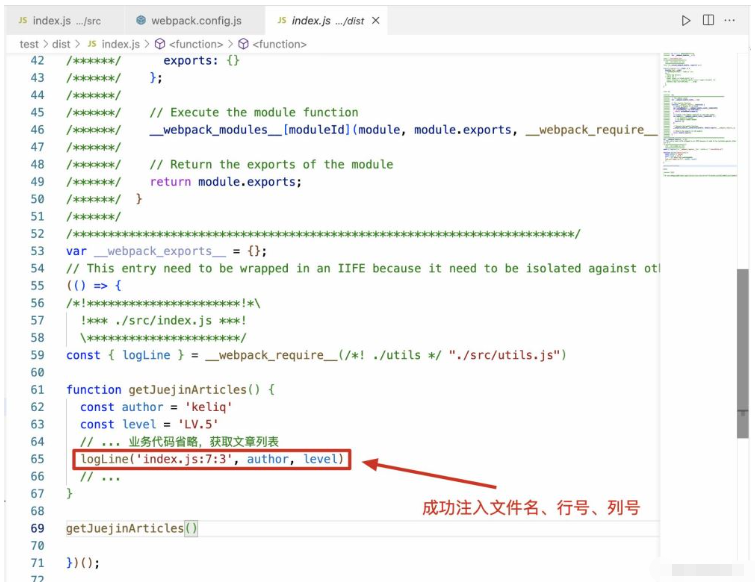
这样的话,即使代码经过各种压缩转换,也不会改变开发状态下代码所在的文件名、行与列的位置了。打开 webpack 打包后的文件看一下:

到这里,功能就已经开发完了,不过还有一个小小的缺陷就是 logLine 函数名是写死的,能不能让用户自己定义这个函数名呢?当然可以,在 webpack 配置文件中,支持利用 options 属性传递 config 配置参数:
module.exports = {
  entry: './src/index.js',
  output: {
    filename: 'index.js',
  },
  module: {
    rules: [
      {
        test: /.js$/,
        exclude: [/node_modules/],
        use: [
          {
            loader: require.resolve('./loaders/inject-line.loader'),
            options: {
              config: {
                name: 'customLogName',
              },
            },
          },
        ],
      },
    ],
  },
}然后在 inject-line.loader.js 代码中通过 this.query.config 拿到该配置即可,不过正则表达式也要根据这个配置动态创建,字符串替换的时候也要换成该配置变量,最终代码如下:
module.exports = function (content) {
  content = content.toString('utf-8')
  if (this.cacheable) this.cacheable()
  const { name = 'logLine' } = this.query.config || {}
  const fileName = this.resourcePath.split('/src/').pop()
  content = content
    .split('\n')
    .map((line, row) => {
      const re = new RegExp(`${name}\((.*?)\)`, 'g')
      let result
      let newLine = ''
      let cursor = 0
      while ((result = re.exec(line))) {
        const col = result.index
        newLine += line.slice(cursor, result.index) + `${name}('${fileName}:${row + 1}:${col + 1}', ` + result[1] + ')'
        cursor += col + result[0].length
      }
      newLine += line.slice(cursor)
      return newLine
    })
    .join('\n')

  return content
}
module.exports.raw = true读到这里,这篇“怎么使用webpack在日志中记录文件行号”文章已经介绍完毕,想要掌握这篇文章的知识点还需要大家自己动手实践使用过才能领会,如果想了解更多相关内容的文章,欢迎关注亿速云行业资讯频道。
亿速云「云服务器」,即开即用、新一代英特尔至强铂金CPU、三副本存储NVMe SSD云盘,价格低至29元/月。点击查看>>
免责声明:本站发布的内容(图片、视频和文字)以原创、转载和分享为主,文章观点不代表本网站立场,如果涉及侵权请联系站长邮箱:is@yisu.com进行举报,并提供相关证据,一经查实,将立刻删除涉嫌侵权内容。