这篇文章主要讲解了“怎么用命令行CLI一键生成各种烦人的lint配置”,文中的讲解内容简单清晰,易于学习与理解,下面请大家跟着小编的思路慢慢深入,一起来研究和学习“怎么用命令行CLI一键生成各种烦人的lint配置”吧!
这个工具叫做 create-lint-config,一个一键创建所有的 lint 配置的 CLI 命令行工具。前端工程中特别多的配置文件例如 Eslint、Prettier 等让我们心烦意乱。我们的目标是快速而轻松地生成这些配置!
在你的项目根目录执行以下命令:
# npm
npm create lint-config@latest
# yarn
yarn create lint-config
# pnpm
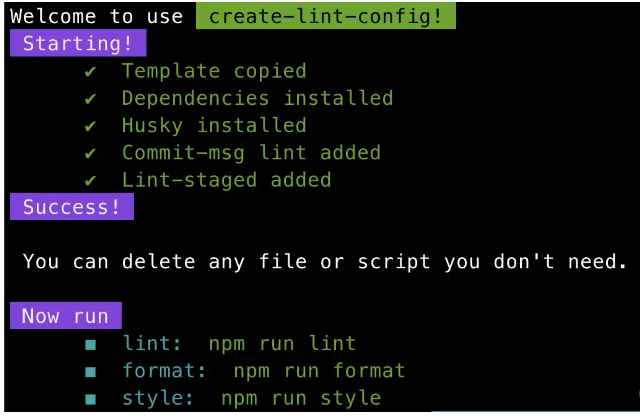
pnpm create lint-config@latest执行结果如下:

这个命令,一次执行,创建了 Eslint、StyleLint、prettier、commitlint、husy、lint-staged 等所有配置文件。
生成 Eslint 配置。
生成 prettier 配置。
生成 stylelint 配置。
生成 husky 配置。
生成 commitlint 配置。
自动安装依赖。
期待更多。
#!/usr/bin/env node
async function install({ pkgManager, cwd, _arguments }: { pkgManager: string; cwd: string; arguments: array }) {}
async function init() {
  // 拷贝配置文件基础模板,包括 Eslint、StyleLint、prettier、commitlint、husy、lint-staged
  await spinner({
    start: `Base template copying...`,
    end: 'Template copied',
    while: () => {
      try {
        copy('base')
      } catch (e) {
        error('error', e)
        process.exit(1)
      }
    },
  })
  // 安装 husky
  await spinner({
    start: `Husky installing...`,
    end: 'Husky installed',
    while: () =>
      install({
        cwd: process.cwd(),
        pkgManager: 'npx',
        _arguments: ['husky', 'install'],
      }).catch((e) => {
        error('error', e)
        process.exit(1)
      }),
  })
  // husky 写入 commit-msg 校验指令,使用 commitlint
  await spinner({
    start: `Adding commit-msg lint...`,
    end: 'Commit-msg lint added',
    while: () =>
      install({
        cwd: process.cwd(),
        pkgManager: 'npx',
        _arguments: ['husky', 'add', '.husky/commit-msg', 'npx --no-install commitlint --edit ""'],
      }).catch((e) => {
        error('error', e)
        process.exit(1)
      }),
  })
  // husky 写入 pre-commit校验指令,使用 lint-staged 执行 elint 等
  await spinner({
    start: `Adding lint-staged...`,
    end: 'Lint-staged added',
    while: () =>
      install({
        cwd: process.cwd(),
        pkgManager: 'npx',
        _arguments: ['husky', 'add', '.husky/pre-commit', 'npx lint-staged'],
      }).catch((e) => {
        error('error', e)
        process.exit(1)
      }),
  })
  // 安装依赖
  await spinner({
    start: `Dependencies installing with npm...`,
    end: 'Dependencies installed',
    while: () =>
      install({
        cwd: process.cwd(),
        pkgManager: 'npm',
        _arguments: ['install'],
      }).catch((e) => {
        error('error', e)
        process.exit(1)
      }),
  })
}
init().catch((e) => {
  console.error(e)
})支持通过--template标志来选择模板,创建更多的配置文件模板,包括 ts、vue、react、node 等等
支持更灵活的交互式选项。现在只能一键生成默认的模板,有些配置可能是一些人不需要的,后续计划可以更灵活。
感谢各位的阅读,以上就是“怎么用命令行CLI一键生成各种烦人的lint配置”的内容了,经过本文的学习后,相信大家对怎么用命令行CLI一键生成各种烦人的lint配置这一问题有了更深刻的体会,具体使用情况还需要大家实践验证。这里是亿速云,小编将为大家推送更多相关知识点的文章,欢迎关注!
亿速云「云服务器」,即开即用、新一代英特尔至强铂金CPU、三副本存储NVMe SSD云盘,价格低至29元/月。点击查看>>
免责声明:本站发布的内容(图片、视频和文字)以原创、转载和分享为主,文章观点不代表本网站立场,如果涉及侵权请联系站长邮箱:is@yisu.com进行举报,并提供相关证据,一经查实,将立刻删除涉嫌侵权内容。