本篇内容主要讲解“@AliasFor注解如何使用”,感兴趣的朋友不妨来看看。本文介绍的方法操作简单快捷,实用性强。下面就让小编来带大家学习“@AliasFor注解如何使用”吧!
@AliasFor注解基本上都是在spring源码当中出现的,AliasFor是Spring提供的注解,Alias是别名的意思,For是为了,首先我们通过命名可以得出一个结论,他是为了别名而自定义的注解!
Spring中@AliasFor注解的作用有两点:
将同一个注解类的属性设置互为别名
将一个注解上的属性值传递给另一个注解
但这并不是java原生支持的,需要通过Spring中提供的工具类:org.springframework.core.annotation.AnnotationUtils或者org.springframework.core.annotation.AnnotatedElementUtils来解析。AnnotatedElementUtils内部还是调用的AnnotationUtils。
源码如下:它有三个属性value和attribute以及annotation,@AliasFor注解注释了自身,并且value和attribute互为别名,通过源码很容易知道,当我们使用这个注解,
@AliasFor(value=“xxx”)和@AliasFor(attribute=“xxx”)是等价的。
@Retention(RetentionPolicy.RUNTIME)
@Target({ElementType.METHOD})
@Documented
public @interface AliasFor {
    @AliasFor("attribute")
    String value() default "";

    @AliasFor("value")
    String attribute() default "";

    Class<? extends Annotation> annotation() default Annotation.class;
}Java 运行时读取Annotation 需要通过反射,Spring 提供AnnotationUtils , AnnotationElementUtils 用于简化操作,其他特点如下:
查询Meta Annotation(注解的注解)
对@AliasFor 解析,生成指定注解的代理,并赋值。(注:定义其他Annotation 的别名)
Utils 调用涉及的元素:
Annotation: Annotation 元数据
AnnotatedElement: 被Annotation注解的对象,包括annotation , class , method等
Method: 类和接口中的方法信息
AnnotationUtils常用方法:
getAnnotation: 从某个类获取某个annotation
findAnnotation: 从类或方法中查找某个annotation。
isAnnotationDeclaredLocally: 验证annotation是否直接注释在类上而不是集成来的。
isAnnotationInherited: 验证annotation是否继承于另一个class。
getAnnotationAttributes: 获取annotation的所有属性。
getValue: 获取指定annotation的值.
getDefaultValue: 获取指定annotation或annotation 属性的默认值
AnnotatedElementUtils常用方法:
findMergedAnnotation:这个方法会合并@AliasFor传递的值
一共有两个属性
import org.springframework.core.annotation.AliasFor;

import java.lang.annotation.*;

@Target(ElementType.TYPE)
@Retention(RetentionPolicy.RUNTIME)
@Documented
public @interface EnableCVS {

	// 这里就算是改成@AliasFor(attribute = "address")测试结果也是一样的
    @AliasFor(value = "address")
    String value() default "";

    @AliasFor(value = "value")
    String address() default "";
}然后使用自定义的注解@EnableCVS修饰
@Configuration
@EnableCVS(address = "hhh")
public class AppConfig {

}import org.springframework.core.annotation.AnnotationUtils;
public class Test {
public static void main(String[] args) {
// spring提供的
EnableCVS annotation = AnnotationUtils.findAnnotation(AppConfig.class, EnableCVS.class);
System.out.println("AnnotationUtils:address:" + annotation.address());
System.out.println("AnnotationUtils:value:" + annotation.value());
// jdk原生
EnableCVS annotation1 = AppConfig.class.getAnnotation(EnableCVS.class);
System.out.println("AppConfig:address:" + annotation1.address());
System.out.println("AppConfig:value:" + annotation1.value());
}
}首先我们设置的注解是@EnableCVS(address = "hhh") ,只设置了address属性,并没有设置value属性,会发现jdk原生方式获取value的时候是拿不到值的,而spring提供的AnnotationUtils却可以获取到,而且获取到的就是address的值!
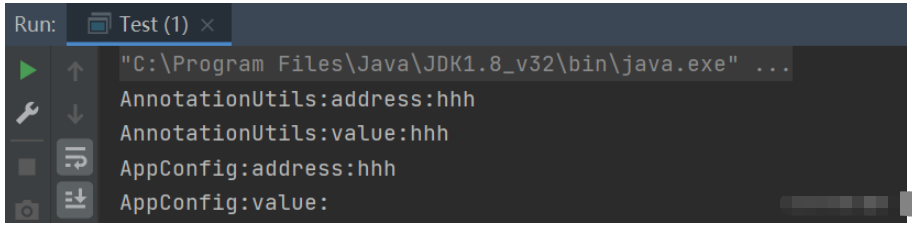
其实就可以理解为,一旦value值设置了如下注解@AliasFor(value = "address"),也就意味着通过AnnotationUtils来获取value属性值的时候,当value值没有设置的时候,实际上会去获取address属性的值!
@AliasFor(value = "address")
String value() default "";
注意:如果@AliasFor注解当中两个属性互相设置了@AliasFor别名,并且使用自定义注解的时候,同时设置address和value的值,这时候通过AnnotationUtils#findAnnotation(Class<?>, annotationType)获取属性值,则会抛出异常!
示例如下:
@Configuration
@EnableCVS(value = "hhh",address = "222")
public class AppConfig {

}@Target(ElementType.TYPE)
@Retention(RetentionPolicy.RUNTIME)
@Documented
@Scope("singleton")
@Component
@Inherited
public @interface SingletonComponent {
@AliasFor(annotation = Component.class, attribute = "value")
String value() default "";
}使用@SingletonComponent修饰
@SingletonComponent("simpleService")
public class SimpleSingletonService {

}import org.springframework.context.annotation.AnnotationConfigApplicationContext;
import org.springframework.context.annotation.ComponentScan;
import org.springframework.context.annotation.Scope;
import org.springframework.core.annotation.AnnotatedElementUtils;
import org.springframework.core.annotation.AnnotationUtils;
import org.springframework.stereotype.Component;
import java.util.Map;
// 这个注解一定要加,不然getAllAnnocations方法获取不到值
@ComponentScan
public class AnnotationUtilsDemo {
private static void annotationUtilsDemo() {
// 获取类注解
SingletonComponent singletonComponentAnnocation = AnnotationUtils.
findAnnotation(SimpleSingletonService.class, SingletonComponent.class);
System.out.println("@SingletonComponent : " + singletonComponentAnnocation);
System.out.println("@SingletonComponent value: " + AnnotationUtils.getValue(singletonComponentAnnocation, "value"));
System.out.println("----------------------------------------------");
Scope scopeAnnocation = AnnotationUtils.findAnnotation(SimpleSingletonService.class, Scope.class);
System.out.println("@Scope : " + scopeAnnocation);
System.out.println("@Scope value: " + AnnotationUtils.getValue(scopeAnnocation, "scopeName"));
System.out.println("----------------------------------------------");
// 获取@AliasFor Marge 后的注解,直接调用 AnnotationUtils的方法不会组合@AliasFor的值,需要调用AnnotatedElementUtils
Component componentAnnocation = AnnotatedElementUtils.findMergedAnnotation(SimpleSingletonService.class, Component.class);
System.out.println("@Component : " + componentAnnocation);
System.out.println("@Component value: " + AnnotationUtils.getValue(componentAnnocation, "value"));
}
private static void getAllAnnocations() {
AnnotationConfigApplicationContext context = new AnnotationConfigApplicationContext(AnnotationUtilsDemo.class);
// 获取SingletonComponent注解修饰的类
Map<String, Object> beans = context.getBeansWithAnnotation(SingletonComponent.class);
for (Object bean : beans.values()) {
System.out.println("bean : " + bean);
// @SingletonComponent 继承了 @Component 所以存在实例,@Component的value值就是通过@AliasFor注解传递过去的
Component componentAnnocation = AnnotatedElementUtils.findMergedAnnotation(bean.getClass(), Component.class);
System.out.println(componentAnnocation);
}
}
public static void main(String[] args) {
AnnotationUtilsDemo.annotationUtilsDemo();
System.out.println("----------------------------------------------");
AnnotationUtilsDemo.getAllAnnocations();
}
}Connected to the target VM, address: '127.0.0.1:49763', transport: 'socket'
@SingletonComponent : @com.gzl.cn.springbootnacos.aa.SingletonComponent(value="simpleService")
@SingletonComponent value: simpleService
----------------------------------------------
@Scope : @org.springframework.context.annotation.Scope(proxyMode=DEFAULT, scopeName="singleton", value="singleton")
@Scope value: singleton
----------------------------------------------
@Component : @org.springframework.stereotype.Component(value="simpleService")
@Component value: simpleService
----------------------------------------------
bean : com.gzl.cn.springbootnacos.aa.SimpleSingletonService@1b759d6
@org.springframework.stereotype.Component(value="simpleService")
如下所示@SpringBootApplication并没有定义新的属性,而是复用其他注解已有的注解属性,并对其进行组合形成新的注解从而到达到便捷的目的。
这样的注解我们可以称之为复合注解。
@Target({ElementType.TYPE})
@Retention(RetentionPolicy.RUNTIME)
@Documented
@Inherited
@SpringBootConfiguration
@EnableAutoConfiguration
@ComponentScan(
    excludeFilters = {@Filter(
    type = FilterType.CUSTOM,
    classes = {TypeExcludeFilter.class}
), @Filter(
    type = FilterType.CUSTOM,
    classes = {AutoConfigurationExcludeFilter.class}
)}
)
public @interface SpringBootApplication {
    @AliasFor(annotation = EnableAutoConfiguration.class)
    Class<?>[] exclude() default {};

    @AliasFor(annotation = EnableAutoConfiguration.class)
    String[] excludeName() default {};

    @AliasFor(
        annotation = ComponentScan.class,
        attribute = "basePackages"
    )
    String[] scanBasePackages() default {};

    @AliasFor(
        annotation = ComponentScan.class,
        attribute = "basePackageClasses"
    )
    Class<?>[] scanBasePackageClasses() default {};

    @AliasFor(
        annotation = ComponentScan.class,
        attribute = "nameGenerator"
    )
    Class<? extends BeanNameGenerator> nameGenerator() default BeanNameGenerator.class;

    @AliasFor(annotation = Configuration.class)
    boolean proxyBeanMethods() default true;
}
所以在使用SpringBoot 时我们只需要@SpringBootApplication一个注解就能开启自动配置,自动扫描的功能。
而不再需要使下面三个注解来达到同样的目的。
@Configuration
@ComponentSan
@EnnableAutoConfiguration
@Target({ElementType.TYPE, ElementType.METHOD})
@Retention(RetentionPolicy.RUNTIME)
@Documented
@Mapping
public @interface RequestMapping {
    String name() default "";

    @AliasFor("path")
    String[] value() default {};

    @AliasFor("value")
    String[] path() default {};

    RequestMethod[] method() default {};

    String[] params() default {};

    String[] headers() default {};

    String[] consumes() default {};

    String[] produces() default {};
}
到此,相信大家对“@AliasFor注解如何使用”有了更深的了解,不妨来实际操作一番吧!这里是亿速云网站,更多相关内容可以进入相关频道进行查询,关注我们,继续学习!
免责声明:本站发布的内容(图片、视频和文字)以原创、转载和分享为主,文章观点不代表本网站立场,如果涉及侵权请联系站长邮箱:is@yisu.com进行举报,并提供相关证据,一经查实,将立刻删除涉嫌侵权内容。


