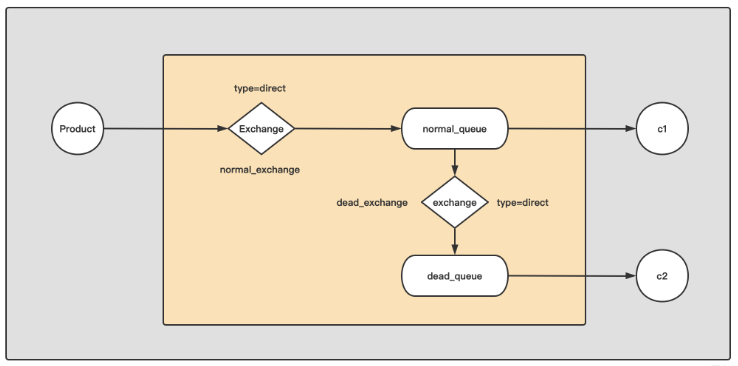
这篇文章主要讲解了“Golang实现RabbitMQ中死信队列的情况有哪些”,文中的讲解内容简单清晰,易于学习与理解,下面请大家跟着小编的思路慢慢深入,一起来研究和学习“Golang实现RabbitMQ中死信队列的情况有哪些”吧!
消费者超时未应答
队列的容量有限
消费者拒绝了的消息

其实整体的思路就是分别创建一个normal_exchange、dead_exchange、normal_queue、dead_queue,然后将normal_exchange与normal_queue进行绑定,将dead_exchange与dead_queue进行绑定,这里比较关键的一个点在于说如何将normal_queue与dead_exchange进行绑定,这样才能将错误的消息传递过来。下面就是这段代码的关键。
// 声明一个normal队列
    _, err = ch.QueueDeclare(
        constant.NormalQueue,
        true,
        false,
        false,
        false,
        amqp.Table{
            //"x-message-ttl":             5000,                    // 指定过期时间
            //"x-max-length":              6,                        // 指定长度。超过这个长度的消息会发送到dead_exchange中
            "x-dead-letter-exchange":    constant.DeadExchange,    // 指定死信交换机
            "x-dead-letter-routing-key": constant.DeadRoutingKey,  // 指定死信routing-key
})consumer1.go
package day07

import (
    amqp "github.com/rabbitmq/amqp091-go"
    "log"
    "v1/utils"
)

type Constant struct {
    NormalExchange   string
    DeadExchange     string
    NormalQueue      string
    DeadQueue        string
    NormalRoutingKey string
    DeadRoutingKey   string
}

func Consumer1() {
    // 获取连接
    ch := utils.GetChannel()
    // 创建一个变量常量
    constant := Constant{
        NormalExchange:   "normal_exchange",
        DeadExchange:     "dead_exchange",
        NormalQueue:      "normal_queue",
        DeadQueue:        "dead_queue",
        NormalRoutingKey: "normal_key",
        DeadRoutingKey:   "dead_key",
    }
    // 声明normal交换机
    err := ch.ExchangeDeclare(
        constant.NormalExchange,
        amqp.ExchangeDirect,
        true,
        false,
        false,
        false,
        nil,
    )
    utils.FailOnError(err, "Failed to declare a normal exchange")
    // 声明一个dead交换机
    err = ch.ExchangeDeclare(
        constant.DeadExchange,
        amqp.ExchangeDirect,
        true,
        false,
        false,
        false,
        nil,
    )
    utils.FailOnError(err, "Failed to declare a dead exchange")

    // 声明一个normal队列
    _, err = ch.QueueDeclare(
        constant.NormalQueue,
        true,
        false,
        false,
        false,
        amqp.Table{
            "x-message-ttl": 5000, // 指定过期时间
            //"x-max-length":              6,
            "x-dead-letter-exchange":    constant.DeadExchange,   // 指定死信交换机
            "x-dead-letter-routing-key": constant.DeadRoutingKey, // 指定死信routing-key
        })
    utils.FailOnError(err, "Failed to declare a normal queue")
    // 声明一个dead队列:注意不要给死信队列设置消息时间,否者死信队列里面的信息会再次过期
    _, err = ch.QueueDeclare(
        constant.DeadQueue,
        true,
        false,
        false,
        false,
        nil)
    utils.FailOnError(err, "Failed to declare a dead queue")

    // 将normal_exchange与normal_queue进行绑定
    err = ch.QueueBind(constant.NormalQueue, constant.NormalRoutingKey, constant.NormalExchange, false, nil)
    utils.FailOnError(err, "Failed to binding normal_exchange with normal_queue")
    // 将dead_exchange与dead_queue进行绑定
    err = ch.QueueBind(constant.DeadQueue, constant.DeadRoutingKey, constant.DeadExchange, false, nil)
    utils.FailOnError(err, "Failed to binding dead_exchange with dead_queue")

    // 消费消息
    msgs, err := ch.Consume(constant.NormalQueue,
        "",
        false, // 这个地方一定要关闭自动应答
        false,
        false,
        false,
        nil)
    utils.FailOnError(err, "Failed to consume in Consumer1")

    var forever chan struct{}

    go func() {
        for d := range msgs {
            if err := d.Reject(false); err != nil {
                utils.FailOnError(err, "Failed to Reject a message")
            }
        }
    }()
    log.Printf(" [*] Waiting for logs. To exit press CTRL+C")

    <-forever
}consumer2.go
package day07

import (
    amqp "github.com/rabbitmq/amqp091-go"
    "log"
    "v1/utils"
)

func Consumer2() {
    // 拿取信道
    ch := utils.GetChannel()

    // 声明一个交换机
    err := ch.ExchangeDeclare(
        "dead_exchange",
        amqp.ExchangeDirect,
        true,
        false,
        false,
        false,
        nil)
    utils.FailOnError(err, "Failed to Declare a exchange")

    // 接收消息的应答
    msgs, err := ch.Consume("dead_queue",
        "",
        false,
        false,
        false,
        false,
        nil,
    )

    var forever chan struct{}
    go func() {
        for d := range msgs {
            log.Printf("[x] %s", d.Body)
            // 开启手动应答ß
            d.Ack(false)
        }
    }()
    log.Printf(" [*] Waiting for logs. To exit press CTRL+C")
    <-forever

}produce.go
package day07

import (
    "context"
    amqp "github.com/rabbitmq/amqp091-go"
    "strconv"
    "time"
    "v1/utils"
)

func Produce() {
    // 获取信道
    ch := utils.GetChannel()
    // 声明一个交换机
    err := ch.ExchangeDeclare(
        "normal_exchange",
        amqp.ExchangeDirect,
        true,
        false,
        false,
        false,
        nil)
    utils.FailOnError(err, "Failed to declare a exchange")
    ctx, cancer := context.WithTimeout(context.Background(), 5*time.Second)
    defer cancer()

    // 发送了10条消息
    for i := 0; i < 10; i++ {
        msg := "Info:" + strconv.Itoa(i)
        ch.PublishWithContext(ctx,
            "normal_exchange",
            "normal_key",
            false,
            false,
            amqp.Publishing{
                ContentType: "text/plain",
                Body:        []byte(msg),
            })
    }
}只需要改变consumer1.go中的对normal_queue的声明
// 声明一个normal队列
    _, err = ch.QueueDeclare(
        constant.NormalQueue,
        true,
        false,
        false,
        false,
        amqp.Table{
            //"x-message-ttl": 5000, // 指定过期时间
            "x-max-length":              6,
            "x-dead-letter-exchange":    constant.DeadExchange,   // 指定死信交换机
            "x-dead-letter-routing-key": constant.DeadRoutingKey, // 指定死信routing-key
})这里需要完成两点工作
工作1:需要在consumer1中作出拒绝的操作
go func() {
        for d := range msgs {
            if err := d.Reject(false); err != nil {
                utils.FailOnError(err, "Failed to Reject a message")
            }
        }
}()工作2:如果你consume的时候开启了自动应答一定要关闭
// 消费消息
    msgs, err := ch.Consume(constant.NormalQueue,
        "",
        false, // 这个地方一定要关闭自动应答
        false,
        false,
        false,
nil)其他的部分不需要改变,按照问题1中的设计即可。
感谢各位的阅读,以上就是“Golang实现RabbitMQ中死信队列的情况有哪些”的内容了,经过本文的学习后,相信大家对Golang实现RabbitMQ中死信队列的情况有哪些这一问题有了更深刻的体会,具体使用情况还需要大家实践验证。这里是亿速云,小编将为大家推送更多相关知识点的文章,欢迎关注!
亿速云「云服务器」,即开即用、新一代英特尔至强铂金CPU、三副本存储NVMe SSD云盘,价格低至29元/月。点击查看>>
免责声明:本站发布的内容(图片、视频和文字)以原创、转载和分享为主,文章观点不代表本网站立场,如果涉及侵权请联系站长邮箱:is@yisu.com进行举报,并提供相关证据,一经查实,将立刻删除涉嫌侵权内容。