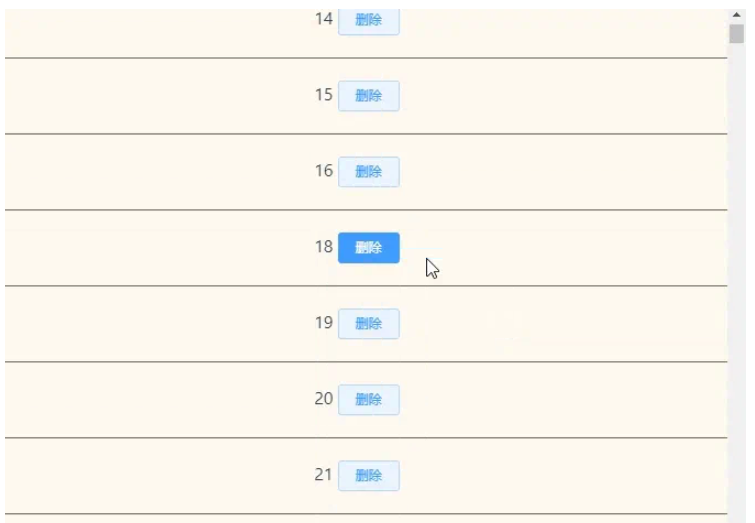
今天小编给大家分享一下基于Vue如何封装一个虚拟列表组件的相关知识点,内容详细,逻辑清晰,相信大部分人都还太了解这方面的知识,所以分享这篇文章给大家参考一下,希望大家阅读完这篇文章后有所收获,下面我们一起来了解一下吧。

使用方法
<template>
  <div>
    <div class="virtual-list-md-wrap">
      <hub-virtual-list :allData="data" itemHeight="70" :virtualData.sync="virtualData">
        <div v-for="(item, index) in virtualData" class="item">
         {{ item  }}
         <el-button type="primary" size="mini" plain @click="deleteItem(item)">删除</el-button>
        </div>
      </hub-virtual-list>
    </div>
  </div>

</template>
<script>
export default {
  data() {
    return {
      data: [],
      virtualData: []
    }
  },
  created() {
    setTimeout(() => {
      this.addData()
    }, 1000)
  },
  watch: {
  },
  methods: {
    addData() {
      for(let i = 0; i <= 100000; i ++) {
        this.$set(this.data, i, i)
      }
    },
    deleteItem(index) {
      this.data = this.data.filter((item) => item !== index)
    }
  }
}
</script>
<style>
.virtual-list-md-wrap {
  height: 500px;
  background-color: #FFFAF0;
}
.item {
  border-bottom: 1px solid #666;
  padding: 20px;
  text-align: center;
}
</style>| 参数 | 说明 | 类型 | 可选值 | 默认值 |
|---|---|---|---|---|
| allData | 全部数据 | Array | - | [] |
| virtualData | 虚拟数据 | Array | - | [] |
| itemHeight | 每行的高度,用于计算滚动距离 | Number, String | - | 30 |
| 插槽名 | 说明 |
|---|---|
| - | 自定义默认内容,即主体区域 |
首先梳理我想要的组件效果:
滚动条正常显示
加载渲染大量数据不卡顿
能对列表数据进行操作增删等
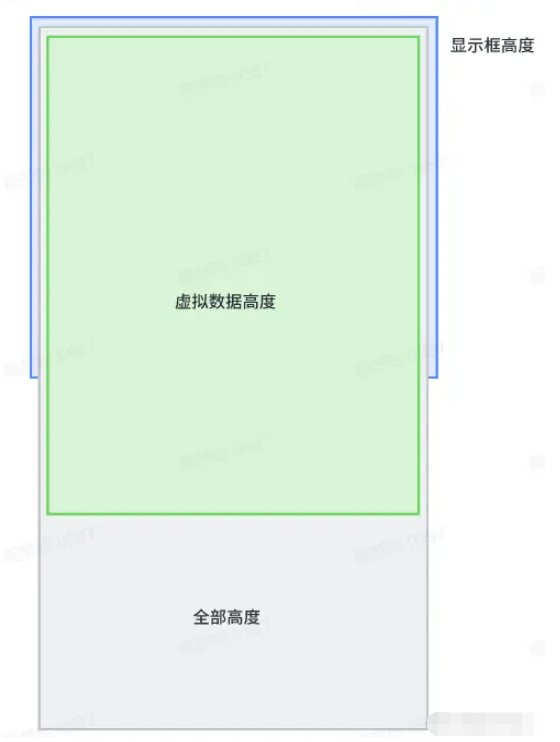
需要把显示框分为3部分:显示高度,全部高度,虚拟数据高度
大概的比例是这样的

为达到滚动条的效果,在最外层显示高度设置overflow: auto可以把滚动条撑出来,全部高度则设置position: absolute;z-index: -1;height: auto;,虚拟数据高度则设置position: absolute; height: auto;
整体样式代码如下
<template>
  <div class="hub-virtual-list">
    <!-- 显示高度 -->
    <div ref="virtualList" class="hub-virtual-list-show-height" @scroll="scrollEvent($event)">
      <!-- 全部高度,撑出滚动条 -->
      <div class="hub-virtual-list-all-height" :/>
      <!-- 存放显示数据 -->
      <div class="virtual-list" :/>
    </div>
  </div>
</template>

<style lang="scss" scoped>
.hub-virtual-list {
  height: 100%;
  &-show-height {
    position: relative;
    overflow: auto;
    height: 100%;
    -webkit-overflow-scrolling: touch;
  }
  &-all-height {
    position: absolute;
    left: 0;
    top: 0;
    right: 0;
    z-index: -1;
    height: auto;
  }
  .virtual-list {
    position: absolute;
    left: 0;
    top: 0;
    right: 0;
    height: auto;
  }
}
</style>如果想要渲染不卡顿,就得只加载显示区域的虚拟数据,虚拟数据的更新逻辑为:用startIndex和endIndex标志虚拟数据的起始索引和结束索引,在滚动条滑动时,通过计算滑动的距离去更新startIndex和endIndex。另外用offset标记偏移量,对虚拟数据区域设置transform: translate3d(0, ${this.offset}px, 0)跟着滚动条去移动
核心部分代码如下
scrollEvent(e) {
  const scrollTop = this.$refs.virtualList.scrollTop
  // 起始索引 = 滚动距离 / 每项高度
  this.startIndex = Math.floor(scrollTop / this.itemHeight)
  // 结束索引 = 开始索引 + 可见数量
  this.endIndex = this.startIndex + this.visibleCount
  // 偏移量 = 滚动距离
  this.offset = scrollTop - (scrollTop % this.itemHeight)
}如果想要在数据里添加操作按钮,则需要在封装组件时设置插槽,且需要把虚拟数据同步给父组件
设置插槽
<!-- 显示高度 -->
<div ref="virtualList" class="hub-virtual-list-show-height" @scroll="scrollEvent($event)">
  <!-- 全部高度,撑出滚动条 -->
  <div class="hub-virtual-list-all-height" :/>
  <!-- 存放显示数据 -->
  <div class="virtual-list" :>
    <!-- 设置插槽 -->
    <slot/>
  </div>
</div>
滚动时把虚拟数据同步给父组件
scrollEvent(e) {
  const scrollTop = this.$refs.virtualList.scrollTop
  // 起始索引 = 滚动距离 / 每项高度
  this.startIndex = Math.floor(scrollTop / this.itemHeight)
  // 结束索引 = 开始索引 + 可见数量
  this.endIndex = this.startIndex + this.visibleCount
  // 偏移量 = 滚动距离
  this.offset = scrollTop - (scrollTop % this.itemHeight)
  // 同步父组件数据
  this.inVirtualData = this.allData.slice(this.startIndex, this.endIndex)
  this.$emit('update:virtualData', this.inVirtualData)
}<template>
<div class="hub-virtual-list">
<!-- 显示高度 -->
<div ref="virtualList" class="hub-virtual-list-show-height" @scroll="scrollEvent($event)">
<!-- 全部高度,撑出滚动条 -->
<div class="hub-virtual-list-all-height" :/>
<!-- 存放显示数据 -->
<div class="virtual-list" >
<slot/>
</div>
</div>
</div>
</template>
<script>
export default {
name: 'hub-virtual-list',
props: {
// 全部数据
allData: {
type: Array,
default: () => []
},
// 虚拟数据
virtualData: {
type: Array,
default: () => []
},
// 每项高度
itemHeight: {
type: [Number, String],
default: '30'
},
// 每项样式
itemStyle: {
type: Object,
default: () => {}
}
},
data() {
return {
// 起始索引
startIndex: 0,
// 结束索引
endIndex: null,
// 偏移量,计算滚动条
offset: 0,
inVirtualData: []
}
},
computed: {
// 所有高度
allHeight() {
// 每项高度 * 项数
return this.itemHeight * this.allData.length
},
// 可见数量
visibleCount() {
// 可见高度 / 每项高度
return Math.ceil(this.showHeight / this.itemHeight)
},
// 显示数据的偏移量
getTransform() {
return `translate3d(0, ${this.offset}px, 0)`
}
},
watch: {
allData: {
handler() {
this.inVirtualData = this.allData.slice(this.startIndex, this.endIndex)
this.$emit('update:virtualData', this.inVirtualData)
},
deep: true
}
},
mounted() {
this.showHeight = this.$el.clientHeight
this.startIndex = 0
this.endIndex = this.startIndex + this.visibleCount
},
methods: {
scrollEvent(e) {
const scrollTop = this.$refs.virtualList.scrollTop
// 起始索引 = 滚动距离 / 每项高度
this.startIndex = Math.floor(scrollTop / this.itemHeight)
// 结束索引 = 开始索引 + 可见数量
this.endIndex = this.startIndex + this.visibleCount
// 偏移量 = 滚动距离
this.offset = scrollTop - (scrollTop % this.itemHeight)
// 同步父组件数据
this.inVirtualData = this.allData.slice(this.startIndex, this.endIndex)
this.$emit('update:virtualData', this.inVirtualData)
}
}
}
</script>
<style lang="scss" scoped>
.hub-virtual-list {
height: 100%;
&-show-height {
position: relative;
overflow: auto;
height: 100%;
-webkit-overflow-scrolling: touch;
}
&-all-height {
position: absolute;
left: 0;
top: 0;
right: 0;
z-index: -1;
height: auto;
}
.virtual-list {
position: absolute;
left: 0;
top: 0;
right: 0;
height: auto;
}
}
</style>以上就是“基于Vue如何封装一个虚拟列表组件”这篇文章的所有内容,感谢各位的阅读!相信大家阅读完这篇文章都有很大的收获,小编每天都会为大家更新不同的知识,如果还想学习更多的知识,请关注亿速云行业资讯频道。
免责声明:本站发布的内容(图片、视频和文字)以原创、转载和分享为主,文章观点不代表本网站立场,如果涉及侵权请联系站长邮箱:is@yisu.com进行举报,并提供相关证据,一经查实,将立刻删除涉嫌侵权内容。