这篇文章主要介绍“怎么通过Python实现批量数据提取”,在日常操作中,相信很多人在怎么通过Python实现批量数据提取问题上存在疑惑,小编查阅了各式资料,整理出简单好用的操作方法,希望对大家解答”怎么通过Python实现批量数据提取”的疑惑有所帮助!接下来,请跟着小编一起来学习吧!
1.ImageMagick
2.tesseract-OCR
3.Python3.7
4.from PIL import Image as PI
5.import io
6.import os
7.import pyocr.builders
8.from cnocr import CnOcr
9.import xlwt

分析上图发现票据金额为“贰拾万元整”,数据金额为大写中文,因此在导入Excel之前我们需要将金额票据的数据转换成数字的格式,基于此,我们需要首先完成大写汉字和数字的转换。
def chineseNumber2Int(strNum: str):
    result = 0
    temp = 1  # 存放一个单位的数字如:十万
    count = 0  # 判断是否有chArr
    cnArr = ['壹', '贰', '叁', '肆', '伍', '陆', '柒', '捌', '玖']
    chArr = ['拾', '佰', '仟', '万', '亿']
    for i in range(len(strNum)):
        b = True
        c = strNum[i]
        for j in range(len(cnArr)):
            if c == cnArr[j]:
                if count != 0:
                    result += temp
                    count = 0
                temp = j + 1
                b = False
                break
        if b:
            for j in range(len(chArr)):
                if c == chArr[j]:
                    if j == 0:
                        temp *= 10
                    elif j == 1:
                        temp *= 100
                    elif j == 2:
                        temp *= 1000
                    elif j == 3:
                        temp *= 10000
                    elif j == 4:
                        temp *= 100000000
                count += 1
        if i == len(strNum) - 1:
            result += temp
return result通过上述代码即可实现大写字母与数字的转换,例如输入“贰拾万元整”即可导出“200000”,再将其转换成数字后即可极大地简化表格的操作,也可以在完成表格操作的同时有利于数据归档。
接下来,我们需要分析发票的内部内容,分析下图可知,我们需要获取以下几个数据内容:“出票日期”、“汇票到账日期”、“票据号码”、“收款人”、“票据金额”、“出票人”,可以通过画图软件获取精准定位。
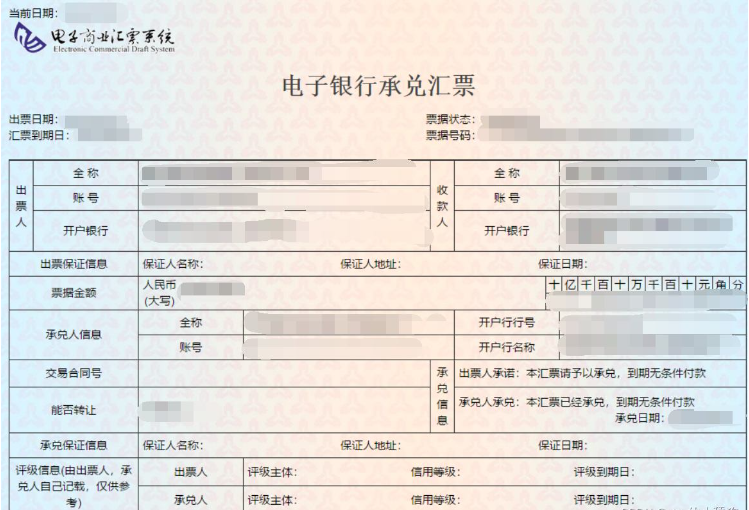
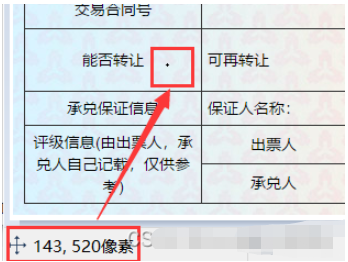
如图,小黑点即鼠标所在地,画图软件左下角即他的坐标。
def text1(new_img):
    #提取出票日期
    left = 80
    top = 143
    right = 162
    bottom = 162
    image_text1 = new_img.crop((left, top, right, bottom))
    #展示图片
    #image_text1.show()
    txt1 = tool.image_to_string(image_text1)
    print(txt1)
return str(txt1)def text2(new_img):
#提取金额
left = 224
top = 355
right = 585
bottom = 380
image_text2 = new_img.crop((left, top, right, bottom))
#展示图片
#image_text2.show()
image_text2.save("img/tmp.png")
temp = ocr.ocr("img/tmp.png")
temp="".join(temp[0])
txt2=chineseNumber2Int(temp)
print(txt2)
return txt2def text3(new_img):
#提取出票人
left = 177
top = 207
right = 506
bottom = 231
image_text3 = new_img.crop((left, top, right, bottom))
#展示图片
#image_text3.show()
image_text3.save("img/tmp.png")
temp = ocr.ocr("img/tmp.png")
txt3="".join(temp[0])
print(txt3)
return txt3def text4(new_img):
#提取付款行
left = 177
top = 274
right = 492
bottom = 311
image_text4 = new_img.crop((left, top, right, bottom))
#展示图片
#image_text4.show()
image_text4.save("img/tmp.png")
temp = ocr.ocr("img/tmp.png")
txt4="".join(temp[0])
print(txt4)
return txt4def text5(new_img):
#提取汇票到日期
left = 92
top = 166
right = 176
bottom = 184
image_text5 = new_img.crop((left, top, right, bottom))
#展示图片
#image_text5.show()
txt5 = tool.image_to_string(image_text5)
print(txt5)
return txt5def text6(new_img):
#提取票据号码
left = 598
top = 166
right = 870
bottom = 182
image_text6 = new_img.crop((left, top, right, bottom))
#展示图片
#image_text6.show()
txt6 = tool.image_to_string(image_text6)
print(txt6)
return txt6在将数据全部提取完成之后,即进入设置环节,我们需要首先将所有账单文件进行提取,获取他们的文件名和路径。
ocr=CnOcr() tool = pyocr.get_available_tools()[0] filePath='img' img_name=[] for i,j,name in os.walk(filePath): img_name=name
在获取完整后,即可进行数据导入Excel的操作。
count=1
book = xlwt.Workbook(encoding='utf-8',style_compression=0)
sheet = book.add_sheet('test',cell_overwrite_ok=True)
for i in img_name:
img_url = filePath+"/"+i
with open(img_url, 'rb') as f:
a = f.read()
new_img = PI.open(io.BytesIO(a))
## 写入csv
col = ('年份','出票日期','金额','出票人','付款行全称','汇票到日期','备注')
for j in range(0,7):
sheet.write(0,j,col[j])
book.save('1.csv')
shijian=text1(new_img)
sheet.write(count,0,shijian[0:4])
sheet.write(count,1,shijian[5:])
sheet.write(count,2,text2(new_img))
sheet.write(count,3,text3(new_img))
sheet.write(count,4,text4(new_img))
sheet.write(count,5,text5(new_img))
sheet.write(count,6,text6(new_img))
count = count + 1至此,完整流程结束。
from wand.image import Image
from PIL import Image as PI
import pyocr
import io
import re
import os
import shutil
import pyocr.builders
from cnocr import CnOcr
import requests
import xlrd
import xlwt
from openpyxl import load_workbook
def chineseNumber2Int(strNum: str):
result = 0
temp = 1 # 存放一个单位的数字如:十万
count = 0 # 判断是否有chArr
cnArr = ['壹', '贰', '叁', '肆', '伍', '陆', '柒', '捌', '玖']
chArr = ['拾', '佰', '仟', '万', '亿']
for i in range(len(strNum)):
b = True
c = strNum[i]
for j in range(len(cnArr)):
if c == cnArr[j]:
if count != 0:
result += temp
count = 0
temp = j + 1
b = False
break
if b:
for j in range(len(chArr)):
if c == chArr[j]:
if j == 0:
temp *= 10
elif j == 1:
temp *= 100
elif j == 2:
temp *= 1000
elif j == 3:
temp *= 10000
elif j == 4:
temp *= 100000000
count += 1
if i == len(strNum) - 1:
result += temp
return result
def text1(new_img):
#提取出票日期
left = 80
top = 143
right = 162
bottom = 162
image_text1 = new_img.crop((left, top, right, bottom))
#展示图片
#image_text1.show()
txt1 = tool.image_to_string(image_text1)
print(txt1)
return str(txt1)
def text2(new_img):
    #提取金额
    left = 224
    top = 355
    right = 585
    bottom = 380
    image_text2 = new_img.crop((left, top, right, bottom))
    #展示图片
    #image_text2.show()
    image_text2.save("img/tmp.png")
    temp = ocr.ocr("img/tmp.png")
    temp="".join(temp[0])
    txt2=chineseNumber2Int(temp)
    print(txt2)
    return txt2
def text3(new_img):
    #提取出票人
    left = 177
    top = 207
    right = 506
    bottom = 231
    image_text3 = new_img.crop((left, top, right, bottom))
    #展示图片
    #image_text3.show()
    image_text3.save("img/tmp.png")
    temp = ocr.ocr("img/tmp.png")
    txt3="".join(temp[0])
    print(txt3)
    return txt3
def text4(new_img):
    #提取付款行
    left = 177
    top = 274
    right = 492
    bottom = 311
    image_text4 = new_img.crop((left, top, right, bottom))
    #展示图片
    #image_text4.show()
    image_text4.save("img/tmp.png")
    temp = ocr.ocr("img/tmp.png")
    txt4="".join(temp[0])
    print(txt4)
    return txt4
def text5(new_img):
    #提取汇票到日期
    left = 92
    top = 166
    right = 176
    bottom = 184
    image_text5 = new_img.crop((left, top, right, bottom))
    #展示图片
    #image_text5.show()
    txt5 = tool.image_to_string(image_text5)
    print(txt5)
    return txt5
def text6(new_img):
    #提取票据号码
    left = 598
    top = 166
    right = 870
    bottom = 182
    image_text6 = new_img.crop((left, top, right, bottom))
    #展示图片
    #image_text6.show()
    txt6 = tool.image_to_string(image_text6)
    print(txt6)
    return txt6
ocr=CnOcr()
tool = pyocr.get_available_tools()[0]
filePath='img'
img_name=[]
for i,j,name in os.walk(filePath):
    img_name=name
count=1
book = xlwt.Workbook(encoding='utf-8',style_compression=0)
sheet = book.add_sheet('test',cell_overwrite_ok=True)
for i in img_name:
    img_url = filePath+"/"+i
    with open(img_url, 'rb') as f:
        a = f.read()
    new_img = PI.open(io.BytesIO(a))
    ## 写入csv
    col = ('年份','出票日期','金额','出票人','付款行全称','汇票到日期','备注')
    for j in range(0,7):
        sheet.write(0,j,col[j])
    book.save('1.csv')
    shijian=text1(new_img)
    sheet.write(count,0,shijian[0:4])
    sheet.write(count,1,shijian[5:])
    sheet.write(count,2,text2(new_img))
    sheet.write(count,3,text3(new_img))
    sheet.write(count,4,text4(new_img))
    sheet.write(count,5,text5(new_img))
    sheet.write(count,6,text6(new_img))
count = count + 1到此,关于“怎么通过Python实现批量数据提取”的学习就结束了,希望能够解决大家的疑惑。理论与实践的搭配能更好的帮助大家学习,快去试试吧!若想继续学习更多相关知识,请继续关注亿速云网站,小编会继续努力为大家带来更多实用的文章!
亿速云「云服务器」,即开即用、新一代英特尔至强铂金CPU、三副本存储NVMe SSD云盘,价格低至29元/月。点击查看>>
免责声明:本站发布的内容(图片、视频和文字)以原创、转载和分享为主,文章观点不代表本网站立场,如果涉及侵权请联系站长邮箱:is@yisu.com进行举报,并提供相关证据,一经查实,将立刻删除涉嫌侵权内容。
原文链接:https://blog.csdn.net/yyfloveqcw/article/details/129556574


 计算
计算 安全
安全 数据库
数据库 网络和加速
网络和加速 企业服务
企业服务


