今天小编给大家分享一下Android怎么在XML文件中自定义控件的相关知识点,内容详细,逻辑清晰,相信大部分人都还太了解这方面的知识,所以分享这篇文章给大家参考一下,希望大家阅读完这篇文章后有所收获,下面我们一起来了解一下吧。
Android本身提供了很多控件,比如TextView、ImageView等,在实际开发中,有时候单个的控件并不能很好的满足业务需求,因此我们会将多种控件组合在一起,形成一个具有特定功能的自定义控件,就好比零件的拼装,将多个小零件最后拼成一个大零件来使用。
例如:
<?xml version="1.0" encoding="utf-8"?>
<androidx.constraintlayout.widget.ConstraintLayout xmlns:android="http://schemas.android.com/apk/res/android"
    android:layout_width="match_parent"
    android:layout_height="80dp"
    xmlns:app="http://schemas.android.com/apk/res-auto"
    android:id="@+id/mi_layout">
    <View
        android:id="@+id/view_1"
        android:layout_width="match_parent"
        android:layout_height="1dp"
        android:background="@color/line"
        app:layout_constraintTop_toTopOf="parent" />
    <ImageView
        android:id="@+id/image_1"
        android:layout_width="40dp"
        android:layout_height="40dp"
        android:background="@color/blue"
        app:layout_constraintStart_toStartOf="parent"
        app:layout_constraintTop_toTopOf="parent"
        app:layout_constraintBottom_toBottomOf="parent"
        android:layout_marginStart="10dp" />
    <TextView
        android:id="@+id/text_1"
        android:layout_width="wrap_content"
        android:layout_height="wrap_content"
        app:layout_constraintTop_toTopOf="@id/image_1"
        app:layout_constraintStart_toEndOf="@id/image_1"
        android:layout_marginStart="8dp"
        android:text="预约申请"
        android:textSize="14sp"
        android:textColor="@color/black" />
    <TextView
        android:id="@+id/text_2"
        android:layout_width="0dp"
        android:layout_height="wrap_content"
        app:layout_constraintStart_toStartOf="@id/text_1"
        app:layout_constraintTop_toBottomOf="@id/text_1"
        app:layout_constraintBottom_toBottomOf="@id/image_1"
        app:layout_constraintEnd_toStartOf="@id/image_2"
        android:layout_marginEnd="66dp"
        android:layout_marginTop="10dp"
        android:ellipsize="end"
        android:lines="1"
        android:text="李老师申请实验室"
        android:textSize="12sp"
        android:textColor="@color/gray" />
    <androidx.constraintlayout.utils.widget.ImageFilterView
        android:id="@+id/image_2"
        android:layout_width="8dp"
        android:layout_height="8dp"
        app:layout_constraintEnd_toEndOf="parent"
        app:layout_constraintTop_toTopOf="parent"
        app:layout_constraintBottom_toBottomOf="parent"
        android:layout_marginEnd="15dp"
        android:layout_marginTop="20dp"
        app:roundPercent="1"
        android:background="@color/color_f31515" />
    <View
        android:id="@+id/view_2"
        android:layout_width="match_parent"
        android:layout_height="1dp"
        android:background="@color/line"
        app:layout_constraintBottom_toBottomOf="parent" />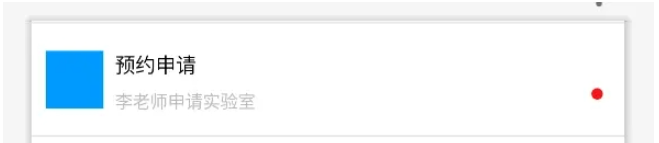
</androidx.constraintlayout.widget.ConstraintLayout>具体效果如下图所示
public class MessageItem extends ConstraintLayout {
    private LayoutMessageItemBinding binding;
    ConstraintLayout layout;
    ImageView iv1;
    TextView tv1;
    TextView tv2;
    ImageView iv2;
    private int imageResource1 = R.color.bottom_down;
    private int imageResource2 = R.color.color_f31515;
    private String text1 = "";
    private String text2 = "";
    private boolean showSpot = true;
    public MessageItem(@NonNull Context context) {
        this(context, null);
    }
    public MessageItem(@NonNull Context context, @Nullable AttributeSet attrs) {
        this(context, attrs, 0);
    }
    public MessageItem(@NonNull Context context, @Nullable AttributeSet attrs, int defStyleAttr) {
        super(context, attrs, defStyleAttr);
        TypedArray array = context.obtainStyledAttributes(attrs, R.styleable.MessageItem);
        imageResource1 = array.getResourceId(R.styleable.MessageItem_imageResource1, imageResource1);
        imageResource2 = array.getResourceId(R.styleable.MessageItem_imageResource2, imageResource2);
        text1 = array.getString(R.styleable.MessageItem_text1);
        text2 = array.getString(R.styleable.MessageItem_text2);
        showSpot = array.getBoolean(R.styleable.MessageItem_showSpot, true);
        array.recycle();
        if (isInEditMode()) {
            return;
        }
        binding = LayoutMessageItemBinding.inflate(LayoutInflater.from(MyApplication.getContext()), this, true);
        bindView();
        init();
    }
    private void bindView() {
        layout = binding.miLayout;
        iv1 = binding.image1;
        iv2 = binding.image2;
        tv1 = binding.text1;
        tv2 = binding.text2;
    }
    private void init() {
        setImageResource1(imageResource1);
        setImageResource2(imageResource2);
        setText1(text1);
        setText2(text2);
        setShowSpot(showSpot);
    }
    private MessageItem setImageResource1(int resId) {
        this.iv1.setBackgroundResource(resId);
        return this;
    }
    private MessageItem setImageResource2(int resId) {
        this.iv2.setBackgroundResource(resId);
        return this;
    }
    private MessageItem setText1(String text) {
        this.tv1.setText(text);
        return this;
    }
    private MessageItem setText2(String text) {
        this.tv2.setText(text);
        return this;
    }
    private MessageItem setShowSpot(boolean b) {
        this.iv1.setVisibility(b ? VISIBLE : GONE);
        return this;
    }
}<?xml version="1.0" encoding="utf-8"?>
<resources>
<declare-styleable name="MessageItem">
<attr name="imageResource1" format="reference" />
<attr name="imageResource2" format="reference" />
<attr name="text1" format="string" />
<attr name="text2" format="string" />
<attr name="showSpot" format="boolean" />
</declare-styleable>
</resources>在使用的时候,我们只需要在相应的 XML 文件中引入即可,例如:
<com.example.lims.widget.MessageItem
    android:id="@+id/f_message_i3"
    app:text1="维修意见"
    app:text2="张同学向您提出设备维护意见"
    app:imageResource1="@drawable/message_3"
    android:layout_width="match_parent"
    android:layout_height="wrap_content"
    app:layout_constraintTop_toBottomOf="@id/f_message_i2"
app:layout_constraintStart_toStartOf="parent" /><com.example.lims.widget.MessageItem
android:id="@+id/f_message_i1"
app:text1="预约申请"
app:text2="王老师向您申请实验室"
app:imageResource1="@drawable/message_1"
android:layout_width="match_parent"
android:layout_height="wrap_content"
app:layout_constraintTop_toBottomOf="@id/toolbar"
app:layout_constraintStart_toStartOf="parent" />其中,app:text1、app:text2、app:imageResource1 为自定义属性。这样就可以根据业务需要,为我们的自定义控件设置不同的属性值,最终得到不同的效果。
以上就是“Android怎么在XML文件中自定义控件”这篇文章的所有内容,感谢各位的阅读!相信大家阅读完这篇文章都有很大的收获,小编每天都会为大家更新不同的知识,如果还想学习更多的知识,请关注亿速云行业资讯频道。
亿速云「云服务器」,即开即用、新一代英特尔至强铂金CPU、三副本存储NVMe SSD云盘,价格低至29元/月。点击查看>>
免责声明:本站发布的内容(图片、视频和文字)以原创、转载和分享为主,文章观点不代表本网站立场,如果涉及侵权请联系站长邮箱:is@yisu.com进行举报,并提供相关证据,一经查实,将立刻删除涉嫌侵权内容。
原文链接:https://juejin.cn/post/7186680059284406331


 计算
计算 安全
安全 数据库
数据库 网络和加速
网络和加速 企业服务
企业服务


