本篇内容介绍了“Vue如何实现移动端日历”的有关知识,在实际案例的操作过程中,不少人都会遇到这样的困境,接下来就让小编带领大家学习一下如何处理这些情况吧!希望大家仔细阅读,能够学有所成!
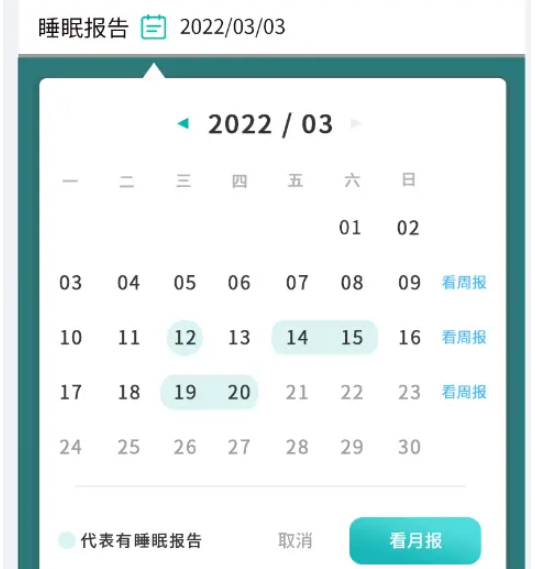
先看看UI给的设计图和,需求是有数据的日期做标记,可以查看某一周/某一月的数据,周数据不用自定义,就按照日历上的周数据截取.

实现效果

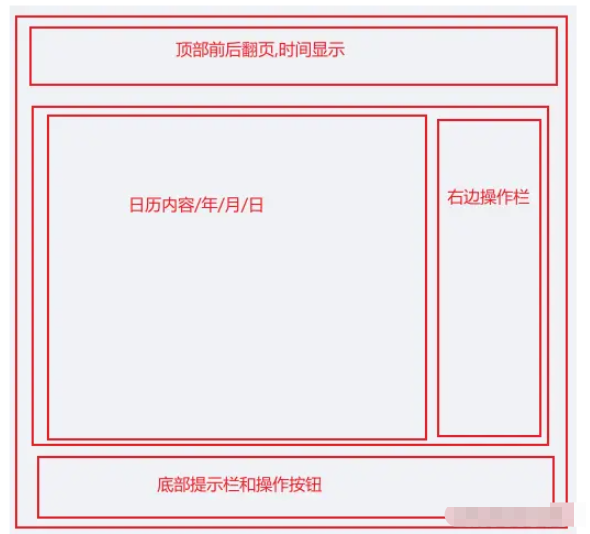
1.规划dom部分区块划分

2.页面实现
选择月份和选择年份与日期做了条件渲染,切换方式是点击顶部时间切换选项
<template>
  <div class="calendar">
    <div class="date-top">
      <div class="left" @click="dateOperate('down')">
        <div></div>
      </div>
      <div class="time" @click="selectDate">{{ date.join("/") }}</div>
      <div class="right" @click="dateOperate('up')">
        <div></div>
      </div>
    </div>
    <!-- 日期列表 -->
    <div class="date-list" v-if="show === 'date'">
      <div class="date-content">
        <!-- 日历头 -->
        <div v-for="item in header" :key="item">
          {{ item }}
        </div>
        <!-- 日列表 -->
        <div
          v-for="(s, k) in dayList"
          :class="[
            'date-item',
            s.month !== date[1] ? 'other-day' : '',
            s.day === date[2] && s.month === date[1] ? 'today' : '',
          ]"
          :key="s + '-' + k"
          @click="selectDay(s)"
        >
          {{ s.day }}
          <div
            :class="[
              'check',
              haveList.includes(`${s.year}-${s.month}-${s.day}`) ? 'have' : '',
            ]"
          ></div>
        </div>
      </div>
      <!-- 操作栏 -->
      <div class="date-btn">
        <div
          class="btn-item"
          v-for="k in weeks + 1"
          :key="k"
          @click="weekReport(k)"
        >
          {{ k === 1 ? "" : "看周报" }}
        </div>
      </div>
    </div>
    <!-- 月份列表 -->
    <div class="month-list" v-else-if="show === 'month'">
      <div
        :class="date[1] == i ? 'month-item active' : 'month-item'"
        v-for="i in 12"
        :key="i"
        @click="selectMonth(i)"
      >
        {{ i }}月
      </div>
    </div>
    <!-- 年份列表 -->
    <div
      class="year-list"
      v-else
      @touchmove="touchMove"
      @touchstart="touchStart"
    >
      <div
        :class="date[0] === i ? 'month-item active' : 'month-item'"
        v-for="i in yearList"
        :key="i"
        @click="selectYear(i)"
      >
        {{ i }}
      </div>
    </div>
    <!-- 底部操作栏 -->
    <div class="date-bottom">
      <div class="b-left">
        <div class="tab"></div>
        <div class="totip">代表有睡眠报告</div>
      </div>
      <div class="b-right">
        <div class="cancel" @click="cancel">取消</div>
        <div class="m-report" @click="changeReport">看月报</div>
      </div>
    </div>
  </div>
</template>
css部分
<style lang="scss" scoped>
.calendar {
  width: 100%;
  background-color: #fff;

  .date-top {
    width: 100%;
    padding: 20px;
    display: flex;
    justify-content: space-around;
    align-items: center;
    .left,
    .right {
      width: 100px;
      height: 100%;
      display: flex;
      flex-direction: column;
      justify-content: center;
      align-items: center;
      div {
        width: 20px;
        height: 20px;
        background-color: #00b7ae;
      }
    }
    .left > div {
      clip-path: polygon(0% 50%, 100% 0%, 100% 100%);
    }

    .right > div {
      clip-path: polygon(0% 0%, 100% 50%, 0% 100%);
    }

    .time {
      font-size: 38px;
      font-weight: 500;
      color: #333333;
    }
  }
  .date-list,
  .year-list,
  .month-list {
    width: 100%;
    padding: 30px;
    height: 540px;
  }
  .month-list,
  .year-list {
    display: grid;
    grid-template-columns: 1fr 1fr 1fr;
    grid-template-rows: auto;
    .month-item {
      text-align: center;
      display: flex;
      justify-content: center;
      align-items: center;
      font-size: 30px;
      height: 122px;
    }
    .month-item:active {
      background-color: #eee;
    }
    .active {
      background-color: #dcf4f3;
    }
  }
  .date-list {
    padding-top: 0;
    display: flex;
    .date-content {
      flex: 1;
      height: 100%;
      display: grid;
      grid-template-columns: 1fr 1fr 1fr 1fr 1fr 1fr 1fr;
      grid-template-rows: auto;
      grid-gap: 20px 20px;
      div {
        height: 100%;
        display: flex;
        flex-direction: column;
        justify-content: center;
        align-items: center;
        border-radius: 10px;
      }
      .other-day {
        color: rgba($color: #363636, $alpha: 0.6) !important;
      }
      .today {
        background-color: #dcf4f3;
      }
      .date-item {
        font-size: 28px;
        font-weight: 400;
        color: #363636;
        .check {
          width: 10px;
          height: 10px;
          margin-top: 6px;
          border-radius: 50%;
          background-color: #00b7ae;
          opacity: 0;
        }
        .have {
          opacity: 1;
        }
      }
    }
    .date-btn {
      height: 100%;
      width: 80px;
      font-size: 22px;
      color: #4eb9f5;
      display: grid;
      grid-template-columns: 1fr;
      grid-template-rows: auto;
      grid-gap: 20px 20px;
      margin-left: 20px;
      .btn-item {
        display: flex;
        justify-content: center;
        align-items: center;
        height: 100%;
      }
    }
  }

  .date-bottom {
    width: calc(100% - 80px);
    display: flex;
    justify-content: space-between;
    align-content: center;
    padding: 20px;
    margin: 0 auto;
    border-top: 1px solid #eee;
    .b-left,
    .b-right {
      display: flex;
      align-items: center;
    }
    .b-left {
      .tab {
        width: 27px;
        height: 26px;
        background: #dcf4f3;
        border-radius: 13px;
      }
      .totip {
        font-size: 24px;
        font-weight: 400;
        color: #363636;
        margin-left: 20px;
      }
    }
    .b-right {
      .cancel {
        font-size: 26px;
        font-weight: 500;
        color: rgba($color: #000000, $alpha: 0.5);
      }
      .m-report {
        width: 195px;
        line-height: 70px;
        color: #fff;
        font-size: 26px;
        background: linear-gradient(196deg, #50dcdc, #18b6b7);
        border-radius: 20px;
        margin-left: 50px;
        text-align: center;
      }
    }
  }
}
</style>
3.接下来是逻辑处理部分 日数据的显示一共42条数据,先获取当前月的总天数,将每个月的天数保存在一个数组里,然后根据传入的参数返回相应的天数, 因为有闰年的存在,2月会是29天,所以做了闰年的判断.然后获取每周的第一天是周几,使用new Date().getDay()获取某一天是周几,返回的是0-7,这里为了方便使用将日历表头用数组保存起来返回的数字刚好是日里头对应的下标,然后根据第一天是周几计算出需要补上个月的几天数据,通过new Date(y,m,0)可以获取到上个月最后一天的,然后向日数据中添加上个月最后几天的数据,补充下个月开始的几天数据,直接使用42减去当月的天数和补充的上个月的天数得到的就是需要补充的下月天数.
月数据的切换显示,前后翻动切换年数据,每年固定都是12月所以就直接写固定值12然后v-for遍历生成dom
年数据的切换显示,每页显示12条数据,保存每页数据的第一条和最后一条用于前后翻页计算显示的数据+12或者-12.
校验选择的月份和已选择的日期是否匹配,因为选择日期后再切换月份有可能切换到的月份没有选择的日期如31日30日29日,所以需要验证是否正确,若是没有的话就当前月的最后一天.
手势操作没有写完整,只写了年份选择的滑动事件逻辑.
为了方便js部分的代码每行都有写详细的注释
自定月选择日期范围只需要修改日期点击事件的逻辑,新增一个参数判断是单日期选择还是选择一个日期范围,在事件处理里面记录点击的两个日期并计算中间的日期保存返回.
import { formatTime } from "@/utils/format";
export default {
  name: "calendar",
  props: {
    haveList: {
      type: Array,
      default: [],
    },
  },
  data() {
    return {
      // 切换日期选择
      show: "date",
      // 日历头
      header: ["日", "一", "二", "三", "四", "五", "六"],
      // 选择日期
      date: [],
      // 年列表
      yearList: [],
      // 天列表
      dayList: [],
      // 定时器
      timer: null,
      // 手势操作数据
      move: {
        pageX: 0,
        fNum: null,
        lNum: null,
      },
      // 第一天是周几
      weeks: 0,
    };
  },
  created() {},
  mounted() {
    let time = new Date();
    this.date.push(
      time.getFullYear(),
      formatTime(time.getMonth() + 1),
      formatTime(time.getDate())
    );
    this.countDay();
  },
  methods: {
    // 计算显示的天数据
    countDay() {
      console.log("chufa");
      let [y, m, d] = this.date;
      // 获取第一天是周几
      let week = new Date(`${y}/${m}/1`).getDay(),
        // 获取当前月的上个月多少天
        lastDays = this.getDays(y, m - 1),
        // 获取这个月有多少天
        days = this.getDays(y, m);
      // 计算这个月有多少周
      this.weeks = Math.ceil((days - (7 - week)) / 7) + 1;
      // 将当前月份的天数生成数组
      this.dayList = Array.from({ length: this.getDays(y, m) }, (v, k) => {
        return {
          day: formatTime(k + 1),
          month: m,
          year: y,
        };
      });
      // 将本月1日前的数据补齐
      for (let i = lastDays; i > lastDays - week; i--) {
        this.dayList.unshift({
          day: i,
          // 如果当前日期是1月补齐的是去年12月的数据
          month: +m - 1 === 0 ? 12 : formatTime(+m - 1),
          year: +m - 1 === 0 ? y - 1 : y,
        });
      }
      // 计算需要补齐多少天
      let length = this.weeks * 7 - this.dayList.length;
      console.log("length", week, lastDays, days, this.weeks);
      // 将本月最后一天的数据补齐
      for (let i = 1; i <= length; i++) {
        this.dayList.push({
          day: i,
          // 如果当前日期是12月补齐的是明年年1月的数据
          month: +m + 1 > 12 ? 1 : formatTime(+m + 1),
          year: +m + 1 > 12 ? y + 1 : y,
        });
      }

      console.log(this.dayList);
    },
    // 顶部时间点击事件
    selectDate() {
      let type = {
        month: "year",
        date: "month",
      };
      // 判断点击事件选择月份还是年份
      if (this.show !== "year") {
        this.show = type[this.show];
      }
      // 如果是月份就计算dateList数据
      if (this.show === "month") {
        // 清空每页显示的年份数据
        this.yearList.length = 0;
        // 计算页面显示的年份数据 每页显示12条数据
        for (let i = this.date[0] - 4; i <= this.date[0] + 7; i++) {
          this.yearList.push(i);
        }
      }
    },
    // 屏幕点击事件
    touchStart(val) {
      // 获取按下屏幕的x轴坐标
      this.move.pageX = val.touches[0].pageX;
    },
    // 左右滑动切换事件
    touchMove(val) {
      // 获取按下屏幕移动结束的x轴坐标
      let move = val.touches[0].pageX;
      clearTimeout(this.timer);
      // 判断往左滑动还是往右滑动
      // 滑动结束x轴坐标减去最初按下坐标为负数就是往左滑动,翻看当前日期以后的年份
      if (move - this.move.pageX < -20) {
        console.log("右滑", this.move.lNum);
        // 定时器防抖
        this.timer = setTimeout(this.changeYear("right"), 100);
      }
      // 滑动结束x轴坐标减去最初按下坐标为正数就是往右滑动,翻看当前日期以前的年份
      if (move - this.move.pageX > 20) {
        // 定时器防抖
        this.timer = setTimeout(this.changeYear("left"), 100);
      }
    },
    // 年份选择切换
    changeYear(type) {
      // 清空每页显示的年份数据
      this.yearList.length = 0;
      if (type === "right") {
        // 计算页面显示的年份数据 每页显示12条数据
        for (let i = this.move.lNum + 1; i < this.move.lNum + 13; i++) {
          this.yearList.push(i);
        }
      } else {
        for (let i = this.move.fNum - 12; i < this.move.fNum; i++) {
          this.yearList.push(i);
        }
      }
    },
    // 年份点击事件
    selectYear(val) {
      this.date[0] = val;
      this.show = "month";
    },
    // 月份点击事件
    selectMonth(val) {
      this.date[1] = val;
      this.show = "date";
      this.countDay();
      this.checkDay();
    },
    // 校验选择的月份和已选择的日期是否匹配
    checkDay() {
      // 获取选择的年月有多少天 防止这年不是闰年 就将日期跳转到28号,或者有的月份没有31号就跳到30号
      let num = this.getDays(this.date[0], this.date[1]);
      if (num < this.date[2]) {
        this.date.splice(2, 1, num);
      }
    },
    // 日期点击事件
    selectDay(val) {
      let oVal = this.date[1];
      this.date.splice(1, 2, val.month, val.day);
      if (val.month !== oVal) {
        this.countDay();
      }
      this.$emit("change", this.date.join("-"));
    },
    // 获取某个月有多少天
    getDays(year, month) {
      // 一年中每个月的天数
      let days = [31, 28, 31, 30, 31, 30, 31, 31, 30, 31, 30, 31];
      // 判断是不是闰年 2月29天
      if (year % 4 === 0 && (year % 100 !== 0 || year % 400 === 0)) {
        days[1] = 29;
      }
      return days[month - 1];
    },
    //左右按钮点击事件
    dateOperate(type) {
      let [y, m, d] = this.date;
      // 如果是向后翻
      if (type === "up") {
        // 日期向后翻 切换月份
        if (this.show === "date") {
          if (+m === 12) {
            this.date.splice(0, 1, y + 1);
            this.date.splice(1, 1, "01");
          } else {
            this.date.splice(1, 1, formatTime(+m + 1));
          }
          // 月份向后翻 切换年份
        } else if (this.show === "month") {
          this.date.splice(0, 1, y + 1);
          // 年份向后翻 重组数据
        } else {
          this.changeYear("right");
        }

        // 如果是前后翻
      } else {
        // 日期向前翻 切换月份
        if (this.show === "date") {
          if (+m === 1) {
            this.date.splice(0, 1, y - 1);
            this.date.splice(1, 1, 12);
          } else {
            this.date.splice(1, 1, formatTime(+m - 1));
          }
          // 月份向前翻 切换年份
        } else if (this.show === "month") {
          this.date.splice(0, 1, y - 1);
          // 年份向前翻 重组数据
        } else {
          this.changeYear("left");
        }
      }
      this.countDay();
      this.checkDay();
    },
    // 右侧按钮点击事件
    weekReport(i) {
      if (i === 1) return;
      let arr = [],
        // 选择一周的数据 开始
        s = 7 * (i - 1) - 7,
        // 结束
        e = 7 * (i - 1);
      // 遍历日数据 截取选择的周数据
      for (let k = s; k < e; k++) {
        arr.push(
          `${this.dayList[k].year}-${this.dayList[k].month}-${this.dayList[k].day}`
        );
      }
      this.$emit("weekReport", arr);
    },

    // 看月报事件
    changeReport() {
      let [y, m, d] = this.date;
      this.$emit("changeReport", `${y}-${m}`);
    },
    // 取消事件
    cancel() {
      this.$emit("cancel");
    },
  },
  computed: {},
  watch: {
    yearList(nVal, oVal) {
      // 记录每一页显示的数据第一位和最后一位 用于计算下一页或者上一页的数据
      this.move.fNum = nVal[0];
      this.move.lNum = nVal[11];
    },
    deep: true,
    immediate: true,
  },
};
formatTime是给月份和日期小于10的前面加0的方法
“Vue如何实现移动端日历”的内容就介绍到这里了,感谢大家的阅读。如果想了解更多行业相关的知识可以关注亿速云网站,小编将为大家输出更多高质量的实用文章!
免责声明:本站发布的内容(图片、视频和文字)以原创、转载和分享为主,文章观点不代表本网站立场,如果涉及侵权请联系站长邮箱:is@yisu.com进行举报,并提供相关证据,一经查实,将立刻删除涉嫌侵权内容。