本篇内容介绍了“Vue封装数字框组件如何实现”的有关知识,在实际案例的操作过程中,不少人都会遇到这样的困境,接下来就让小编带领大家学习一下如何处理这些情况吧!希望大家仔细阅读,能够学有所成!
(1)准备基本结构
<script lang="ts" setup name="Numbox">
//
</script>
<template>
  <div class="numbox">
    <div class="label">数量</div>
    <div class="numbox">
      <a href="javascript:;" rel="external nofollow"  rel="external nofollow"  rel="external nofollow"  rel="external nofollow"  rel="external nofollow"  rel="external nofollow"  rel="external nofollow"  rel="external nofollow" >-</a>
      <input type="text" readonly value="1" />
      <a href="javascript:;" rel="external nofollow"  rel="external nofollow"  rel="external nofollow"  rel="external nofollow"  rel="external nofollow"  rel="external nofollow"  rel="external nofollow"  rel="external nofollow" >+</a>
    </div>
  </div>
</template>
<style scoped lang="less">
.numbox {
  display: flex;
  align-items: center;
  .label {
    width: 60px;
    color: #999;
    padding-left: 10px;
  }
  .numbox {
    width: 120px;
    height: 30px;
    border: 1px solid #e4e4e4;
    display: flex;
    > a {
      width: 29px;
      line-height: 28px;
      text-align: center;
      background: #f8f8f8;
      font-size: 16px;
      color: #666;
      &:first-of-type {
        border-right: 1px solid #e4e4e4;
      }
      &:last-of-type {
        border-left: 1px solid #e4e4e4;
      }
    }
    > input {
      width: 60px;
      padding: 0 5px;
      text-align: center;
      color: #666;
    }
  }
}
</style>
(2)全局注册
import Numbox from '@/components/numbox/index.vue'
export default {
  install(app: App) {
    app.component('Numbox', Numbox)
  },
}
(3)提供类型声明
import Numbox from '@/components/numbox/index.vue'
declare module 'vue' {
  export interface GlobalComponents {
    Numbox: typeof Numbox
  }
}
export {}
(4)渲染
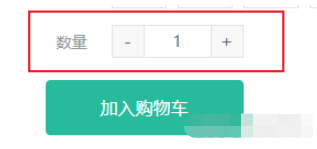
<div class="spec">
  <!-- 数字选择框 -->
  <XtxNumbox></XtxNumbox>
</div>
效果
目标:掌握vue3.0的v-model语法糖原理
在vue2.0中v-mode语法糖简写的代码 <Son :value="msg" @input="msg=$event" />
在vue3.0中v-model语法糖有所调整:<Son :modelValue="msg" @update:modelValue="msg=$event" />
演示代码:
<script lang="ts" setup>
defineProps({
  money: {
    type: Number,
    default: 0,
  },
})
const emit = defineEmits(['update:money'])
</script>
<template>
  <h4>子组件-{{ money }}</h4>
  <button @click="emit('update:money', money + 1)">+1</button>
</template>
<style scoped lang="less"></style>
总结: vue3.0封装组件支持v-model的时候,父传子:modelValue 子传父 @update:modelValue
补充: vue2.0的 xxx.sync 语法糖解析 父传子 :xxx 子传父 @update:xxx 在vue3.0 使用 v-model:xxx 代替。
大致功能分析:
默认值为1
可限制最大最小值
点击-就是减1 点击+就是加1
需要完成v-model得实现
存在无label情况
<script lang="ts" setup name="Numbox">
const props = defineProps({
  modelValue: {
    type: Number,
    default: 1,
  },
  min: {
    type: Number,
    default: 1,
  },
  max: {
    type: Number,
    default: 20,
  },
  showLabel: {
    type: Boolean,
    default: false,
  },
})
const emit = defineEmits<{
  (e: 'update:modelValue', value: number): void
}>()
const add = () => {
  if (props.modelValue >= props.max) return
  emit('update:modelValue', props.modelValue + 1)
}
const sub = () => {
  if (props.modelValue <= props.min) return
  emit('update:modelValue', props.modelValue - 1)
}
</script>
<template>
  <div class="numbox">
    <div class="label" v-if="showLabel"><slot>数量</slot></div>
    <div class="numbox">
      <a href="javascript:;" rel="external nofollow"  rel="external nofollow"  rel="external nofollow"  rel="external nofollow"  rel="external nofollow"  rel="external nofollow"  rel="external nofollow"  rel="external nofollow"  @click="sub">-</a>
      <input type="text" readonly :value="modelValue"/>
      <a href="javascript:;" rel="external nofollow"  rel="external nofollow"  rel="external nofollow"  rel="external nofollow"  rel="external nofollow"  rel="external nofollow"  rel="external nofollow"  rel="external nofollow"  @click="add">+</a>
    </div>
  </div>
</template>
<style scoped lang="less">
.numbox {
  display: flex;
  align-items: center;
  .label {
    width: 60px;
    color: #999;
    padding-left: 10px;
  }
  .numbox {
    width: 120px;
    height: 30px;
    border: 1px solid #e4e4e4;
    display: flex;
    > a {
      width: 29px;
      line-height: 28px;
      text-align: center;
      background: #f8f8f8;
      font-size: 16px;
      color: #666;
      &:first-of-type {
        border-right: 1px solid #e4e4e4;
      }
      &:last-of-type {
        border-left: 1px solid #e4e4e4;
      }
    }
    > input {
      width: 60px;
      padding: 0 5px;
      text-align: center;
      color: #666;
    }
  }
}
</style>
动态控制禁用效果
<script lang="ts" setup name="Numbox">
const props = defineProps({
  modelValue: {
    type: Number,
    default: 1,
  },
  min: {
    type: Number,
    default: 1,
  },
  max: {
    type: Number,
    default: 20,
  },
  showLabel: {
    type: Boolean,
    default: false,
  },
})
const emit = defineEmits<{
  (e: 'update:modelValue', value: number): void
}>()
const add = () => {
  if (props.modelValue >= props.max) return
  emit('update:modelValue', props.modelValue + 1)
}
const sub = () => {
  if (props.modelValue <= props.min) return
  emit('update:modelValue', props.modelValue - 1)
}
</script>
<template>
  <div class="numbox">
    <div class="label" v-if="showLabel"><slot>数量</slot></div>
    <div class="numbox">
     + <a href="javascript:;" rel="external nofollow"  rel="external nofollow"  rel="external nofollow"  rel="external nofollow"  rel="external nofollow"  rel="external nofollow"  rel="external nofollow"  rel="external nofollow"  @click="sub" :class="{not:props.modelValue <= props.main}">-</a>
      <input type="text" readonly :value="modelValue" />
     + <a href="javascript:;" rel="external nofollow"  rel="external nofollow"  rel="external nofollow"  rel="external nofollow"  rel="external nofollow"  rel="external nofollow"  rel="external nofollow"  rel="external nofollow"  @click="add" :class="{not:props.modelValue >= props.max}">+</a>
    </div>
  </div>
</template>
<style scoped lang="less">
.numbox {
  display: flex;
  align-items: center;
  .label {
    width: 60px;
    color: #999;
    padding-left: 10px;
  }
  .numbox {
    width: 120px;
    height: 30px;
    border: 1px solid #e4e4e4;
    display: flex;
    > a {
      width: 29px;
      line-height: 28px;
      text-align: center;
      background: #f8f8f8;
      font-size: 16px;
      color: #666;
 +     &.not {
 +       cursor: not-allowed;
 +     }
      &:first-of-type {
        border-right: 1px solid #e4e4e4;
      }
      &:last-of-type {
        border-left: 1px solid #e4e4e4;
      }
    }
    > input {
      width: 60px;
      padding: 0 5px;
      text-align: center;
      color: #666;
    }
  }
}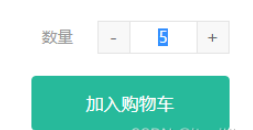
</style>使用组件:src/views/goods/index.vue
<script lang="ts" setup name="Numbox">
import {ref} from "vue";
const count = ref(1)
</script>
<!-- 商品信息 -->
<div class="goods-info">
    <!-- 数字选择框 -->
    <XtxNumbox v-model="count" min:"1" :max="20" ></XtxNumbox>
</div>
思考:
我们的输入框不仅能点击加减还可以输入数字,如果用户通过输入框输入非数字会出现什么问题?
优化代码
<script lang="ts" setup name="Numbox">
const props = defineProps({
  modelValue: {
    type: Number,
    default: 1,
  },
  min: {
    type: Number,
    default: 1,
  },
  max: {
    type: Number,
    default: 20,
  },
  showLabel: {
    type: Boolean,
    default: false,
  },
})
+const { proxy } = getCurrentInstance() as ComponentInternalInstance
const emit = defineEmits<{
  (e: 'update:modelValue', value: number): void
}>()
const add = () => {
  if (props.modelValue >= props.max) return
  emit('update:modelValue', props.modelValue + 1)
}
const sub = () => {
  if (props.modelValue <= props.min) return
  emit('update:modelValue', props.modelValue - 1)
}
+const handleChange = (e: Event) => {
+  // 通过类型断言,让ts知道目前元素的类型
+  const element = e.target as HTMLInputElement
+  let value = +element.value
+  if (isNaN(value)) value = 1
+  if (value >= props.max) value = props.max
+  if (value <= props.main) value = props.main
+  emit('update:modelValue',value)
+  // 强制刷新
+  proxy?.$forceUpdate()
}
</script>
<template>
  <div class="numbox">
    <div class="label" v-if="showLabel"><slot>数量</slot></div>
    <div class="numbox">
      <a href="javascript:;" rel="external nofollow"  rel="external nofollow"  rel="external nofollow"  rel="external nofollow"  rel="external nofollow"  rel="external nofollow"  rel="external nofollow"  rel="external nofollow"  @click="sub" :class="{not:props.modelValue <= props.main}">-</a>
      <input type="text" readonly :value="modelValue" @change="handleChange($event)"/>
      <a href="javascript:;" rel="external nofollow"  rel="external nofollow"  rel="external nofollow"  rel="external nofollow"  rel="external nofollow"  rel="external nofollow"  rel="external nofollow"  rel="external nofollow"  @click="add" :class="{not:props.modelValue >= props.max}">+</a>
    </div>
  </div>
</template>
<style scoped lang="less">
.numbox {
  display: flex;
  align-items: center;
  .label {
    width: 60px;
    color: #999;
    padding-left: 10px;
  }
  .numbox {
    width: 120px;
    height: 30px;
    border: 1px solid #e4e4e4;
    display: flex;
    > a {
      width: 29px;
      line-height: 28px;
      text-align: center;
      background: #f8f8f8;
      font-size: 16px;
      color: #666;
      &.not {
        cursor: not-allowed;
      }
      &:first-of-type {
        border-right: 1px solid #e4e4e4;
      }
      &:last-of-type {
        border-left: 1px solid #e4e4e4;
      }
    }
    > input {
      width: 60px;
      padding: 0 5px;
      text-align: center;
      color: #666;
    }
  }
}
</style>
“Vue封装数字框组件如何实现”的内容就介绍到这里了,感谢大家的阅读。如果想了解更多行业相关的知识可以关注亿速云网站,小编将为大家输出更多高质量的实用文章!
免责声明:本站发布的内容(图片、视频和文字)以原创、转载和分享为主,文章观点不代表本网站立场,如果涉及侵权请联系站长邮箱:is@yisu.com进行举报,并提供相关证据,一经查实,将立刻删除涉嫌侵权内容。


