博客已转移到:http://blog.phpue.com/Article/index/id/13.html
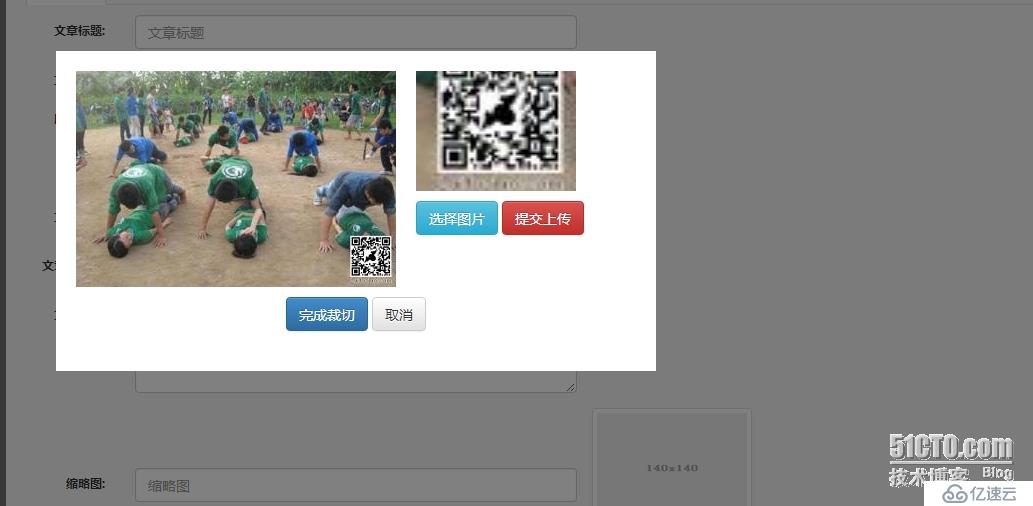
这几天自己在写一个cms.之前在用到图片上传裁切的时候总是用的flash的,或者是swfupload之类的。用的还不熟练,所以今天就用ajax做一个图片上传裁切的实例.个人感觉还不错,现在就分享出来.我用的是ThinkPHP的框架,先将用到的插件分享出来.demo下载
ajaxfileupload.js ajax上传文件的插件。
jquery.imgareaselect.min.js 图片裁切插件
jquery.min.js jquery框架文件
先写好需要的样式


对应的html代码
<input type="text" name="" id="pics" /><a href="#" class="OpenDialog">上传图片</a>
<div class="dialog" style="position: fixed;bottom:200px;left:50px;background: #ffffff;width:600px;height:320px;z-index:2000">
<div class="span12" style="padding:0 20px;">
<div class="jc-demo-box">
<img src="./images/pics_default.png" id="target" alt="图片预览" style="float:left;width:320px;height:240px;margin-right:20px;"/>
<div id="preview-pane" style="float:left;">
<div class="preview-container" style="margin-bottom: 10px;">
<img src="./images/pics_default.png" class="jcrop-preview" alt="Preview" />
</div>
<form action="__URL__/uploadsImg" class="ajaxPic" enctype="multipart/form-data" method="post">
<input type="button" value="选择图片" onclick="document.all.tt.click()" class="btn btn-info"/>
<INPUT TYPE="file" name="tt" style="display:none" id="tt">
<input type="submit" value="提交上传"  class="btn btn-danger"/>
</form>
</div>
<div class="clearfix"></div>
</div>
</div>
<form action="__URL__/cutImg" method="post" class="ajaxCut" style="padding-top:10px;padd-bottom:20px;">
<input type="hidden" id="x" name="x" />
<input type="hidden" id="y" name="y" />
<input type="hidden" id="x1" name="x1" />
<input type="hidden" id="y1" name="y1" />
<input type="hidden" id="w" name="w" />
<input type="hidden" id="h" name="h" />
<input type="hidden" name="filename" value="">
<input type="submit" value="完成裁切" class="btn btn-primary"/>
<input type="button" value="取消" class="btn btn-default closeDialog"/>
</form>
</div>样式css
div.clearfix{clear:both;}
div.dialog{display:none;}
div.modal-backdrop{position: fixed;top: 0;right: 0;bottom: 0;left: 0;z-index: 1030;background-color: #000;opacity: 0.5;}
.jcrop-holder #preview-pane {
display: block;
position: absolute;
z-index: 2000;
top: 10px;
right: -240px;
padding: 6px;
background-color: white;
}
#preview-pane .preview-container {
width: 160px;
height: 120px;
overflow: hidden;
}
div.jcrop-holder{
width:400px;
}ok,然后开始第一步,要先实现弹窗效果。点击上传按钮弹出class=dialog上传图片的div。
$('.OpenDialog').click(function(){
$('div.dialog').show();
$('<div class="modal-backdrop"></div>').appendTo('body');
return false;
})第二步是点击上传文件就上传并且无刷新替换到预览区域的图片地址
$('form.ajaxPic').submit(function(){
$.ajaxFileUpload({
url: $(this).attr('action'),
secureuri: false,
fileElementId: 'tt',
dataType: 'json',
success: function(ajax){
var img1 = $('div.jc-demo-box').find('img');
var $pimg = $('.jcrop-preview');
var $pcnt = $('#preview-pane .preview-container'), xsize = $pcnt.width(), ysize = $pcnt.height();
var $preview = $('#preview-pane');
img1.attr('src', ajax.data);
$('input[type=hidden][name=filename]').val(ajax.data);
$('<img/>').attr('src', ajax.data).load(function(){
$('#target').css({
width: this.width,
height: this.height,
})
$pimg.css({
width: this.width,
height: this.height,
})
})
$('#target').imgAreaSelect({
aspectRatio: '160:120',
onSelectChange: preview
});
function preview(img, selection){
var scaleX = 160 / selection.width;
var scaleY = 120 / selection.height;
var width = $('#target').width();
var height = $('#target').height();
$('.jcrop-preview').css({
width: Math.round(scaleX * width) + 'px',
height: Math.round(scaleY * height) + 'px',
marginLeft: '-' + Math.round(scaleX * selection.x1) + 'px',
marginTop: '-' + Math.round(scaleY * selection.y1) + 'px'
});
$('#x').val(selection.x1);
$('#y').val(selection.y1);
$('#x1').val(selection.x2);
$('#y1').val(selection.y2);
$('#w').val(selection.width);
$('#h').val(selection.height);
}
}
})
return false;
})这里用到了ajax上传的插件,在上传成功以后,则加载裁切程序。aspectRatio: '160:120',这部分是裁切区域的比例,如果没有指定则可以自由裁切。
最后在点击完成裁切以后,则隐藏弹出框并且把地址带回。
//ajax上传裁切
$('form.ajaxCut').submit(function(){
var thumbnail = $('.img-thumbnail');
var dialog = $('.dialog');
$.ajax({
url: $(this).attr('action'),
type: 'post',
data: $(this).serialize(),
dataType: 'json',
success: function(ajax){
thumbnail.attr('src', ajax.data);
$('#pics').val(ajax.data);
$('input[type=button].closeDialog').trigger('click');
}
})
return false;
})图片上传对应的php代码
function uploadsImg(){
import('ORG.Net.UploadFile');
$upload = new UploadFile();// 实例化上传类
$upload->maxSize  = 3145728 ;// 设置附件上传大小
$upload->allowExts  = array('jpg', 'gif', 'png', 'jpeg');// 设置附件上传类型
$savePath='./uploads/'.date('Ymd').'/';
if (!file_exists($savePath)){
if (!mkdir($savePath)){
$this->ajaxReturn('创建文件夹'.$savePath.'失败,请检查uploads文件夹权限是否为777');
}
}
$upload->savePath =$savePath;  // 设置附件上传目录
if(!$upload->upload()) {// 上传错误提示错误信息
$info=$upload->getErrorMsg();
}else{// 上传成功 获取上传文件信息
$info =  $upload->getUploadFileInfo();
}
if (!is_array($info)){
$this->ajaxReturn($info);
}else{
import('ORG.Net.Image');
$img=new Image($info[0]['savepath'].$info[0]['savename'],1,'320','240',$info[0]['savepath'].'s_'.$info[0]['savename']);
$img->outimage();
$picRealPath=J(__ROOT__.'/'.$img->getImageName());
$this->ajaxReturn($picRealPath);
}
}这里用到的就是ThinkPHP自带的图片上传,但是在上传以后,为了不让太大,太小或者不规则的图影响到裁切时候的效果,所以适当对图片做了下裁切。然后将图片上传的地址返回给ajax
图片裁切代码
function cutImg(){
$dfile='./uploads/'.date('Ymd').'/';
if(!file_exists($dfile)){
if (!mkdir($dfile)){
$this->ajaxReturn('创建文件夹'.$dfile.'失败,请检查uploads文件夹权限是否为777');
}
}
$sfile=$_REQUEST['filename'];
$sfile=str_replace(__ROOT__, '.', $sfile);
$file_tmp=explode('/', $sfile);
$file=$file_tmp[count($file_tmp)-1];
$x=$_REQUEST['x'];
$y=$_REQUEST['y'];
$x1=$_REQUEST['x1'];
$y1=$_REQUEST['y1'];
$width=$_REQUEST['w'];
$height=$_REQUEST['h'];
import('ORG.Net.Image');
$value1=$x.','.$y;
$value2=$width.','.$height;
$dfile=$dfile.'small_'.$file;
$img=new Image($sfile,2,$value1,$value2,$dfile);
$img->outimage();
$filename=$img->getImageName();
$filename=J(__ROOT__.'/'.$filename);
$this->ajaxReturn($filename);
}图片裁切就是通过坐标以及裁切时候的大小,返回到php的类里去完成最后的裁切。

亿速云「云服务器」,即开即用、新一代英特尔至强铂金CPU、三副本存储NVMe SSD云盘,价格低至29元/月。点击查看>>
免责声明:本站发布的内容(图片、视频和文字)以原创、转载和分享为主,文章观点不代表本网站立场,如果涉及侵权请联系站长邮箱:is@yisu.com进行举报,并提供相关证据,一经查实,将立刻删除涉嫌侵权内容。