①background-position 图片位移
应用场景,在实际的生产环境中咱们在网页上看到的小图片不是一个一个的零散的小图片的,咱们只是看到了大图片的一部分。比如一个大图片,我只让他显示一部分并不全部显示怎么做?
可以这么想:
有一个窗口,你在窗口的一边,只能通过窗口来看外面,你不能动,我们可以通过移动这个窗口来让你看到不同的场景,当然你看到的大小和窗口的大小有关!
代码如下:
<!DOCTYPE html>
<html lang="en">
<head>
<meta charset="UTF-8">
<title></title>
</head>
<style>
.chuangkou{
/*定义一个图片*/
background-p_w_picpath: url('content_p_w_picpaths.jpg');
/*定义一个窗口,指定长和宽*/
height: 80px;
width:100px;
/*设置图片不重复*/
background-repeat:no-repeat;
background-position: 3px 10px ;
}
</style>
<body>
<div class="chuangkou">
</div>
</body>
</html>
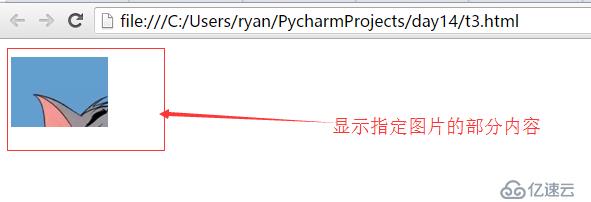
显示结果:

原本图片为:

综合对比,上面的确实只显示了图片的部分内容,即窗口大小设置后,移动图片位置,只显示要显示的部分。
②内外边距
内边距,代码如下:
<!DOCTYPE html>
<html lang="en">
<head>
<meta charset="UTF-8">
<title></title>
</head>
<body>
<div >
<div >
</div>
</div>
</body>
</html>
运行结果如下:

调整外边距:
在上面的代码增加代码"padding-top: 20p",
<!DOCTYPE html>
<html lang="en">
<head>
<meta charset="UTF-8">
<title></title>
</head>
<body>
<div >
<div >
</div>
</div>
</body>
</html>
刷新页面如下:

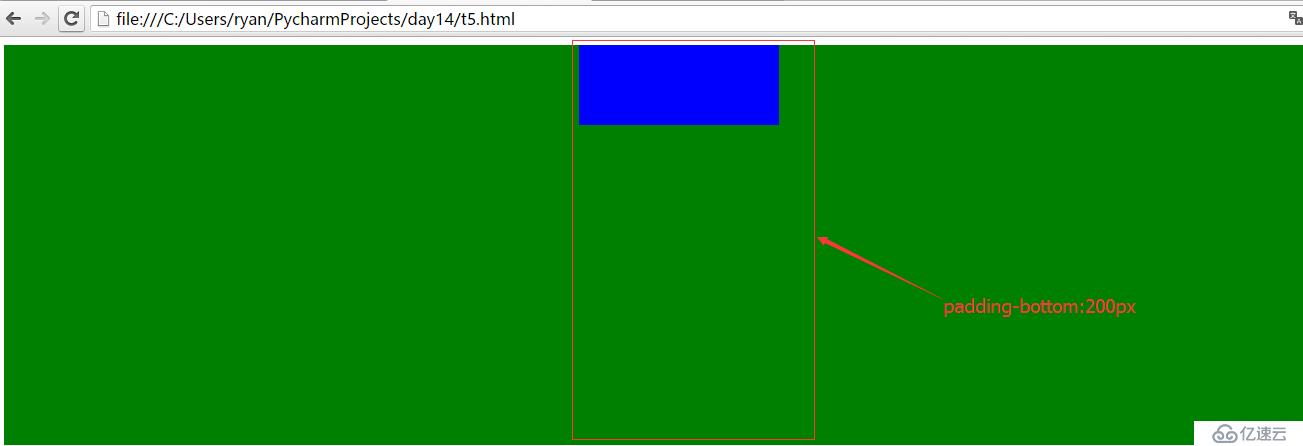
同样还有padding-right,pading-left,padding-bottom,样式效果分别如下:


以上表示蓝色方块相对绿色方块的位置放生变化,实际是在绿色方块代码上做的调整,验证了padding属性是调整方块(此处是调整绿色方块)自身的大小。
下面通过调整蓝色方块代码进一步演示调整结果:
<!DOCTYPE html>
<html lang="en">
<head>
<meta charset="UTF-8">
<title></title>
</head>
<body>
<div >
<div >
</div>
</div>
</body>
</html>
此时在蓝色方块代码中添加"padding-top: 20px;"代码
添加padding属性之前:
 添加padding属性之后:

相对于增加padding属性之前,经过对比绿色方块大小不变,蓝色方块高度变大。
同样依次将padding-top改为padding-left、padding-right、padding-bottom进行对比,效果依次如下:


 从以上各种情况的演示效果可以看出padding属性是对方块自身大小的调整。
还有另外一种属性margin,其效果是外部方块大小调整,即外边距大小的调整,margin有margin-top、margin-right、margin-left、margin-bottom几种属性,这里仍然是以该代码为例,对外方块大小调整进行演示,原始代码如下:
<!DOCTYPE html>
<html lang="en">
<head>
<meta charset="UTF-8">
<title></title>
</head>
<body>
<div >
<div >
</div>
</div>
</body>
</html>
添加margin属性之前显示如下:

添加margin-top:20px;
<!DOCTYPE html>
<html lang="en">
<head>
<meta charset="UTF-8">
<title></title>
</head>
<body>
<div >
<div >
</div>
</div>
</body>
</html>
显示如下:

接下来依次为margin-left、margin-right、margin-bottom演示效果:


从以上演示结果发现,margin-left、margin-right、margin-top效果很明显,而margin-bottom效果不是很明显,但是从以上的结果可以发现margin属性是蓝色方块外部的绿方块大小进行调整。
经过面的演示,可以得出结论:
padding:自身增加,即自身尺寸大小调整;换句话说就是调整内边距,改变自己的内部边距;
padding-top、padding-left、padding-right、padding-bottom
margin: 外部增加,即离边框越来越远,即外边距;换句话说就是改变自己与外部其他标签的边距;
margin-top、margin-left、margin-right、margin-bottom
注意:对于padding和margin值的设置方式,以padding为例,如果设置了padding:20px,则表示padding所在的标签下,上下左右的值都为20px,即:padding:20px等价于:
padding-top:20px;
padding-right:20px;
padding-bottom:20px;
padding-left:20px;
如果设置了pading:10px 20px;则等价于:
padding-top:10px;
padding-right:20px;
padding-bottom:10px;
padding-left:20px;
padding值设置生效方式为:上右下左
如果设置了一个值,则上下左右的值都是一样,如果设置了两个值,则第一个值是对应上和右,第二个值则对应下和左
该方式合适margin和border,另外如果想某个标签水平居中,可以使用margin:0 auto;
②位置标签position的属性,即定位。
1、fixed,固定浏览器窗口的位置,相对于整个浏览器窗口而固定的某个标签的位置。
<body>
<a >返回顶部</a>
<div ></div>
<a >返回顶部</a>
</body>
运行效果:

2、绝对(absolute)和相对(relative)位置
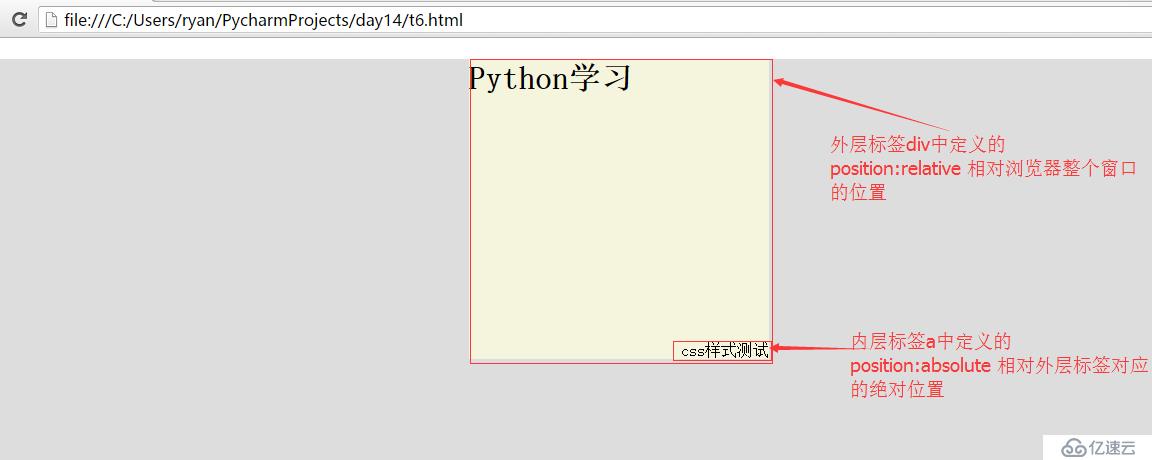
当位置position的值absolute和relative要一起用才会生效,一般情况下relative要放在外层标签,而absolute则放在内存标签上,示例代码如下:
<body>
<div id="content" >
<div color:rgb(255,0,0);">position:relative;background-color: beige;width:300px;margin: 0 auto;height:300px;">
<!--外层标签---->
<h2>Python学习</h2>
<a color:rgb(255,0,0);">position:absolute;right:0;bottom:0px;">css样式测试</a>
<!--内层标签----->
</div>
</div>
</body>
显示效果如下:

③float属性
正常情况下定义两个div标签显示结果如下:
<body>
<div >
<div>1111111111</div>
<div>2222222222</div>
</div>
显示结果如下:
 如果想两个div标签中的内容都在一行显示,我们可以运用float属性来定义,对上面代码记性改进:
<body>
<div >
<div >1111111111</div>
<div >2222222222</div>
</div>
</body>

从上述效果发现,虽然两个div标签中的结果都出现在一行显示,但是背景颜色没有了,这里可以通过如下两个方式解决:
a、在第二个div标签后面添加一个div标签,具体内容如下:
<body>
<div >
<div >1111111111</div>
<div >2222222222</div>
<div ></div>
</div>
</body>
显示结果如下:

b、或者在父标签中添加一个高度,即:
<body>
<div >
<div >1111111111</div>
<div >2222222222</div>
</div>
</body>
显示结果如下:

这样就解决了背景不显示的问题。
④overflow
平时我们如果固定了背景的高度,然后背景框里有一些内容,但是内容超出了固定背景框的高度,如下图所示:

代码为:
<body>
<div >
python之路</br>
python之路</br>
python之路</br>
python之路</br>
python之路</br>
python之路</br>
python之路</br>
python之路</br>
python之路</br>
python之路</br>
python之路</br>
</div>
如出现这种情况肯定不是我们想要的,那么如何解决呢?一般的解决的最好方法是能让背景框随着内容量的多少进行自由扩展或者收缩,这里可以用样式overflow:auto,或者overflow:hidden
<body>
<div color:rgb(255,0,0);">overflow:auto;height:100px;background-color: darkorange;">
python之路</br>
python之路</br>
python之路</br>
python之路</br>
python之路</br>
python之路</br>
python之路</br>
python之路</br>
python之路</br>
python之路</br>
python之路</br>
</div>
显示结果为:

或者:
<body>
<div color:rgb(255,0,0);">overflow:hidden;height:100px;background-color: darkorange;">
python之路</br>
python之路</br>
python之路</br>
python之路</br>
python之路</br>
python之路</br>
python之路</br>
python之路</br>
python之路</br>
python之路</br>
python之路</br>
</div>
显示效果如下:

⑤opacity属性,透明度
针对一些背景页面设置透明度,针对chrome浏览器设置透明度可以用opacity:0.5;这样的方法设置,还有其他浏览器设置方式为:
filter:alpha(opacity=50);
-moz-opacity:0.5
opacity:0.5
<body>
<div >
python之路
python之路
python之路
</div>
</body>
显示结果为:

⑥z-index属性
用来设置浏览器中页面的层级
代码如下:
<body>
<li>Python 之路学习</li>
<div ></div>
<input type="button" value="提交数据">
<div ></div>
<div ></div>
<div >
<input />
<input />
<input />
<input />
</div>
</body>
后台布局示例代码:
<!DOCTYPE html>
<html lang="en">
<head>
<meta charset="UTF-8">
<title></title>
<style>
body{
margin: 0 auto;
}
.pg-header{
height:48px;
background-color:rgb(51,122,183);
}
.pg-body .menu {
background-color: #dddddd;
position: absolute;
top: 50px;
left: 0;
bottom: 0;
width: 200px;
overflow: auto;
}
.pg-body .content{
background-color: darkslategray;
position: absolute;
right: 0;
top: 50px;
bottom: 0;
left: 210px;
overflow: auto;
}
</style>
</head>
<body>
<div class="pg-header"></div>
<div class="pg-body">
<div class="menu">
<a>菜单</a>
<a>菜单</a>
<a>菜单</a>
<a>菜单</a>
<a>菜单</a>
<a>菜单</a>
<p>测试菜单</p>
<p>测试菜单</p>
<p>测试菜单</p>
<p>测试菜单</p>
<p>测试菜单</p>
<p>测试菜单</p>
<p>测试菜单</p>
<p>测试菜单</p>
<p>测试菜单</p>
<p>测试菜单</p>
<p>测试菜单</p>
<p>测试菜单</p>
<p>测试菜单</p>
<p>测试菜单</p>
<a>菜单</a>
<a>菜单</a>
<a>菜单</a>
<p>测试菜单</p>
<p>测试菜单</p>
<p>测试菜单</p>
<p>测试菜单</p>
<p>测试菜单</p>
<a>菜单</a>
<a>菜单</a>
<a>菜单</a>
<p>测试菜单</p>
<p>测试菜单</p>
<p>测试菜单</p>
<p>测试菜单</p>
<p>测试菜单</p>
<a>菜单</a>
<a>菜单</a>
<a>菜单</a>
<p>测试菜单</p>
<p>测试菜单</p>
<p>测试菜单</p>
<p>测试菜单</p>
<p>测试菜单</p>
</div>
<div class="content">
内容布局内容布局内容布局内容布局
<div >
<h2 >测试内容</h2>
</div>
</div>
</div>
</body>
</html>
亿速云「云服务器」,即开即用、新一代英特尔至强铂金CPU、三副本存储NVMe SSD云盘,价格低至29元/月。点击查看>>
免责声明:本站发布的内容(图片、视频和文字)以原创、转载和分享为主,文章观点不代表本网站立场,如果涉及侵权请联系站长邮箱:is@yisu.com进行举报,并提供相关证据,一经查实,将立刻删除涉嫌侵权内容。