跨域需要服务端和客户端都作处理。
首先让asp.net core跨域,在nuget中添加Microsoft.AspNetCore.Cors的引用,然后在StartUp.cs中的ConfigureServices中添加如下代码:
    var urls = "http://localhost:5000/";
    services.AddCors(options =>
    options.AddPolicy("MyDomain",
builder => builder.WithOrigins(urls).AllowAnyMethod().AllowAnyHeader().AllowAnyOrigin().AllowCredentials()));再在Configure中添加
app.UseCors("AllowSameDomain");再添加验证,添加Microsoft.AspNetCore.Authentication.Cookies引用 在Configure中添加
app.UseCookieAuthentication(new CookieAuthenticationOptions
{
    AuthenticationScheme = "validates",
    LoginPath = new Microsoft.AspNetCore.Http.PathString("/login"),
    AccessDeniedPath = new Microsoft.AspNetCore.Http.PathString("/Home/Error"),
    AutomaticAuthenticate = true,
    AutomaticChallenge = true,
    SlidingExpiration = true
});在Controller中添加允许跨域特性,然后再添验证特性
using Microsoft.AspNetCore.Mvc;
using Microsoft.AspNetCore.Cors;
using Microsoft.AspNetCore.Authorization;
using System.Security.Claims;

namespace WebUI.Controllers
{
    [Authorize(Roles = "Admin")]
    [EnableCors("MyDomain")]
    public class HomeController : Controller
    {
        /// <summary>
        /// 测试方法
        /// </summary>
        /// <param name="item"></param>
        /// <returns></returns>
        [HttpPost("additem")]
        public IActionResult AddItem(Item item)
        {
            return new JsonResult(new { Result = 0, Message = "添加成功", Content = item.ToString(), UserName = User.Identity.Name }, new Newtonsoft.Json.JsonSerializerSettings());
        }
        /// <summary>
        /// 登录
        /// </summary>
        /// <param name="username">用户名</param>
        /// <param name="password">密码</param>
        /// <returns></returns>
        [AllowAnonymous]
        [HttpPost("login")]
        public IActionResult Login(string username, string password)
        {
            if (username == "aaa" && password == "111")
            {

                var user = new { RoleType = 1, Name = "张三丰", ID = 1 };
                string roleId = user.RoleType.ToString();
                var roleName = "";
                switch (roleId)
                {
                    case "1":
                        roleName = "Admin";//管理员
                        break;
                }
                var id = user.ID.ToString();
                var claims = new Claim[] {
                      new Claim(ClaimTypes.UserData,roleId),
                      new Claim(ClaimTypes.Role,roleName),
                      new Claim(ClaimTypes.Name,username)
                };
                HttpContext.Authentication.SignInAsync("validates", new ClaimsPrincipal(new ClaimsIdentity(claims, "Cookie")));
                HttpContext.User = new ClaimsPrincipal(new ClaimsIdentity(claims));

                return new JsonResult(new { Message = "登录成功" }, new Newtonsoft.Json.JsonSerializerSettings());

            }
            else
            {

                return new JsonResult(new { Message = "用户名或密码错误" }, new Newtonsoft.Json.JsonSerializerSettings());
            }
        }
    }
}在JQuery中,使用$.ajax登录后,才能执行保存,否则没有权限保存数据,重点时ajax请求时xhrFields: {withCredentials: true }这个属性,可以把登录后的cookie在后面的操作中带回服务端(关于原理不多说了)<!DOCTYPE html>
<html>
<head>
<meta http-equiv="Content-Type" content="text/html; charset=utf-8" />
<title></title>
<meta charset="utf-8" />
<script src="bower_components/jquery/dist/jquery.js"></script>
</head>
<body>
<input id="login" value="登录" type="button" />
<input id="sava" value="保存" type="button" />
<span id="message"></span>
<script>
$("#login").click(function () {
$.ajax({
type: 'POST',
url: "http://localhost:5000/login",
data: { username: "aaa", password: "111" },
dataType: "json",
xhrFields: {
withCredentials: true
},
success: function (result) {
$("#message").html(result.Message);
},
error: function () {
$("#message").html("登录失败!");
}
});
})
$("#sava").click(function () {
$.ajax({
type: 'POST',
url: "http://localhost:5000/additem",
data: { ID: 112, Name: "李四", Birthday: "2017-01-23" },
dataType: "json",
//必须有这项的配置,不然cookie无法发送至服务端
xhrFields: {
withCredentials: true
},
success: function (result) {
$("#message").html(result.Message + result.Content + result.UserName);
},
error: function (xhr,status) {
$("#message").html(status);
}
});
})
</script>
</body>
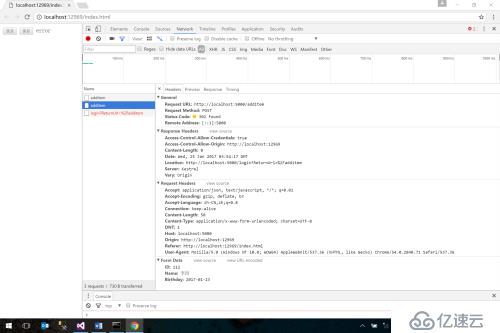
</html>来看一下测试结果:
当直接点保存时,系统会导航登录
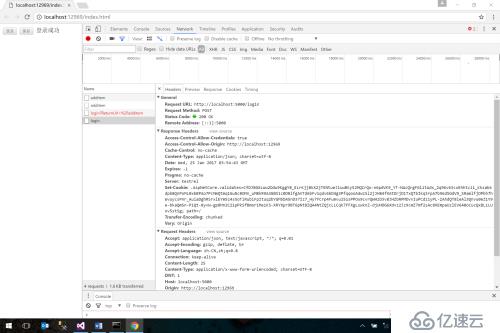
登录
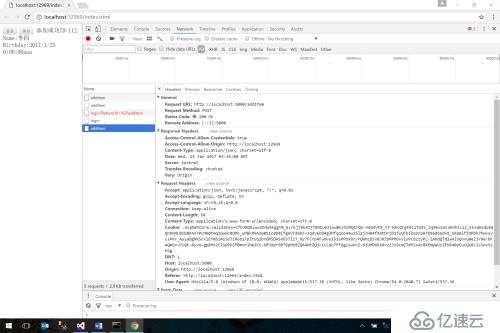
再次保存
亿速云「云服务器」,即开即用、新一代英特尔至强铂金CPU、三副本存储NVMe SSD云盘,价格低至29元/月。点击查看>>
免责声明:本站发布的内容(图片、视频和文字)以原创、转载和分享为主,文章观点不代表本网站立场,如果涉及侵权请联系站长邮箱:is@yisu.com进行举报,并提供相关证据,一经查实,将立刻删除涉嫌侵权内容。


 计算
计算 安全
安全 数据库
数据库 网络和加速
网络和加速 企业服务
企业服务


