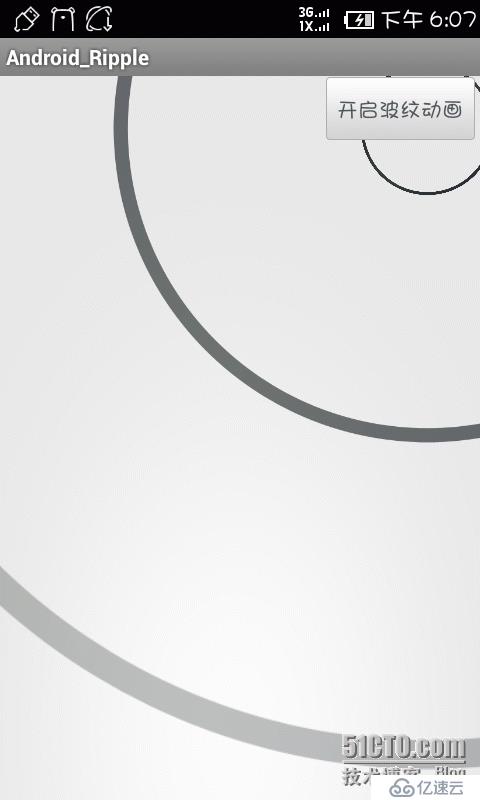
今天我实现一个wifi当中搜索时的动画效果,通常我们会使用多张图片进行Frame动画播放,这里我使用了Tween动画,仅对一张图片进行操作,实现了wifi扫描动画效果,有兴趣的可以看看!
效果图:

这里我们采用了自定义布局的方式 activity_main.xml
<RelativeLayout xmlns:android="http://schemas.android.com/apk/res/android"
    xmlns:tools="http://schemas.android.com/tools"
    android:layout_width="match_parent"
    android:layout_height="match_parent"
    >
    <com.zhf.android_ripple.AnimationFrameLayout
        android:id="@+id/search_animation_wf_main"
        android:layout_width="fill_parent"
        android:layout_height="fill_parent" >
    </com.zhf.android_ripple.AnimationFrameLayout>
    <Button
        android:id="@+id/button1"
        android:layout_width="wrap_content"
        android:layout_height="wrap_content"
        android:layout_alignParentRight="true"
        android:text="开启波纹动画" />
</RelativeLayout>
AnimationFrameLayout类:
package com.zhf.android_ripple;
import java.lang.ref.SoftReference;
import android.content.Context;
import android.graphics.Bitmap;
import android.graphics.BitmapFactory;
import android.util.AttributeSet;
import android.util.Log;
import android.view.LayoutInflater;
import android.view.View;
import android.view.animation.AccelerateDecelerateInterpolator;
import android.view.animation.AlphaAnimation;
import android.view.animation.Animation;
import android.view.animation.Animation.AnimationListener;
import android.view.animation.AnimationSet;
import android.view.animation.ScaleAnimation;
import android.widget.FrameLayout;
import android.widget.ImageView;
public class AnimationFrameLayout extends FrameLayout {
    private SoftReference<Bitmap> m_bitmapRipple;//波纹图片 (软引用)
    private ImageView[] m_p_w_picpathVRadars; //ImageView数组

    public AnimationFrameLayout(Context context) {
        super(context);
        init();
    }
    public AnimationFrameLayout(Context context, AttributeSet attrs,
            int defStyle) {
        super(context, attrs, defStyle);
        init();
    }
    public AnimationFrameLayout(Context context, AttributeSet attrs) {
        super(context, attrs);
        init();
    }
    /**初始化**/
    private void init() {
        loadRadarBitmap();
        m_p_w_picpathVRadars = new ImageView[3];
        View v = LayoutInflater.from(getContext()).inflate(R.layout.wt_search_device_anima, this);
        m_p_w_picpathVRadars[0] = (ImageView) v.findViewById(R.id.radar_ray_1);
        m_p_w_picpathVRadars[1] = (ImageView) v.findViewById(R.id.radar_ray_2);
        m_p_w_picpathVRadars[2] = (ImageView) v.findViewById(R.id.radar_ray_3);
    }
    /**加载图片**/
    private void loadRadarBitmap() {
        try {
            //获取波纹图片
            m_bitmapRipple = new SoftReference<Bitmap>(BitmapFactory.decodeStream(getContext().getResources()
                            .openRawResource(R.drawable.wifi_body_ripple)));
        } catch (Exception localException) {
            Log.e("WTSearchAnimationFrameLayout",
                    Log.getStackTraceString(localException));
        } catch (OutOfMemoryError localOutOfMemoryError) {
            Log.e("WTSearchAnimationFrameLayout",
                    Log.getStackTraceString(localOutOfMemoryError));
            System.gc();  //回收
        }
    }

    /**重置,停止动画**/
    public void stopAnimation() {
        for (int  i= 0;  i< m_p_w_picpathVRadars.length; ++i) {
            if(m_bitmapRipple != null){
                Bitmap localBitmap = m_bitmapRipple.get(); //软引用获取对象
                if(localBitmap != null && !localBitmap.isRecycled()) {
                    //回收图片资源
                    localBitmap.recycle();
                }
                m_bitmapRipple = null;
                ImageView localImageView = m_p_w_picpathVRadars[i];
                localImageView.setImageBitmap(null); //设置ImageView为空
                localImageView.setVisibility(View.GONE);
                localImageView.clearAnimation(); //取消动画
            }
        }
    }

    /**开始动画**/
    public void startAnimation() {
        if(m_bitmapRipple == null) {
            loadRadarBitmap();
        }
        for (int i = 0; i < m_p_w_picpathVRadars.length; i++) {
            ImageView localImageView;
            long ltime;
            while(true) {
                localImageView = m_p_w_picpathVRadars[i];
                localImageView.setImageBitmap(m_bitmapRipple.get());  //获取图片
                localImageView.setVisibility(View.VISIBLE);
                //放大
                ltime= 333L * i;
                if(localImageView.getAnimation() == null) {
                    break;
                }
                localImageView.getAnimation().start();
            }

            ScaleAnimation localScaleAnimation = new ScaleAnimation(1.0f, 14.0f,1.0f,14.0f,1,0.5f,1,0.5f);
            localScaleAnimation.setRepeatCount(-1); //动画重复
            AlphaAnimation localAlphaAnimation = new AlphaAnimation(1.0f, 0.2f);
            AnimationSet localAnimationSet = new AnimationSet(true);  //true:使用相同的加速器

            localAnimationSet.addAnimation(localScaleAnimation);
            localAnimationSet.addAnimation(localAlphaAnimation);  //将两种动画效果添加进去
            //设置相关属性
            localAnimationSet.setDuration(1000L);  //持续时间
            localAnimationSet.setFillEnabled(true);
            localAnimationSet.setFillBefore(true);  //控件保持在动画开始之前
            localAnimationSet.setStartOffset(ltime);   //动画效果推迟ltime秒钟后启动
            localAnimationSet.setInterpolator(new AccelerateDecelerateInterpolator());
            localAnimationSet.setAnimationListener(new MySearchAnimationHandler(this,localImageView)); //绑定监听器
            //将动画集合设置进去
            localImageView.setAnimation(localAnimationSet);
            localImageView.startAnimation(localAnimationSet);//开启动画
        }
    }
    /**动画监听类**/
    public class MySearchAnimationHandler implements AnimationListener{
        private ImageView m_p_w_picpathVRadar;

        public MySearchAnimationHandler(AnimationFrameLayout paramImageView,ImageView m_p_w_picpathVRadar) {
            super();
            this.m_p_w_picpathVRadar = m_p_w_picpathVRadar;
        }
        @Override
        public void onAnimationStart(Animation animation) {
            // TODO Auto-generated method stub
        }
        @Override
        public void onAnimationEnd(Animation animation) {
            this.m_p_w_picpathVRadar.setVisibility(View.GONE);
        }
        @Override
        public void onAnimationRepeat(Animation animation) {
            animation.setStartOffset(0L);
        }
    }
}
重要说明:
1.该类中我们对图片的操作使用软引用,目的是防止OOM.
2.至于动画,使用ImageView[]来依次加载图片,通过更改对每个ImageView实现缩放和透明动画
动画布局 wt_search_device_anima.xml
<?xml version="1.0" encoding="utf-8"?>
<RelativeLayout xmlns:android="http://schemas.android.com/apk/res/android"
    android:layout_width="fill_parent"
    android:layout_height="fill_parent" >
    <ImageView
        android:id="@+id/radar_ray_1"
        android:layout_width="70.0dip"
        android:layout_height="70.0dip"
        android:layout_alignParentRight="true"
        android:layout_alignParentTop="true"
        android:layout_marginLeft="10.0dip" />
    <ImageView
        android:id="@+id/radar_ray_2"
        android:layout_width="70.0dip"
        android:layout_height="70.0dip"
        android:layout_alignParentRight="true"
        android:layout_alignParentTop="true"
        android:layout_marginLeft="10.0dip" />
    <ImageView
        android:id="@+id/radar_ray_3"
        android:layout_width="70.0dip"
        android:layout_height="70.0dip"
        android:layout_alignParentRight="true"
        android:layout_alignParentTop="true"
        android:layout_marginLeft="10.0dip" />
</RelativeLayout>
程序主入口:
package com.zhf.android_ripple;
import android.os.Bundle;
import android.app.Activity;
import android.view.View;
import android.view.View.OnClickListener;
import android.widget.Button;
public class MainActivity extends Activity {

    public Button m_btn1;
    AnimationFrameLayout afl; //动画布局
    @Override
    protected void onCreate(Bundle savedInstanceState) {
        super.onCreate(savedInstanceState);
        setContentView(R.layout.activity_main);

        afl = ((AnimationFrameLayout) findViewById(R.id.search_animation_wf_main));// 搜索时的动画
        m_btn1 = (Button) findViewById(R.id.button1);
        m_btn1.setOnClickListener(new OnClickListener() {
            @Override
            public void onClick(View v) {
                afl.startAnimation();
            }
        });
    }

    @Override
    protected void onDestroy() {
        // TODO Auto-generated method stub
        super.onDestroy();
        afl.stopAnimation();
    }
}
ok! 源码已添加!试试效果吧!
免责声明:本站发布的内容(图片、视频和文字)以原创、转载和分享为主,文章观点不代表本网站立场,如果涉及侵权请联系站长邮箱:is@yisu.com进行举报,并提供相关证据,一经查实,将立刻删除涉嫌侵权内容。