这篇文章主要介绍怎么使用HTML5+css3制作出12种的按钮开关样式,文中介绍的非常详细,具有一定的参考价值,感兴趣的小伙伴们一定要看完!
使用HTML5+css3制作按钮开关的原理
根据设计的要求填充各种颜色。
按钮开关的形状需要具体问题具体分析,如圆形按钮开关需要用到border-radius语句,方形可以直接使用div设置等。
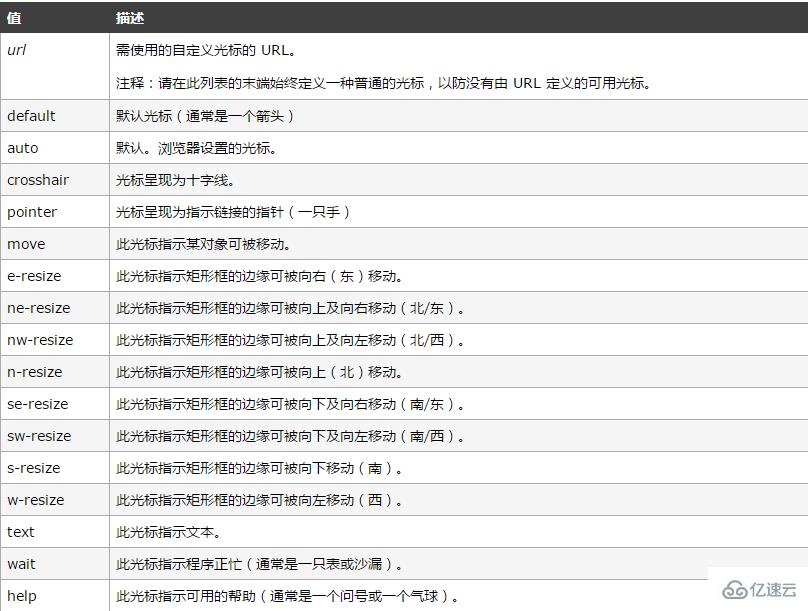
鼠标悬停的时候光标样式的转换也是注重设计感的体现,这里我们着重介绍一下cursor的用法:
cursor 属性规定要显示的光标的类型,该属性定义了鼠标指针放在一个元素边界范围内时所用的光标形状,根据W3C标准,现在市面上的几乎所有浏览器都兼容cursor属性,所以不要担心与浏览器的兼容问题。
cursor属性的用法如下表所示

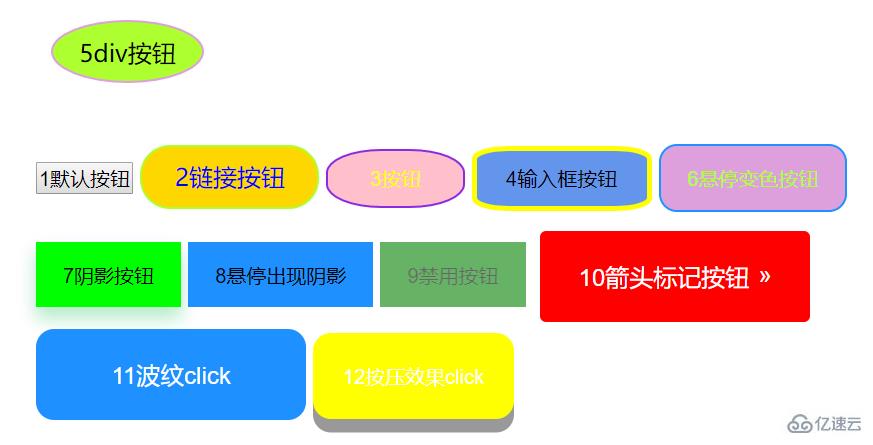
本文所示12种按钮开关样式分别为:div按钮,默认按钮,链接按钮,圆角按钮,输入框按钮,悬停变色按钮,阴影按钮,悬停出现按钮,禁用按钮,箭头标记按钮,波纹按钮和按压效果按钮。
使用HTML5+css3制作按钮开关的代码
<!DOCTYPE html>
<html>
<head>
    <meta charset="UTF-8">
    <title>各式各样的按钮</title>
    <style type="text/css">
        *{
            margin: 0;
            padding: 0;
        }
        .wrap{
            width: 600px;
            height: 400px;
            margin: 0 auto;
            /*background: pink;*/
            padding: 30px 50px;
        }
        /*div按钮*/
        .button5{
            width: 100px;
            height: 30px;
            float: left;
            /*position: absolute;*/
            text-align: center;
            padding-top: 10px;
            margin:0px 10px ;
            background: greenyellow;
            border: 1px solid plum;
            cursor: pointer;
            border-radius: 50%;
        }
        /*链接按钮*/
        .button2{
            background: gold;
            border: 1px solid greenyellow;
            text-decoration: none;
            display: inline-block;
            padding: 10px 22px;
            border-radius: 20px;
            /*cursor: pointer;靠近按钮的一只手*/
        }
        /*按钮*/
        .button3{
            background: pink;
            border: 1px solid blueviolet;
            padding: 10px 28px;
            cursor: pointer;
            color: yellow;
            border-radius: 40%;
        }
        /*输入框按钮*/
        .button4{
            background: cornflowerblue;
            border: 3px solid yellow;
            padding: 10px 20px;
            border-radius: 20%;
            outline-style: none;/*去除点击时外部框线*/
        }
        /*悬停变色按钮*/
        .button6{
            background: plum;
            color: greenyellow;
            border: 1px solid dodgerblue;
            transition-duration: 1s;/*过渡时间*/
            border-radius: 12px;
            padding: 13px 18px;
            margin-top: 20px;
            outline-style: none;/*去除点击时外部框线*/
        }
        .button6:hover{
            background: yellow;
            color: magenta;
            transition-duration: 1s;
        }
        /*阴影按钮*/
        .button7{
            /*display: inline-block;*/
            border: none;
            background: lime;
            padding: 13px 18px;
            margin-top: 20px;
            /*outline-style: none;!*去除点击时外部框线*!*/
            /*-webkit-transition-duration: 0.6s;*/
            transition-duration: 0.6s;
            /*设置按钮阴影*/
            box-shadow: 0 8px 16px 0 rgba(0,255,0,0.2),0 6px 20px 0 rgba(0,0,255,0.1);
        }
        /*悬停出现阴影按钮*/
        .button8{
            border: none;
            background: dodgerblue;
            padding: 13px 18px;
            margin-top: 20px;
            transition-duration: 0.6s;
        }
        .button8:hover{
            box-shadow: 0 12px 16px 0 rgba(0,255,0,0.24),0 17px 50px 0 rgba(0,0,255,0.19);
        }
        /*禁用按钮*/
        .button9{
            border: none;
            background: green;
            padding: 13px 18px;
            margin-top: 20px;
            opacity: 0.6;/*设置按钮的透明度*/
            cursor: not-allowed;/*设置按钮为禁用状态*/
        }
        /*箭头标记按钮*/
        .button10{
            display: inline-block;
            border: none;
            background: red;
            color: white;
            padding: 20px;
            text-align: center;
            border-radius: 4px;
            width: 180px;
            font-size: 16px;/*可以通过字体控制button大小*/
            transition: all 0.5s;
            margin: 5px;
            cursor: pointer;
        }
        .button10 span{
            cursor: pointer;
            display: inline-block;
            position: relative;
            transition: 0.5s;
        }
        .button10 span:after{
            content: '»';
            color: white;
            position: absolute;
            opacity: 0;/*先设置透明度为0,即不可见*/
            right:-20px;/*新增箭头出来的方向*/
            transition: 0.5s;
        }
        .button10:hover span{
            padding-right: 15px;/*新增箭头与前面文字的距离*/
        }
        .button10:hover span:after{
            opacity: 1;/*设置透明度为1,即可见状态*/
            right: 0;
        }
        /*点击出现波纹效果按钮*/
        .button11{
            position: relative;/*必须添上这一句,否则波纹布满整个页面*/
            background: dodgerblue;
            border: none;
            color: white;
            width: 180px;
            font-size: 16px;/*可以通过字体控制button大小*/
            padding: 20px;
            border-radius: 12px;
            transition-duration: 0.4s;
            overflow: hidden;
            outline-style: none;/*去除点击时外部框线*/
        }
        .button11:after{
            content:"";
            background: aquamarine;
            opacity: 0;
            display: block;
            position: absolute;
            padding-top: 300%;
            padding-left: 350%;
            margin-left: -20px!important;
            margin-top: -120%;
            transition: all 0.5s;
        }
        .button11:active:after{
            padding: 0;
            margin: 0;
            opacity: 1;
            transition: 0.1s;
        }
        /*点击出现按压效果*/
        .button12{
            outline-style: none;/*去除点击时外部框线*/
            padding: 20px;
            color: white;
            background: yellow;
            border: none;
            border-radius: 12px;
            box-shadow: 0px 9px 0px rgba(144,144,144,1),0px 9px 25px rgba(0,0,0,.7);
        }
        .button12:hover{
            background: gold;
        }
        .button12:active{
            background: gold;
            box-shadow: 0 5px #666;
            transform: translateY(4px);
            transition-duration: 0s;/*过渡效果持续时间*/
        }
    </style>
</head>
<body>
<div>
    <div>5div按钮</div>
    <p style="clear: both"><br></p>
    <button>1默认按钮</button>
    <a href="#">2链接按钮</a>
    <button>3按钮</button>
    <input type="button" value="4输入框按钮">
    <button>6悬停变色按钮</button>
    <button>7阴影按钮</button>
    <button>8悬停出现阴影</button>
    <button>9禁用按钮</button>
    <button style="vertical-align: middle"><span>10箭头标记按钮</span></button>
    <button>11波纹click</button>
    <button>12按压效果click</button>
</div>
</body>
</html>
按钮开关样式如图所示

以上是怎么使用HTML5+css3制作出12种的按钮开关样式的所有内容,感谢各位的阅读!希望分享的内容对大家有帮助,更多相关知识,欢迎关注亿速云行业资讯频道!
免责声明:本站发布的内容(图片、视频和文字)以原创、转载和分享为主,文章观点不代表本网站立场,如果涉及侵权请联系站长邮箱:is@yisu.com进行举报,并提供相关证据,一经查实,将立刻删除涉嫌侵权内容。