小编给大家分享一下Spring Boot缓存源码是什么,相信大部分人都还不怎么了解,因此分享这篇文章给大家参考一下,希望大家阅读完这篇文章后大有收获,下面让我们一起去了解一下吧!
项目里面要增加一个应用缓存,原本想着要怎么怎么来整合ehcache和springboot,做好准备配置这个配置那个,结果只需要做三件事:
pom依赖
写好一个ehcache的配置文件
在boot的application上加上注解@EnableCaching.
这就完事了,是不是很魔幻。
pom依赖
<dependency>
            <groupId>net.sf.ehcache</groupId>
            <artifactId>ehcache</artifactId>
            <version>2.10.5</version>
</dependency>
配置文件
<?xml version="1.0" encoding="UTF-8"?>
<ehcache>
    <!-- 设定缓存的默认数据过期策略 -->
    <defaultCache
            maxElementsInMemory="500"
            maxElementsOnDisk="2000"
            eternal="false"
            overflowToDisk="true"
            timeToIdleSeconds="90"
            timeToLiveSeconds="300"
            diskPersistent="false"
            diskExpiryThreadIntervalSeconds="300"/>
</ehcache>
应用上加上EnableCaching注解
@SpringBootApplication
@EnableCaching
public class EhCacheApplication {

    public static void main(String[] args) {
        SpringApplication.run(EhCacheApplication.class, args);
    }
}
然后就可以在代码里面使用cache注解了,像这样。
@CachePut(value = "fish-ehcache", key = "#person.id")
    public Person save(Person person) {
        System.out.println("为id、key为:" + person.getId() + "数据做了缓存");
        return person;
    }

    @CacheEvict(value = "fish-ehcache")
    public void remove(Long id) {
        System.out.println("删除了id、key为" + id + "的数据缓存");
    }


    @Cacheable(value = "fish-ehcache", key = "#person.id")
    public Person findOne(Person person) {
        findCount.incrementAndGet();
        System.out.println("为id、key为:" + person.getId() + "数据做了缓存");
        return person;
    }
很方便对不对。下面,我们就来挖一挖,看看spring是怎么来做到的。主要分成两部分,一是启动的时候做了什么,二是运行的时候做了什么,三是和第三方缓存组件的适配
启动的时候做了什么、
这个得从@EnableCaching标签开始,在使用缓存功能时,在springboot的Application启动类上需要添加注解@EnableCaching,这个标签引入了
@Target({ElementType.TYPE})
@Retention(RetentionPolicy.RUNTIME)
@Documented
@Import({CachingConfigurationSelector.class})
public @interface EnableCaching {
    boolean proxyTargetClass() default false;
    AdviceMode mode() default AdviceMode.PROXY;
    int order() default 2147483647;
}
引入了CachingConfigurationSelector类,这个类便开启了缓存功能的配置。这个类添加了AutoProxyRegistrar.java,ProxyCachingConfiguration.java两个类。
AutoProxyRegistrar : 实现了ImportBeanDefinitionRegistrar接口。这里看不懂,还需要继续学习。
ProxyCachingConfiguration : 是一个配置类,生成了BeanFactoryCacheOperationSourceAdvisor,CacheOperationSource,和CacheInterceptor这三个bean。
CacheOperationSource封装了cache方法签名注解的解析工作,形成CacheOperation的集合。CacheInterceptor使用该集合过滤执行缓存处理。解析缓存注解的类是SpringCacheAnnotationParser,其主要方法如下
/**
由CacheOperationSourcePointcut作为注解切面,会解析
SpringCacheAnnotationParser.java
扫描方法签名,解析被缓存注解修饰的方法,将生成一个CacheOperation的子类并将其保存到一个数组中去
**/
protected Collection<CacheOperation> parseCacheAnnotations(SpringCacheAnnotationParser.DefaultCacheConfig cachingConfig, AnnotatedElement ae) {
        Collection<CacheOperation> ops = null;
        //找@cacheable注解方法
        Collection<Cacheable> cacheables = AnnotatedElementUtils.getAllMergedAnnotations(ae, Cacheable.class);
        if (!cacheables.isEmpty()) {
            ops = this.lazyInit(ops);
            Iterator var5 = cacheables.iterator();

            while(var5.hasNext()) {
                Cacheable cacheable = (Cacheable)var5.next();
                ops.add(this.parseCacheableAnnotation(ae, cachingConfig, cacheable));
            }
        }
        //找@cacheEvict注解的方法
        Collection<CacheEvict> evicts = AnnotatedElementUtils.getAllMergedAnnotations(ae, CacheEvict.class);
        if (!evicts.isEmpty()) {
            ops = this.lazyInit(ops);
            Iterator var12 = evicts.iterator();

            while(var12.hasNext()) {
                CacheEvict evict = (CacheEvict)var12.next();
                ops.add(this.parseEvictAnnotation(ae, cachingConfig, evict));
            }
        }
        //找@cachePut注解的方法
        Collection<CachePut> puts = AnnotatedElementUtils.getAllMergedAnnotations(ae, CachePut.class);
        if (!puts.isEmpty()) {
            ops = this.lazyInit(ops);
            Iterator var14 = puts.iterator();

            while(var14.hasNext()) {
                CachePut put = (CachePut)var14.next();
                ops.add(this.parsePutAnnotation(ae, cachingConfig, put));
            }
        }
        Collection<Caching> cachings = AnnotatedElementUtils.getAllMergedAnnotations(ae, Caching.class);
        if (!cachings.isEmpty()) {
            ops = this.lazyInit(ops);
            Iterator var16 = cachings.iterator();

            while(var16.hasNext()) {
                Caching caching = (Caching)var16.next();
                Collection<CacheOperation> cachingOps = this.parseCachingAnnotation(ae, cachingConfig, caching);
                if (cachingOps != null) {
                    ops.addAll(cachingOps);
                }
            }
        }
        return ops;
}
解析Cachable,Caching,CachePut,CachEevict 这四个注解对应的方法都保存到了Collection<CacheOperation> 集合中。
执行方法时做了什么
执行的时候,主要使用了CacheInterceptor类。
public class CacheInterceptor extends CacheAspectSupport implements MethodInterceptor, Serializable {
    public CacheInterceptor() {
    }

    public Object invoke(final MethodInvocation invocation) throws Throwable {
        Method method = invocation.getMethod();
        CacheOperationInvoker aopAllianceInvoker = new CacheOperationInvoker() {
            public Object invoke() {
                try {
                    return invocation.proceed();
                } catch (Throwable var2) {
                    throw new ThrowableWrapper(var2);
                }
            }
        };

        try {
            return this.execute(aopAllianceInvoker, invocation.getThis(), method, invocation.getArguments());
        } catch (ThrowableWrapper var5) {
            throw var5.getOriginal();
        }
    }
}
这个拦截器继承了CacheAspectSupport类和MethodInterceptor接口。其中CacheAspectSupport封装了主要的逻辑。比如下面这段。
/**
CacheAspectSupport.java
执行@CachaEvict @CachePut @Cacheable的主要逻辑代码
**/

private Object execute(final CacheOperationInvoker invoker, Method method, CacheAspectSupport.CacheOperationContexts contexts) {
        if (contexts.isSynchronized()) {
            CacheAspectSupport.CacheOperationContext context = (CacheAspectSupport.CacheOperationContext)contexts.get(CacheableOperation.class).iterator().next();
            if (this.isConditionPassing(context, CacheOperationExpressionEvaluator.NO_RESULT)) {
                Object key = this.generateKey(context, CacheOperationExpressionEvaluator.NO_RESULT);
                Cache cache = (Cache)context.getCaches().iterator().next();

                try {
                    return this.wrapCacheValue(method, cache.get(key, new Callable<Object>() {
                        public Object call() throws Exception {
                            return CacheAspectSupport.this.unwrapReturnValue(CacheAspectSupport.this.invokeOperation(invoker));
                        }
                    }));
                } catch (ValueRetrievalException var10) {
                    throw (ThrowableWrapper)var10.getCause();
                }
            } else {
                return this.invokeOperation(invoker);
            }
        } else {
            /**
            执行@CacheEvict的逻辑,这里是当beforeInvocation为true时清缓存
            **/
            this.processCacheEvicts(contexts.get(CacheEvictOperation.class), true, CacheOperationExpressionEvaluator.NO_RESULT);
            //获取命中的缓存对象
            ValueWrapper cacheHit = this.findCachedItem(contexts.get(CacheableOperation.class));
            List<CacheAspectSupport.CachePutRequest> cachePutRequests = new LinkedList();
            if (cacheHit == null) {
                //如果没有命中,则生成一个put的请求
                this.collectPutRequests(contexts.get(CacheableOperation.class), CacheOperationExpressionEvaluator.NO_RESULT, cachePutRequests);
            }


            Object cacheValue;
            Object returnValue;
            /**
                如果没有获得缓存对象,则调用业务方法获得返回对象,hasCachePut会检查exclude的情况
            **/
            if (cacheHit != null && cachePutRequests.isEmpty() && !this.hasCachePut(contexts)) {
                cacheValue = cacheHit.get();
                returnValue = this.wrapCacheValue(method, cacheValue);
            } else {

                returnValue = this.invokeOperation(invoker);
                cacheValue = this.unwrapReturnValue(returnValue);
            }

            this.collectPutRequests(contexts.get(CachePutOperation.class), cacheValue, cachePutRequests);
            Iterator var8 = cachePutRequests.iterator();

            while(var8.hasNext()) {
                CacheAspectSupport.CachePutRequest cachePutRequest = (CacheAspectSupport.CachePutRequest)var8.next();
                /**
                执行cachePut请求,将返回对象放到缓存中
                **/
                cachePutRequest.apply(cacheValue);
            }
            /**
            执行@CacheEvict的逻辑,这里是当beforeInvocation为false时清缓存
            **/
            this.processCacheEvicts(contexts.get(CacheEvictOperation.class), false, cacheValue);
            return returnValue;
        }
    }
上面的代码片段比较核心,均是cache的内容,对于aop的源码,这里不详细展开,应该单起一篇文章进行研究。主要的类和接口都在spring的context中,org.springframework.cache包中。
和第三方缓存组件的适配
通过以上的分析,知道了spring cache功能的来龙去脉,下面需要分析的是,为什么只需要maven声明一下依赖,spring boot 就可以自动就适配了.
在上面的执行方法中,我们看到了cachePutRequest.apply(cacheValue) ,这里会操作缓存,CachePutRequest是CacheAspectSupport的内部类。
private class CachePutRequest {
        private final CacheAspectSupport.CacheOperationContext context;
        private final Object key;
        public CachePutRequest(CacheAspectSupport.CacheOperationContext context, Object key) {
            this.context = context;
            this.key = key;
        }
        public void apply(Object result) {
            if (this.context.canPutToCache(result)) {
                //从context中获取cache实例,然后执行放入缓存的操作
                Iterator var2 = this.context.getCaches().iterator();
                while(var2.hasNext()) {
                    Cache cache = (Cache)var2.next();
                    CacheAspectSupport.this.doPut(cache, this.key, result);
                }
            }
        }
    }
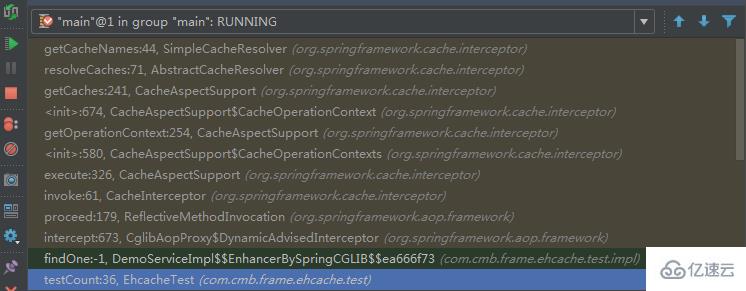
Cache是一个标准接口,其中EhCacheCache就是EhCache的实现类。这里就是SpringBoot和Ehcache之间关联的部分,那么context中的cache列表是什么时候生成的呢。答案是CacheAspectSupport的getCaches方法
protected Collection<? extends Cache> getCaches(CacheOperationInvocationContext<CacheOperation> context, CacheResolver cacheResolver) {
        Collection<? extends Cache> caches = cacheResolver.resolveCaches(context);
        if (caches.isEmpty()) {
            throw new IllegalStateException("No cache could be resolved for '" + context.getOperation() + "' using resolver '" + cacheResolver + "'. At least one cache should be provided per cache operation.");
        } else {
            return caches;
        }
    }
而获取cache是在每一次进行进行缓存操作的时候执行。可以看一下调用栈

貌似有点跑题,拉回来... 在spring-boot-autoconfigure包里,有所有自动装配相关的类。这里有个EhcacheCacheConfiguration类 ,如下
@Configuration
@ConditionalOnClass({Cache.class, EhCacheCacheManager.class})
@ConditionalOnMissingBean({CacheManager.class})
@Conditional({CacheCondition.class, EhCacheCacheConfiguration.ConfigAvailableCondition.class})
class EhCacheCacheConfiguration {
 ......
 static class ConfigAvailableCondition extends ResourceCondition {
        ConfigAvailableCondition() {
            super("EhCache", "spring.cache.ehcache", "config", new String[]{"classpath:/ehcache.xml"});
        }
    }
}
这里会直接判断类路径下是否有ehcache.xml文件
以上是Spring Boot缓存源码是什么的所有内容,感谢各位的阅读!相信大家都有了一定的了解,希望分享的内容对大家有所帮助,如果还想学习更多知识,欢迎关注亿速云行业资讯频道!
免责声明:本站发布的内容(图片、视频和文字)以原创、转载和分享为主,文章观点不代表本网站立场,如果涉及侵权请联系站长邮箱:is@yisu.com进行举报,并提供相关证据,一经查实,将立刻删除涉嫌侵权内容。