最近项目中需要Python的打包,看到网上也没有很详细的资料,于是做了一些示例程序。小小的研究了一下,Python如何在Windows和Linux上打包,并把程序源码以及各个记录上传到Github上与大家分享。
Python版本:3.6.8
Windows版本:Windows 10 家庭中文版 64-bit (10.0, Build 18362) (18362.19h2_release.190318-1202)
Linux版本:centos7.4
今天没时间研究cx_Freeze,先研究了一下PyInstaller。
3.1、py2exe
py2exe是一个将python转换成windows上的可独立执行的可执行程序(*.exe)的工具。不过,该可执行程序,只能在相同的Windows系统下运行,而且不适合Linux。果断被我舍弃不在研究了。
3.2、cx_Freeze
cx_Freeze 是一个类似 py2exe 的工具,但 cx_Freeze 可以在 linux 下可以直接执行的 ELF 格式的二进制可执行文件,也可以在windows上执行。
cx_Freeze的作用可以让python程序可以脱离python运行环境,在没有安装python的微型linux系统(例如cdlinux、tinycore等)里,方便地运行你的python程序。
程序简介:https://pypi.org/project/cx-Freeze/5.0/
3.3、PyInstaller
号称是目前最全面的打包程序,然后我看了一下程序更新时间。一看是10天前,嗯,不错,就它了。
程序简介:https://pypi.org/project/PyInstaller/
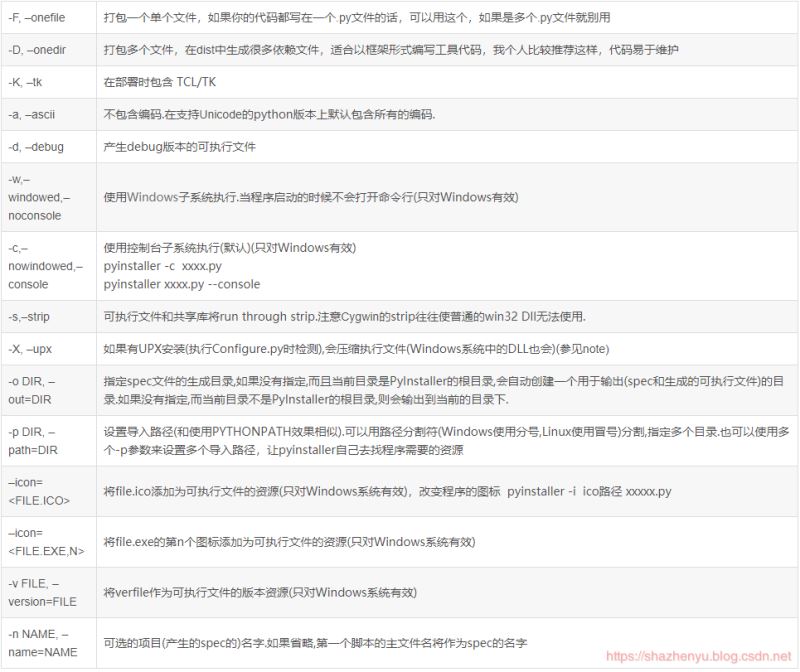
看了一下参数介绍如下:
4.1.1、核心源码
#! -*- coding: utf-8 -*-
"""
Author: ZhenYuSha
Create Time: 2020-1-20
Info: Python打包示例1,单个文件打包
 “pyinstaller -F(单个可执行文件) 程序源 -n 程序名 -w(去掉控制台窗口,这在GUI界面时非常有用) -i 图标.ico”
 “pyinstaller -F test1/Demo_Test1_Python.py”
"""


def bubble_sort(arr):
 """
 冒泡排序
 :param arr:
 :return:
 """
 for i in range(1, len(arr)):
 for j in range(0, len(arr)-i):
  if arr[j] > arr[j+1]:
  arr[j], arr[j + 1] = arr[j + 1], arr[j]
 return arr


if __name__ == '__main__':
 test = [1, 8, 123, 18, 99, 300]
 print("************************************")
 print("*  冒泡排序  *")
 print("************************************")
 print("源列表:", test)
 result = bubble_sort(test)
 print("排序后:", result)
 print("************************************")
 input("按任意键退出...")
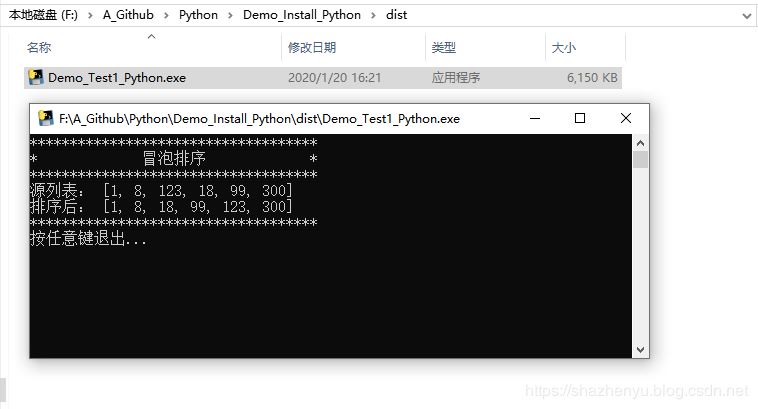
4.1.2、程序运行

4.1.3、打包
pyinstaller -F test1/Demo_Test1_Python.py
4.1.4、打包后效果
4.2.1、核心源码
#! -*- coding: utf-8 -*-
"""
Author: ZhenYuSha
Create Time: 2020-1-20
Info: Python打包示例2,多个文件打包
 “pyinstaller -F(单个可执行文件) 程序源 -n 程序名 -w(去掉控制台窗口,这在GUI界面时非常有用) -i 图标.ico”
 “pyinstaller -F test2/Demo_Test2_Python.py”
"""
from test2.Demo_bubble_sort import bubble_sort
from test2.Demo_heap_sort import heap_sort


if __name__ == '__main__':
 test1 = [1, 8, 123, 18, 99, 300]
 test2 = test1[:]
 print("************************************")
 print("*  两个排序  *")
 print("************************************")
 print("列表1 id:", id(test1))
 print("列表2 id:", id(test2))
 print("源列表1:", test1)
 print("源列表2:", test2)
 result1 = bubble_sort(test1)
 result2 = heap_sort(test1)
 print("冒泡后:", result1)
 print("堆排后:", result2)
 print("************************************")
 input("按任意键退出...")
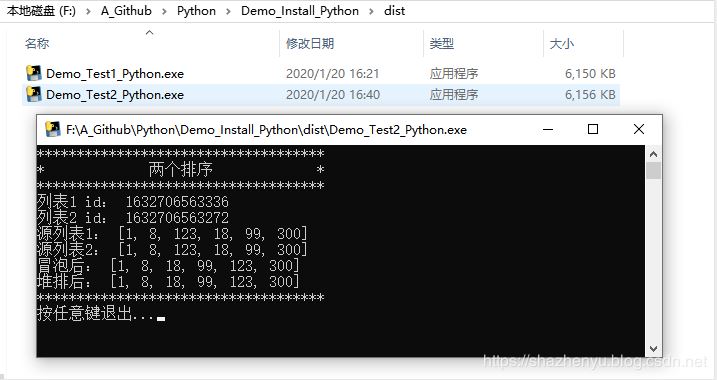
4.2.2、程序运行

4.2.3、打包
pyinstaller -F test2/Demo_Test2_Python.py
4.2.4、打包后效果
4.3.1、核心源码
#! -*- coding: utf-8 -*-
"""
Author: ZhenYuSha
Create Time: 2020-1-20
Info: Python打包示例3,多层文件打包
 “pyinstaller -F(单个可执行文件) 程序源 -n 程序名 -w(去掉控制台窗口,这在GUI界面时非常有用) -i 图标.ico”
 “pyinstaller -F test3/Demo_Test3_Python.py”
"""
from test3.sort.Demo_bubble_sort import bubble_sort
from test3.sort.Demo_heap_sort import heap_sort
from test3.Demo_test import Test


if __name__ == '__main__':
 test1 = [1, 8, 123, 18, 99, 300]
 test2 = test1[:]
 print("************************************")
 print("*  两个排序  *")
 print("************************************")
 print("列表1 id:", id(test1))
 print("列表2 id:", id(test2))
 print("源列表1:", test1)
 print("源列表2:", test2)
 result1 = bubble_sort(test1)
 result2 = heap_sort(test1)
 print("冒泡后:", result1)
 print("堆排后:", result2)
 Test.run()
 print("************************************")
 input("按任意键退出...")
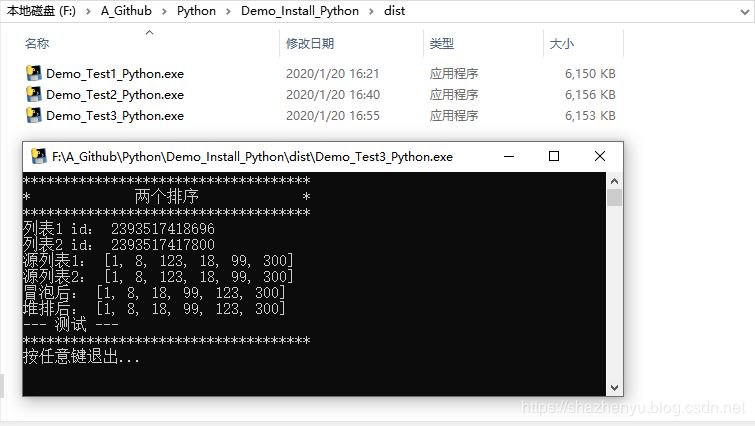
4.3.2、程序运行

4.3.3、打包
pyinstaller -F test3/Demo_Test3_Python.py
4.3.4、打包后效果
4.4.1、核心源码
#! -*- coding: utf-8 -*-
"""
Author: ZhenYuSha
Create Time: 2020-1-20
Info: Python打包示例4,多层文件打包加图标,修改程序名
 “pyinstaller -F(单个可执行文件) 程序源 -n 程序名 -w(去掉控制台窗口,这在GUI界面时非常有用) -i 图标.ico”
 “-p 表示自定义需要加载的类路径(一般情况下用不到)”
 “pyinstaller -F test4/Demo_Test4_Python.py -n Test4 -i test4/test4.ico”
"""
from test3.sort.Demo_bubble_sort import bubble_sort
from test3.sort.Demo_heap_sort import heap_sort
from test3.Demo_test import Test


if __name__ == '__main__':
 test1 = [1, 8, 123, 18, 99, 300]
 test2 = test1[:]
 print("************************************")
 print("*  两个排序  *")
 print("************************************")
 print("列表1 id:", id(test1))
 print("列表2 id:", id(test2))
 print("源列表1:", test1)
 print("源列表2:", test2)
 result1 = bubble_sort(test1)
 result2 = heap_sort(test1)
 print("冒泡后:", result1)
 print("堆排后:", result2)
 Test.run()
 print("************************************")
 input("按任意键退出...")
4.4.2、程序运行

4.4.3、打包
pyinstaller -F test4/Demo_Test4_Python.py -n Test4 -i test4/test4.ico
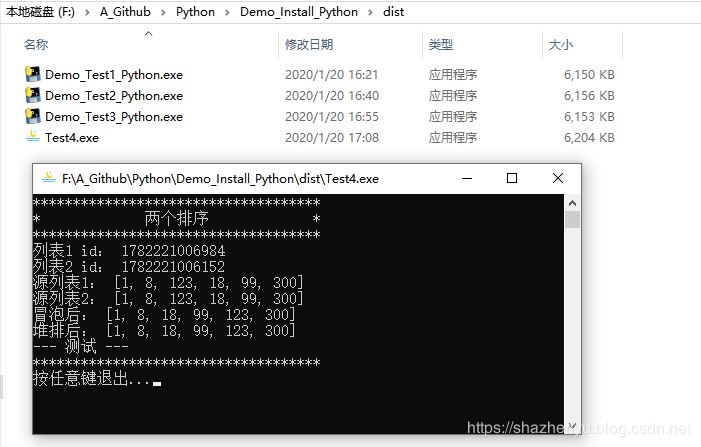
4.4.4、打包后效果
5.1.1、核心源码
#! -*- coding: utf-8 -*-
"""
Author: ZhenYuSha
Create Time: 2020-1-20
Info: Python打包示例5,多层文件打包修改程序名 linux打包
 “pyinstaller -F(单个可执行文件) 程序源 -n 程序名 -w(去掉控制台窗口,这在GUI界面时非常有用) -i 图标.ico”
 “-p 表示自定义需要加载的类路径(一般情况下用不到)”
 “pyinstaller -F Demo_Test5_Python.py -n Test5”
"""
from sort.Demo_bubble_sort import bubble_sort
from sort.Demo_heap_sort import heap_sort
from Demo_test import Test


if __name__ == '__main__':
 test1 = [1, 8, 123, 18, 99, 300]
 test2 = test1[:]
 print("************************************")
 print("*  两个排序  *")
 print("************************************")
 print("列表1 id:", id(test1))
 print("列表2 id:", id(test2))
 print("源列表1:", test1)
 print("源列表2:", test2)
 result1 = bubble_sort(test1)
 result2 = heap_sort(test1)
 print("冒泡后:", result1)
 print("堆排后:", result2)
 Test.run()
 print("************************************")
 input("按任意键退出...")
5.1.2、程序运行
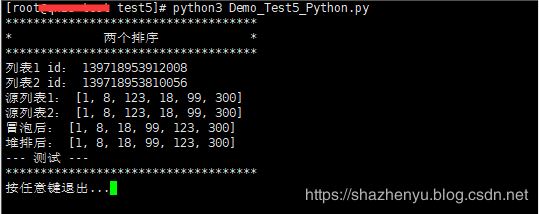
5.1.3、打包后效果

5.2.1、错误1(找不到pyinstaller)
我是用 pip install 安装的pyinstaller,于是先find了一下,找到了此命令,于是就做了个软链接。
解决方案,直接将安装目录下面的pyinstaller包作为软链接到/usr/bin下
ln -s /usr/local/python3.6.8/bin/pyinstaller /usr/bin/pyinstaller3.6
5.2.2、错误2(rebuild your Python with --enable-shared)
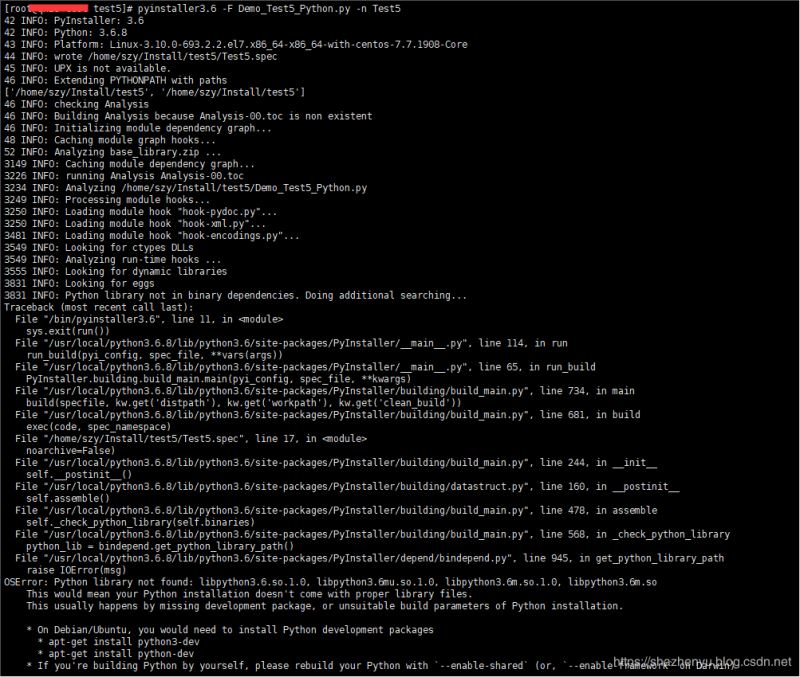
这种错误,人家已经把解决方案说出来了,就是需要重新编译嘛,那我们就按照他的来就OK了。先找到源码按照的目录,并按照以下命令操作。
./configure --prefix=/usr/local/python3.6.8(需要安装的目录) --enable-shared --with-ssl
make
make install

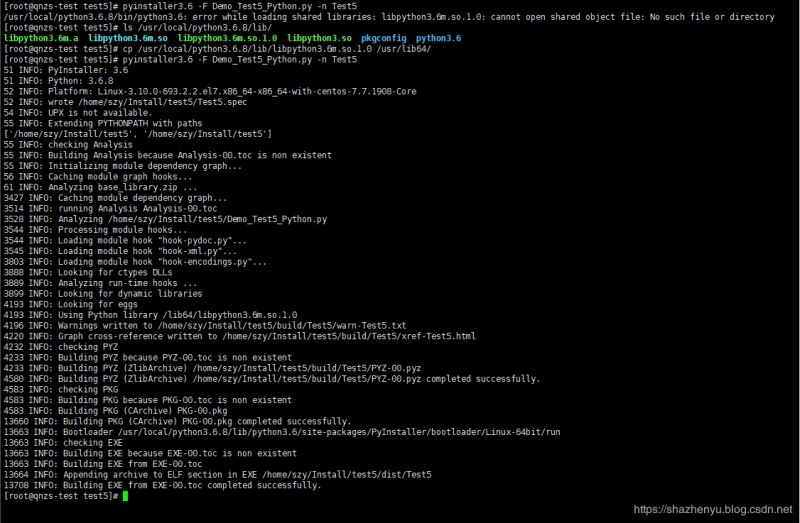
5.2.3、错误3(找不到 libpython3.6m.so.1.0)

解决方案,在安装目录找到此文件,并拷贝到/usr/lib64目录下:
https://github.com/ShaShiDiZhuanLan/Demo_Install_Python
到此这篇关于Python3如何在Windows和Linux上打包的文章就介绍到这了,更多相关Python3 Linux打包内容请搜索亿速云以前的文章或继续浏览下面的相关文章希望大家以后多多支持亿速云!
免责声明:本站发布的内容(图片、视频和文字)以原创、转载和分享为主,文章观点不代表本网站立场,如果涉及侵权请联系站长邮箱:is@yisu.com进行举报,并提供相关证据,一经查实,将立刻删除涉嫌侵权内容。