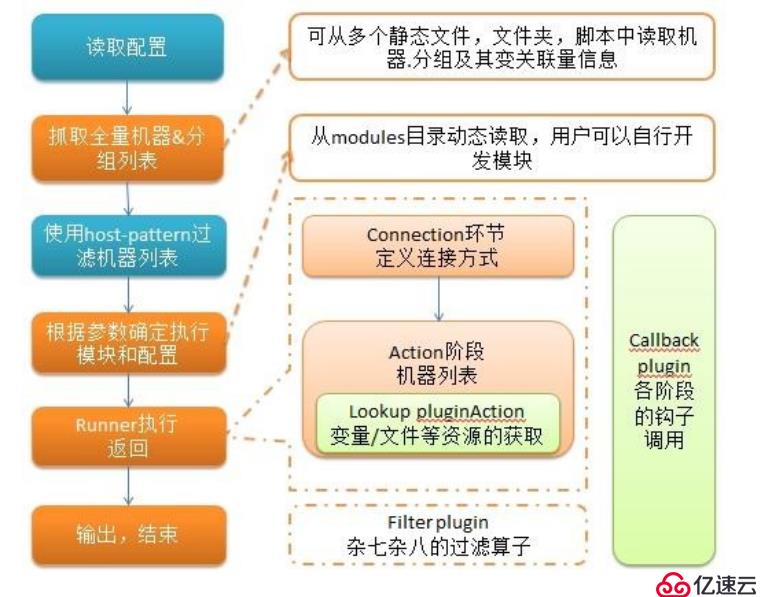
.ansible是新出现的自动化运维工具,基于Python开发,集合了众多运维工具(puppet、cfengine、chef、func、fabric)的优点,实现了批量系统配置、批量程序部署、批量运行命令等功能。ansible是基于模块工作的,本身没有批量部署的能力。真正具有批量部署的是ansible所运行的模块,ansible只是提供一种框架。主要包括:
(1)、连接插件connection plugins:负责和被监控端实现通信;
(2)、host inventory:指定操作的主机,是一个配置文件里面定义监控的主机;
(3)、各种模块核心模块、command模块、自定义模块;
(4)、借助于插件完成记录日志邮件等功能;
(5)、playbook:剧本执行多个任务时,非必需可以让节点一次性运行多个任务。
1.部署简单,只需在主控端部署Ansible环境,被控端无需做任何操作;

2.默认使用SSH协议对设备进行管理;
3.有大量常规运维操作模块,可实现日常绝大部分操作;
4.配置简单、功能强大、扩展性强;
5.支持API及自定义模块,可通过Python轻松扩展;
6.通过Playbooks来定制强大的配置、状态管理;
7.轻量级,无需在客户端安装agent,更新时,只需在操作机上进行一次更新即可;
8.幂等性,一个任务之行1遍或n遍效果一样,不因重复执行出现情况
Ansible:Ansible核心程序。
HostInventory:记录由Ansible管理的主机信息,包括端口、密码、ip等。
Playbooks:“剧本”YAML格式文件,多个任务定义在一个文件中,定义主机需要调用哪些模块来完成的功能。
CoreModules:核心模块,主要操作是通过调用核心模块来完成管理任务。
CustomModules:自定义模块,完成核心模块无法完成的功能,支持多种语言。
ConnectionPlugins:连接插件,Ansible和Host通信使用Ansible 系统由控制主机对被管节点的操作方式可分为两类,即adhoc和playbook:
ad-hoc模式(点对点模式)
  使用单个模块,支持批量执行单条命令。ad-hoc 命令是一种可以快速输入的命令,而且不需要保存起来的命令。就相当于bash中的一句话shell。
playbook模式(剧本模式)
  是Ansible主要管理方式,也是Ansible功能强大的关键所在。playbook通过多个task集合完成一类功能,如Web服务的安装部署、数据库服务器的批量备份等。可以简单地把playbook理解为通过组合多条ad-hoc操作的配置文件。
简单理解就是Ansible在运行时, 首先读取ansible.cfg中的配置, 根据规则获取Inventory中的管理主机列表, 并行的在这些主机中执行配置的任务, 最后等待执行返回的结果。
1.加载自己的配置文件,默认/etc/ansible/ansible.cfg;
2.查找对应的主机配置文件,找到要执行的主机或者组;
3.加载自己对应的模块文件,如 command;
4.通过ansible将模块或命令生成对应的临时py文件(python脚本), 并将该文件传输至远程服务器;
5.对应执行用户的家目录的.ansible/tmp/XXX/XXX.PY文件;
6.给文件 +x 执行权限;
7.执行并返回结果;
8.删除临时py文件,sleep 0退出;
Ansible:基于ssh协议不需要代理,适合中小型应用场景
Saltstack:需要agent代理软件(执行效率更高)
Puppet:ruby,功能强大,配置复杂,适合超大型环境
主控端端:192.168.136.167
被控端01:192.168.136.168
被控端02:192.168.136.185
#三台主机都关闭防火墙
 [root@localhost ~]# systemctl stop firewalld.service
 [root@localhost ~]# setenforce 0

#主控端安装ansible
yum install -y epel-release  //安装epel源
yum install ansible -y

ansible --version          //查看ansible版本
ansible 2.9.3
  config file = /etc/ansible/ansible.cfg
  configured module search path = [u'/root/.ansible/plugins/modules', u'/usr/share/ansible/plugins/modules']
  ansible python module location = /usr/lib/python2.7/site-packages/ansible
  executable location = /usr/bin/ansible
  python version = 2.7.5 (default, Aug  4 2017, 00:39:18) [GCC 4.8.5 20150623 (Red Hat 4.8.5-16)]

yum install tree -y
tree /etc/ansible/      //树状结构展示文件夹
/etc/ansible/
├── ansible.cfg    #ansible的配置文件
├── hosts         #ansible的主仓库,用于存储需要管理的远程主机的相关信息
└── roles     #

cd /etc/ansible
vim hosts       //配置主机清单
[webserver]
192.168.136.168
[mysql]
192.168.136.185

#推送公钥
ssh-keygen -t rsa
[root@localhost ~]# ssh-keygen -t rsa
Generating public/private rsa key pair.
Enter file in which to save the key (/root/.ssh/idrsa):  #回车
Created directory '/root/.ssh'.
Enter passphrase (empty for no passphrase):  #输入密码
Enter same passphrase again:
Your identification has been saved in /root/.ssh/idrsa.
Your public key has been saved in /root/.ssh/idrsa.pub.
The key fingerprint is:
SHA256:QnRuJjR10Jy6HuyQxQz3ccWML8iHCdQ1HZx5ba57Ak0 root@localhost.localdomain
The key's randomart image is:
+---[RSA 2048]----+
|      +o==.ooBo+.|
|     o.+o. o.B +|
|      o=+=  . + |
|     . +=  o E .|
|      .+S. . + . |
|      o.+   . o  |
|       + .   . . |
|        o     o .|
|               o |
+----[SHA256]-----+

#公钥推给对方主机
ssh-copy-id root@192.168.136.168
ssh-copy-id root@192.168.136.185    //配置密钥对验证

#查看被控端两台主机的时间
[root@localhost ~]# ansible 192.168.136.168 -m command -a 'date'
Enter passphrase for key '/root/.ssh/idrsa':
192.168.136.168 | CHANGED | rc=0 >>
Sun Feb  9 09:02:44 CST 2020

[root@localhost ~]# ansible mysql -m command -a 'date'
Enter passphrase for key '/root/.ssh/idrsa':
192.168.136.185 | CHANGED | rc=0 >>
Sun Feb  9 09:03:11 CST 2020

#免交户
[root@localhost ~]# ssh-agent bash #ssh代理
[root@localhost ~]# ssh-add #添加密码

[root@localhost ~]# ansible webserver -m command -a 'date'
192.168.136.168 | CHANGED | rc=0 >>
Sun Feb 9 09:05:08 CST 2020命令格式:ansible [主机] [-m 模块] [-a args]
ansible-doc -l //列出所有已安装的模块 注:按q退出
ansible-doc -s yum //-s列出yum模块描述信息和操作动作
#ansible默认模块,all:代表所有主机(只要主机在线),-a+''号指定参数
[root@localhost ~]# ansible all -a 'date'
192.168.136.185 | CHANGED | rc=0 >>
Sun Feb 9 09:16:22 CST 2020
192.168.136.168 | CHANGED | rc=0 >>
Sun Feb 9 09:16:22 CST 2020
ansible 192.168.80.182 -m command -a 'date' //指定ip执行date
ansible webserver -m command -a 'date' //指定分类执行date
ansible mysql -m command -a 'date'
ansible all -m command -a 'date' //所有hosts主机执行date命令
ansible all -a 'ls /' 如果不加-m模块,则默认运行command模块两种状态(state):present表示添加(可以省略),absent表示移除。
ansible-doc -s cron //查看cron模块信息
#每分钟执行一次,job:操作,echo输出heihei,name:名称
ansible webserver -m cron -a 'minute="/1" job="/bin/echo heihei" name="test cron job"'
192.168.136.168 | CHANGED => {
"ansiblefacts": {
"discoveredinterpreterpython": "/usr/bin/python"
},
"changed": true,
"envs": [],
"jobs": [
"test cron job"
]
}
#查看周期性计划性任务
[root@localhost ~]# ansible webserver -a 'crontab -l'
192.168.136.168 | CHANGED | rc=0 >>
#Ansible: test cron job
/1 /usr/bin/echo heihei
ansible webserver -a 'crontab -l'
ansible webserver -m cron -a 'name="test cron job" state=absent' //移除计划任务,假如该计划任务没有取名字,name=None即可user模块是请求的是useradd, userdel, usermod三个指令
ansible-doc -s user
ansible all -m user -a 'name="test01"' //创建用户test01
192.168.136.185 | CHANGED => {
"ansiblefacts": {
"discoveredinterpreterpython": "/usr/bin/python"
},
"changed": true,
"comment": "",
"createhome": true,
"group": 1001,
"home": "/home/test01",
"name": "test01",
"shell": "/bin/bash",
"state": "present",
"system": false,
"uid": 1001
}
192.168.136.168 | CHANGED => {
"ansiblefacts": {
"discoveredinterpreterpython": "/usr/bin/python"
},
"changed": true,
"comment": "",
"createhome": true,
"group": 1001,
"home": "/home/test01",
"name": "test01",
"shell": "/bin/bash",
"state": "present",
"system": false,
"uid": 1001
}
ansible mysql -m command -a 'tail /etc/passwd'
ansible webserver -m user -a 'name="test01" state=absent' //删除用户test01group模块请求的是groupadd, groupdel, groupmod 三个指令。
ansible-doc -s group
ansible mysql -m group -a 'name=mysql gid=306 system=yes'
ansible mysql -a 'tail /etc/group'
[root@localhost ~]# ansible mysql -a 'tail /etc/group'
192.168.136.185 | CHANGED | rc=0 >>
slocate:x:21:
postdrop:x:90:
postfix:x:89:
stapusr:x:156:
stapsys:x:157:
stapdev:x:158:
tcpdump:x:72:
chen:x:1000:
mysql:x:306:
test01:x:1001:
ansible mysql -m user -a 'name=test02 uid=306 system=yes group=mysql'
ansible mysql -a 'tail /etc/passwd'
ansible mysql -a 'id test02'
192.168.136.185 | CHANGED | rc=0 >>
uid=306(test02) gid=306(mysql) groups=306(mysql)ansible-doc -s copy
#src原,dest目标,owner:指定文件权限
ansible mysql -m copy -a 'src=/etc/fstab dest=/opt/fstab.back owner=root mode=640'
ansible mysql -a 'ls -l /opt'
192.168.136.185 | CHANGED | rc=0 >>
total 4
-rw-r-----. 1 root root 541 Feb 9 09:44 fstab.back
drwxr-xr-x. 2 root root 6 Mar 26 2015 rh
ansible mysql -a 'cat /opt/fstab.back'
#contest:指定内容,生成一个新文件
ansible mysql -m copy -a 'content="hello heihei!"
dest=/opt/fstab.back' //将hello heihei!写入/opt/fstab.back
ansible mysql -a 'cat /opt/fstab.back'
192.168.136.185 | CHANGED | rc=0 >>
hello heihei!ansible-doc -s file
ansible mysql -m user -a 'name=mysql system=yes'
ansible mysql -m group -a 'name=mysql system=yes'
#path:指定文件路径
ansible mysql -m file -a 'owner=mysql group=mysql mode=644 path=/opt/fstab.back' //修改文件的属主属组权限等
ansible mysql -m file -a 'path=/opt/fstab.link src=/opt/fstab.back state=link' //设置/opt/fstab.link为/opt/fstab.back的链接文件
ansible mysql -m file -a "path=/opt/fstab.back state=absent" //删除一个文件
ansible mysql -m file -a "path=/opt/test state=touch" 创建一个文件
-----ping模块-------
ansible all -m ping
192.168.136.185 | SUCCESS => {
"ansiblefacts": {
"discoveredinterpreterpython": "/usr/bin/python"
},
"changed": false,
"ping": "pong"
}
192.168.136.168 | SUCCESS => {
"ansiblefacts": {
"discoveredinterpreterpython": "/usr/bin/python"
},
"changed": false,
"ping": "pong"
}ansible-doc -s service
[root@ab ~]# yum install -y httpd
[root@aa ~]# ansible webserver -a 'systemctl status httpd' //查看web服务器httpd运行状态
ansible webserver -m service -a 'enabled=true name=httpd state=started' #关闭用stop
192.168.136.185 | CHANGED => {
"ansiblefacts": {
"discoveredinterpreterpython": "/usr/bin/python"
},
"changed": true,
"enabled": true,
"name": "httpd",
"state": "started",
"status": {
"ActiveEnterTimestampMonotonic": "0",
"ActiveExitTimestampMonotonic": "0",
"ActiveState": "inactive",
//启动httpd服务
[root@ab ~]# systemctl status httpd //查看是否开启
------shell模块-----
ansible-doc -s shell
[root@localhost ~]# ansible webserver -m shell -a 'echo abc123|passwd --stdin chen'
192.168.136.168 | CHANGED | rc=0 >>
Changing password for user chen.
passwd: all authentication tokens updated successfully.
//创建用户使用无交互模式给用户设置密码#本地创建脚本让其他所有被控端主机一起执行这个脚本
ansible-doc -s script
vi test.sh
#!/bin/bash
echo "hello ansible from script"> /opt/script.txt
chmod +x test.sh
ansible mysql -m script -a 'test.sh'
[root@localhost ~]# ansible mysql -a 'cat /opt/script.txt'
192.168.136.185 | CHANGED | rc=0 >>
hello ansible from scriptansible-doc -s yum
ansible mysql -m yum -a 'name=httpd' //yum安装httpd
192.168.136.185 | CHANGED => {
"ansiblefacts": {
"discoveredinterpreterpython": "/usr/bin/python"
},
"changed": true,
"changes": {
"installed": [
"httpd"
]
},
"msg": "",
"rc": 0,
"results": [
[root@ac ~]# rpm -q httpd
ansible mysql -m yum -a 'name=httpd state=absent' //卸载zsh
[root@ac ~]# rpm -q httpdansible-doc -s setup
ansible mysql -m setup //获取mysql组主机的facts信息
***免责声明:本站发布的内容(图片、视频和文字)以原创、转载和分享为主,文章观点不代表本网站立场,如果涉及侵权请联系站长邮箱:is@yisu.com进行举报,并提供相关证据,一经查实,将立刻删除涉嫌侵权内容。