这篇文章将为大家详细讲解有关vue元素如何实现动画过渡效果,小编觉得挺实用的,因此分享给大家做个参考,希望大家阅读完这篇文章后可以有所收获。
1 在 vue 中,使用 <transition> 标签包含着的单个子元素在使用 v-show 或 v-if 切换显示隐藏前,会先判断是否有对应的 class 样式能匹配到该子元素上:
<script src="/public/javascripts/vuejs"></script>
<style>
  red {background-color: red; width: 100px; height: 100px;}
  redv-leave { margin-top: 50px; }
  redv-leave-active { transition: all 3s;}
  redv-leave-to { margin-top: 100px; opacity: 0;}
  redv-enter { margin-top: 50px; }
  redv-enter-active { transition: all 3s;}
  redv-enter-to { margin-top: 10px; opacity: 0;}
</style>
<body>
<div id="app">
  <transition>
    <div class="red" v-show="show"></div>
  </transition>
  <button v-on:click="change">button</button>
</div>
<script>
new Vue({
  el: '#app',
  data: {
    show: true
  },
  methods: {
    change: function(){
      thisshow = !thisshow;
    }
  }
});
</script>
</script>
</body>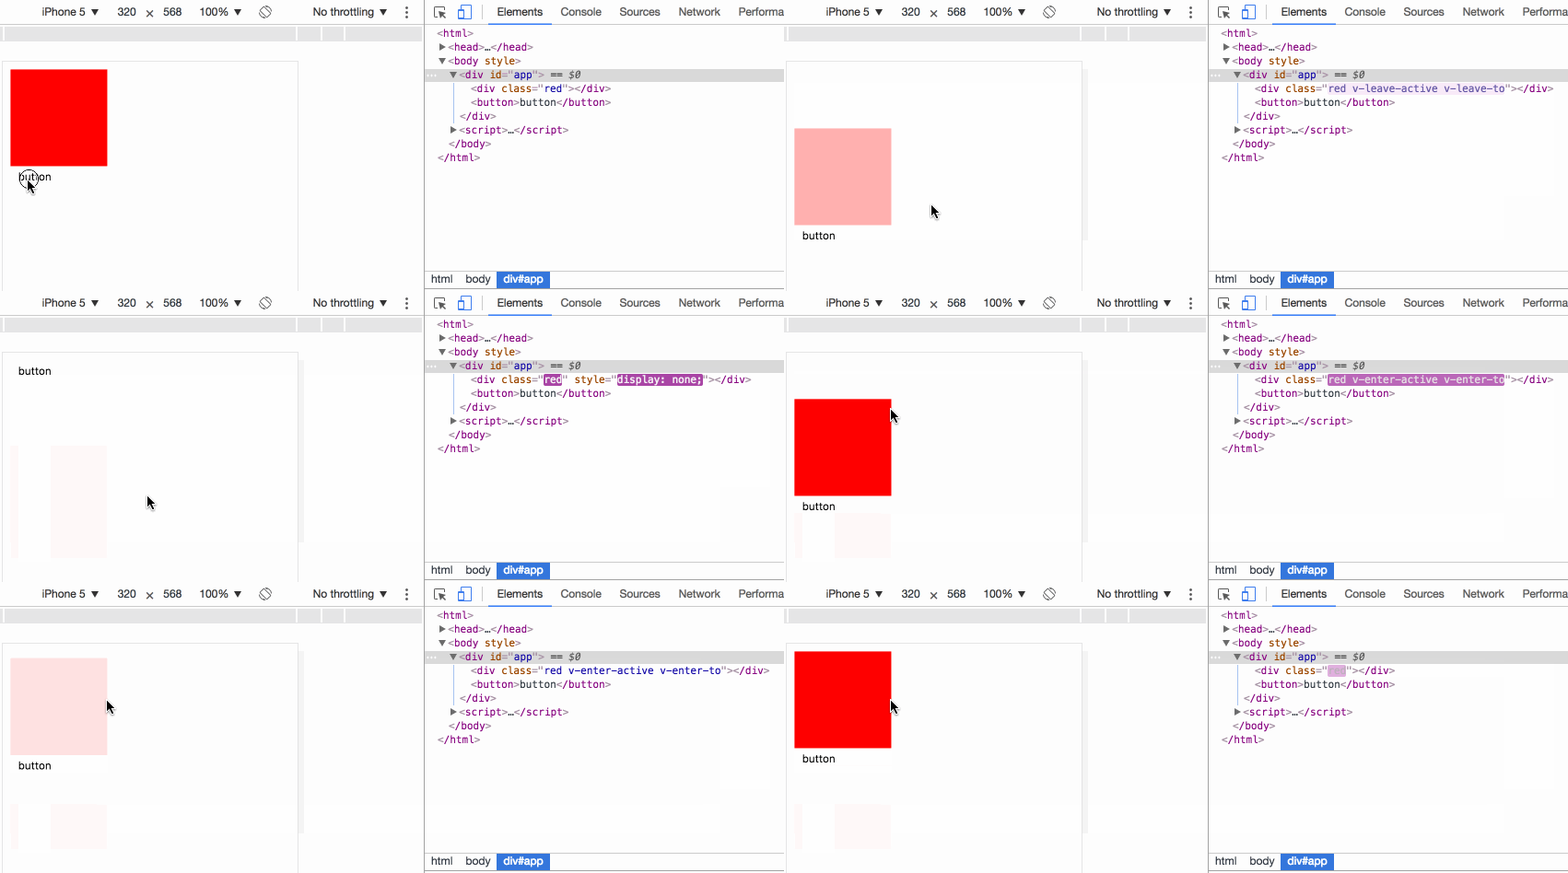
v-leave 当前元素准备从显示转变成隐藏,在动画开始前添加到元素上,动画一旦开始会立即删除;
v-leave-active 在动画过渡过程中,元素一直拥有该样式,直到动画结束则自动删除,用于设置过渡的效果;
v-leave-to 在动画过渡过程中,元素一直拥有该样式,直到动画结束则自动删除,用于设置动画最终的效果;
事例中,当点击 button,div 并不会马上 display: none, 而是首先设置 v-leave ,下一刻即删除 v-leave ,同时添加 v-leave-active v-leave-to,当 v-leave-active 中的过渡时间执行完成,则删除 v-leave-active v-leave-to,同时添加 display: none。
v-enter 当前元素准备从隐藏转变成显示,在动画开始前添加到元素上,动画一旦开始会立即删除;
v-enter-active 在动画过渡过程中,元素一直拥有该样式,直到动画结束则自动删除,用于设置过渡的效果;
v-enter-to 在动画过渡过程中,元素一直拥有该样式,直到动画结束则自动删除,用于设置动画最终的效果;
事例中,当点击 button,div 马上清除 display: none, 然后设置 v-enter ,下一刻即删除 v-enter ,同时添加 v-enter-active v-enter-to,当 v-enter-active 中的过渡时间执行完成,则删除 v-enter-active v-enter-to。
2 自定义动画类名:
<script src="/public/javascripts/vuejs"></script>
<style>
  red {background-color: red; width: 100px; height: 100px;}
  redslide-leave { margin-top: 50px; }
  redslide-leave-active { transition: all 3s;}
  redslide-leave-to { margin-top: 100px; opacity: 0;}
  redslide-enter { margin-top: 50px; }
  redslide-enter-active { transition: all 3s;}
  redslide-enter-to { margin-top: 10px; opacity: 0;}
</style>
<body>
<div id="app">
  <transition name="slide">
    <div class="red" v-show="show"></div>
  </transition>
  <button v-on:click="change">button</button>
</div>
<script>
new Vue({
  el: '#app',
  data: {
    show: true
  },
  methods: {
    change: function(){
      thisshow = !thisshow;
    }
  }
});
</script>该效果与上一例效果完全一致的,transition 元素可以使用 name 属性来指定使用的类名前缀,从而代替 v-字段,例如事例中的 name="slide" 使本来的 v-enter 变成了 slide-enter。
3 transition 与 animation 同时使用时
<script src="/public/javascripts/vuejs"></script>
<style>
@keyframes aslide {
  0% {
    margin-left: 10px;
  }
  100% {
    margin-left: 100px;
  }
}
  red {background-color: red; width: 100px; height: 100px;}
  blue {background-color: blue; width: 100px; height: 100px;}
  v-leave { margin-top: 50px; }
  v-leave-active { transition: all 3s; animation: aslide 5s;}
  v-leave-to { margin-top: 100px;}
</style>
<body>
<div id="app">
  <transition type="transition" >
    <div class="red" v-show="show"></div>
  </transition>
  <br>
  <transition type="animation" >
    <div class="blue" v-show="show"></div>
  </transition>
  <button v-on:click="change">button</button>
</div>
<script>
new Vue({
  el: '#app',
  data: {
    show: true
  },
  methods: {
    change: function(){
      thisshow = !thisshow;
    }
  }
});
</script>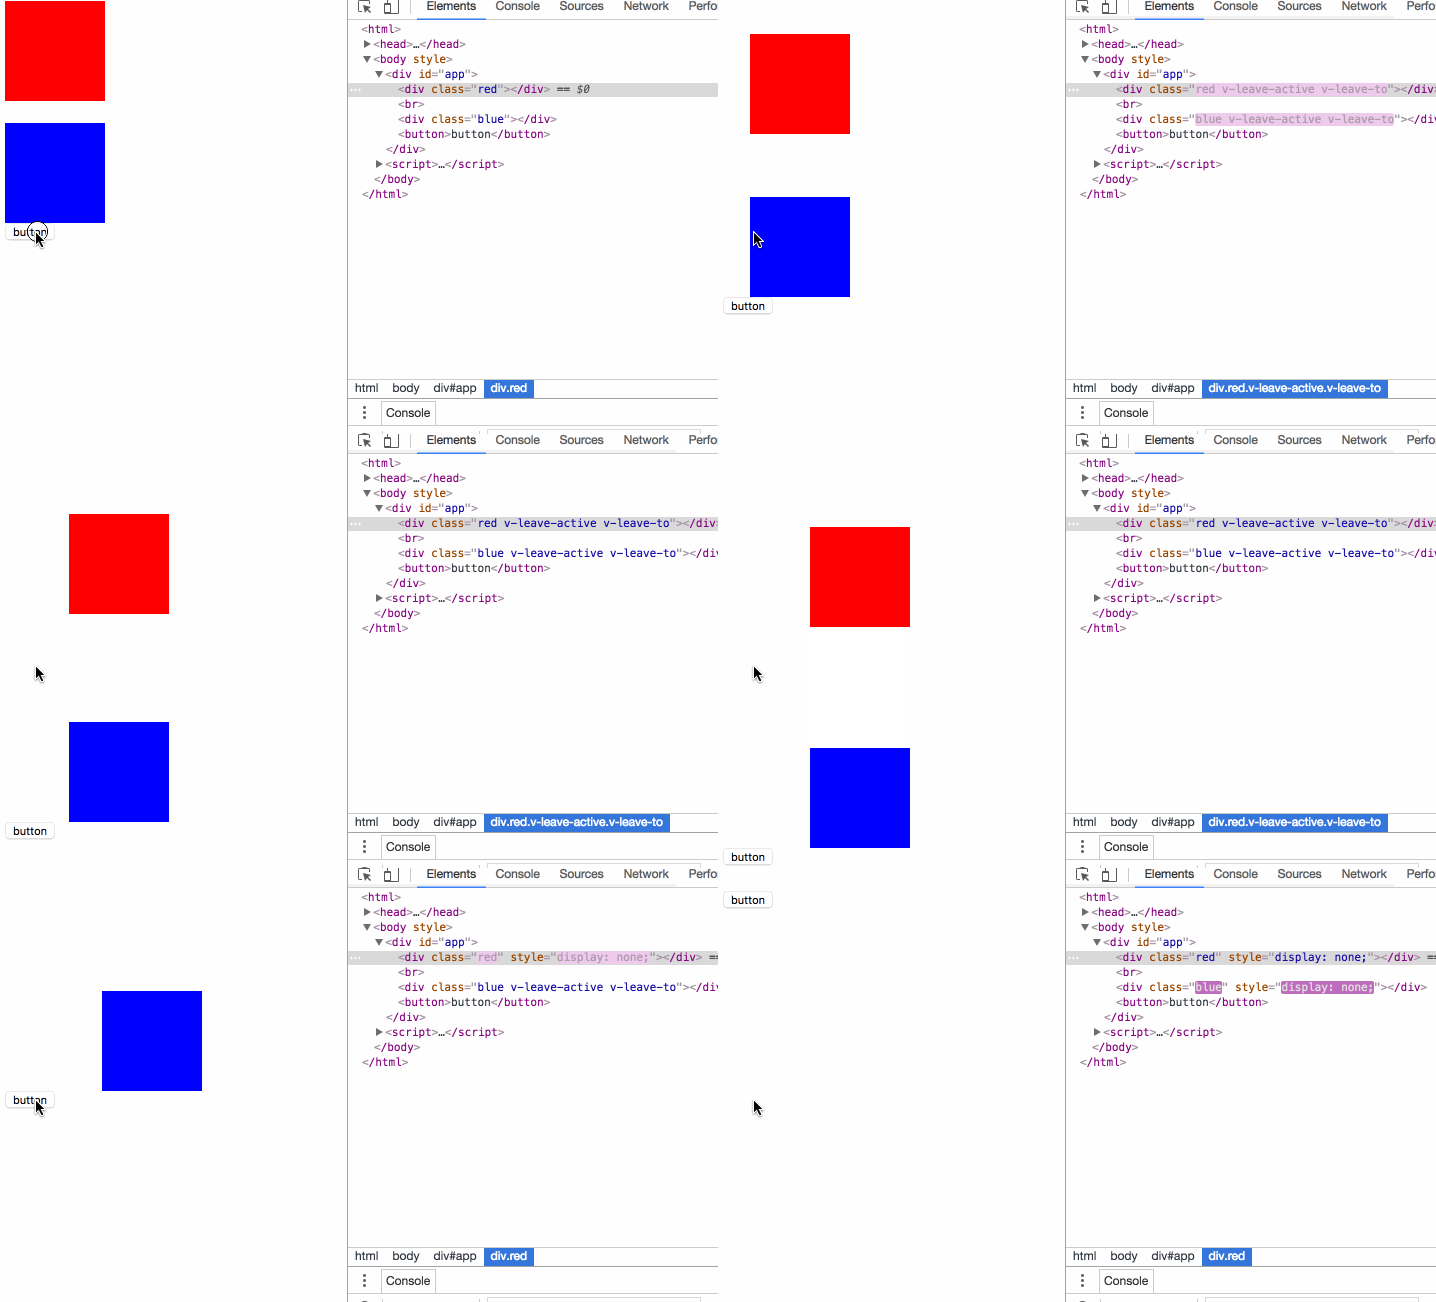
事例中,动画同时指定了 transition 和 animation 动画, transition 元素的 type 属性可以指定以哪种动画的时间为元素的结束时间,如果不指定动画监控的方式,则会以最长时间的为准。
4 javascript 监听动画
<script src="/public/javascripts/vuejs"></script>
<style>
  red {background-color: red; width: 100px; height: 100px;}
  v-leave { margin-top: 50px; }
  v-leave-active { transition: all 3s;}
  v-leave-to { margin-top: 100px;}
</style>
<body>
<div id="app">
  <transition
    v-on:before-enter="beforeEnter"
    v-on:enter="enter"
    v-on:after-enter="afterEnter"
    v-on:enter-cancelled="enterCancelled"
    v-on:before-leave="beforeLeave"
    v-on:leave="leave"
    v-on:after-leave="afterLeave"
    v-on:leave-cancelled="leaveCancelled"
    >
    <div class="red" v-show="show"></div>
  </transition>
  <button v-on:click="change">button</button>
</div>
<script>
new Vue({
  el: '#app',
  data: {
    show: true
  },
  methods: {
    change: function() {
      thisshow = !thisshow;
      consolelog('-----------click---------');
    },
    beforeEnter: function (el) {
      consolelog('beforeEnter:');
    },
    enter: function (el, done) {
      consolelog('enter:');
      // done()
    },
    afterEnter: function (el) {
      consolelog('afterEnter:');
    },
    enterCancelled: function (el) {
      consolelog('enterCancelled:');
    },
    beforeLeave: function (el) {
      consolelog('beforeLeave:');
    },
    leave: function (el, done) {
      consolelog('leave:');
      done()
    },
    afterLeave: function (el) {
      consolelog('afterLeave:');
    },
    leaveCancelled: function (el) {
      consolelog('leaveCancelled:');
    }
  }
});
</script>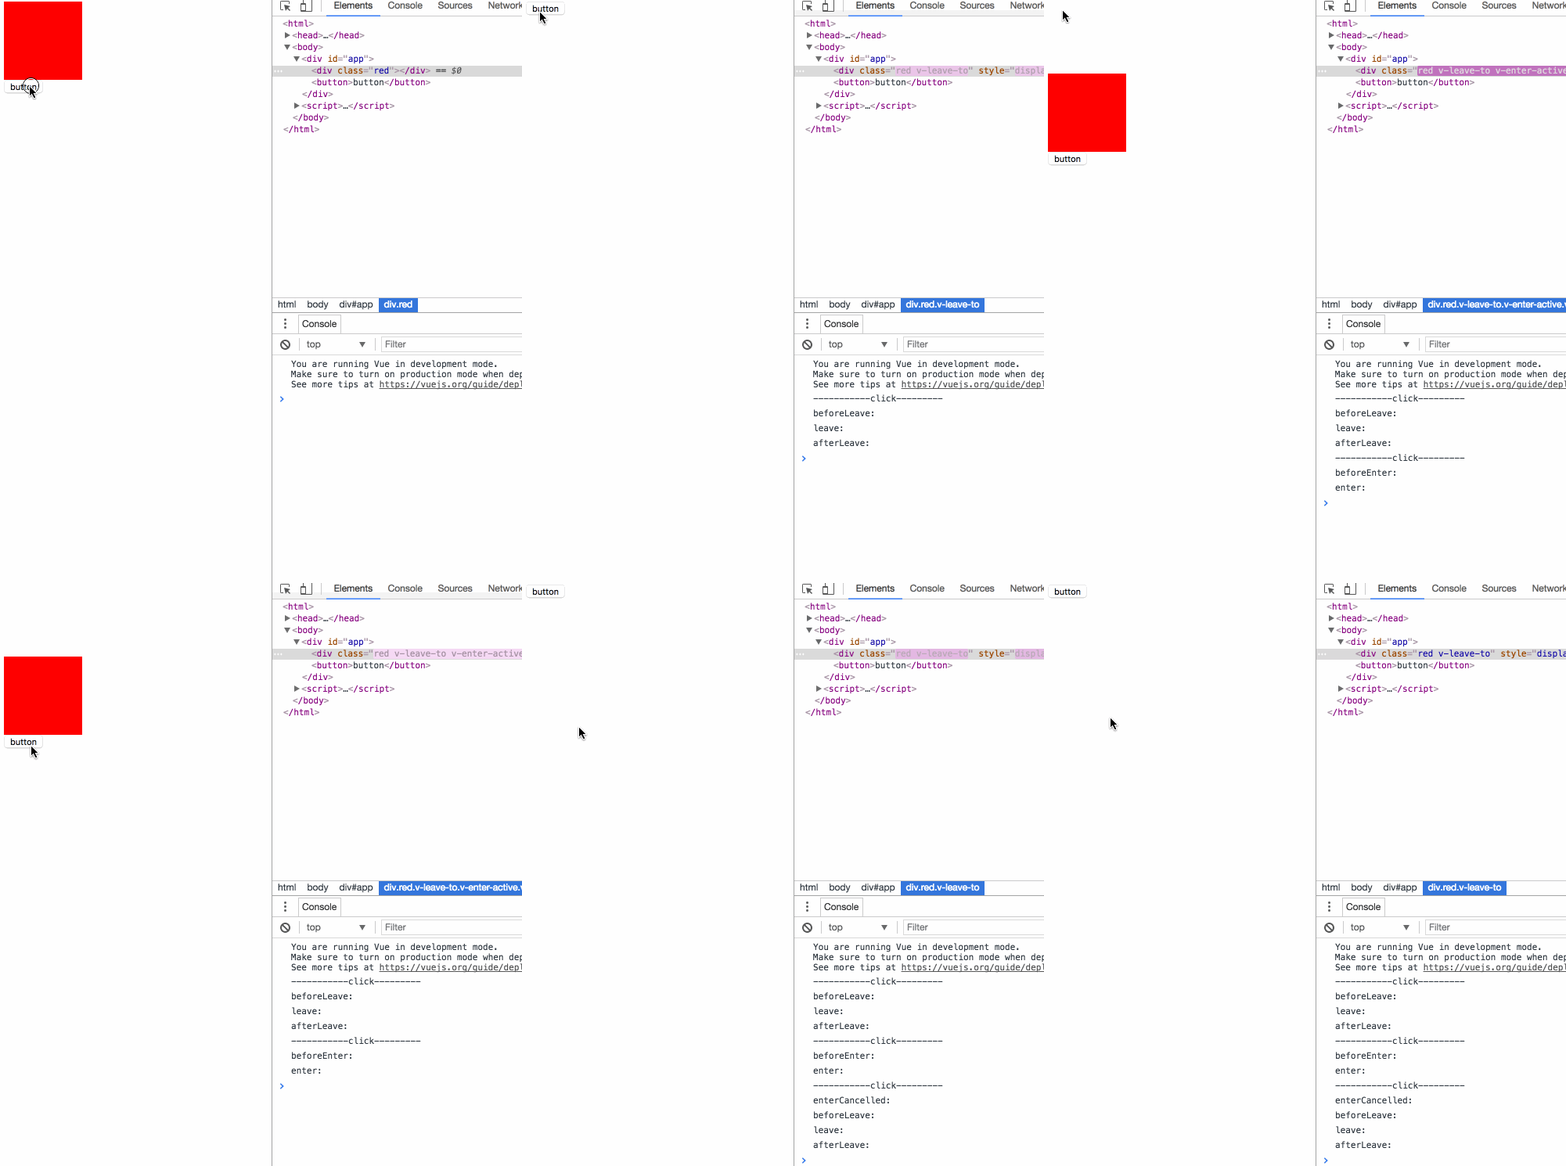
一旦使用 js 事件,原 css 动画过渡效果就会无效,官方推荐在 <div class="red" v-show="show"></div> 上设置 v-bind:css="false" 可令 vue 内部机制免去监测 css 动画事件回调,提高性能。
enter 和 leave 事件需手动调用 done 方法,不然事件一直不会调用后续的 after 事件,没有调用 after 事件但是又有其他事件开始了,则被视为动画被 cancel 了。
5 页面初始化时的动画:
<script src="/public/javascripts/vuejs"></script>
<style>
@keyframes aslide {
  0% {
    margin-left: 10px;
  }
  100% {
    margin-left: 100px;
  }
}
  red {background-color: red; width: 100px; height: 100px;}
  apper { margin-top: 50px; }
  apper-active { margin-top: 100px; animation: aslide 4s; transition: all 3s;}
</style>
<body>
<div id="app">
  <transition
    appear
    appear-class="apper"
    appear-active-class="apper-active"
    v-on:before-appear="customBeforeAppearHook"
    v-on:appear="customAppearHook"
    v-on:after-appear="customAfterAppearHook" >
    <div class="red" ></div>
  </transition>
  <button v-on:click="change">button</button>
</div>
<script>
new Vue({
  el: '#app',
  data: {
    show: true
  },
  methods: {
    change: function() {
      thisshow = !thisshow;
      consolelog('-----------click---------');
    },
    customBeforeAppearHook: function (el) {
      consolelog('customBeforeAppearHook:');
    },
    customAppearHook: function (el) {
      consolelog('customAppearHook:');
      // done()
    },
    customAfterAppearHook: function (el) {
      consolelog('customAfterAppearHook:');
    }
  }
});
</script>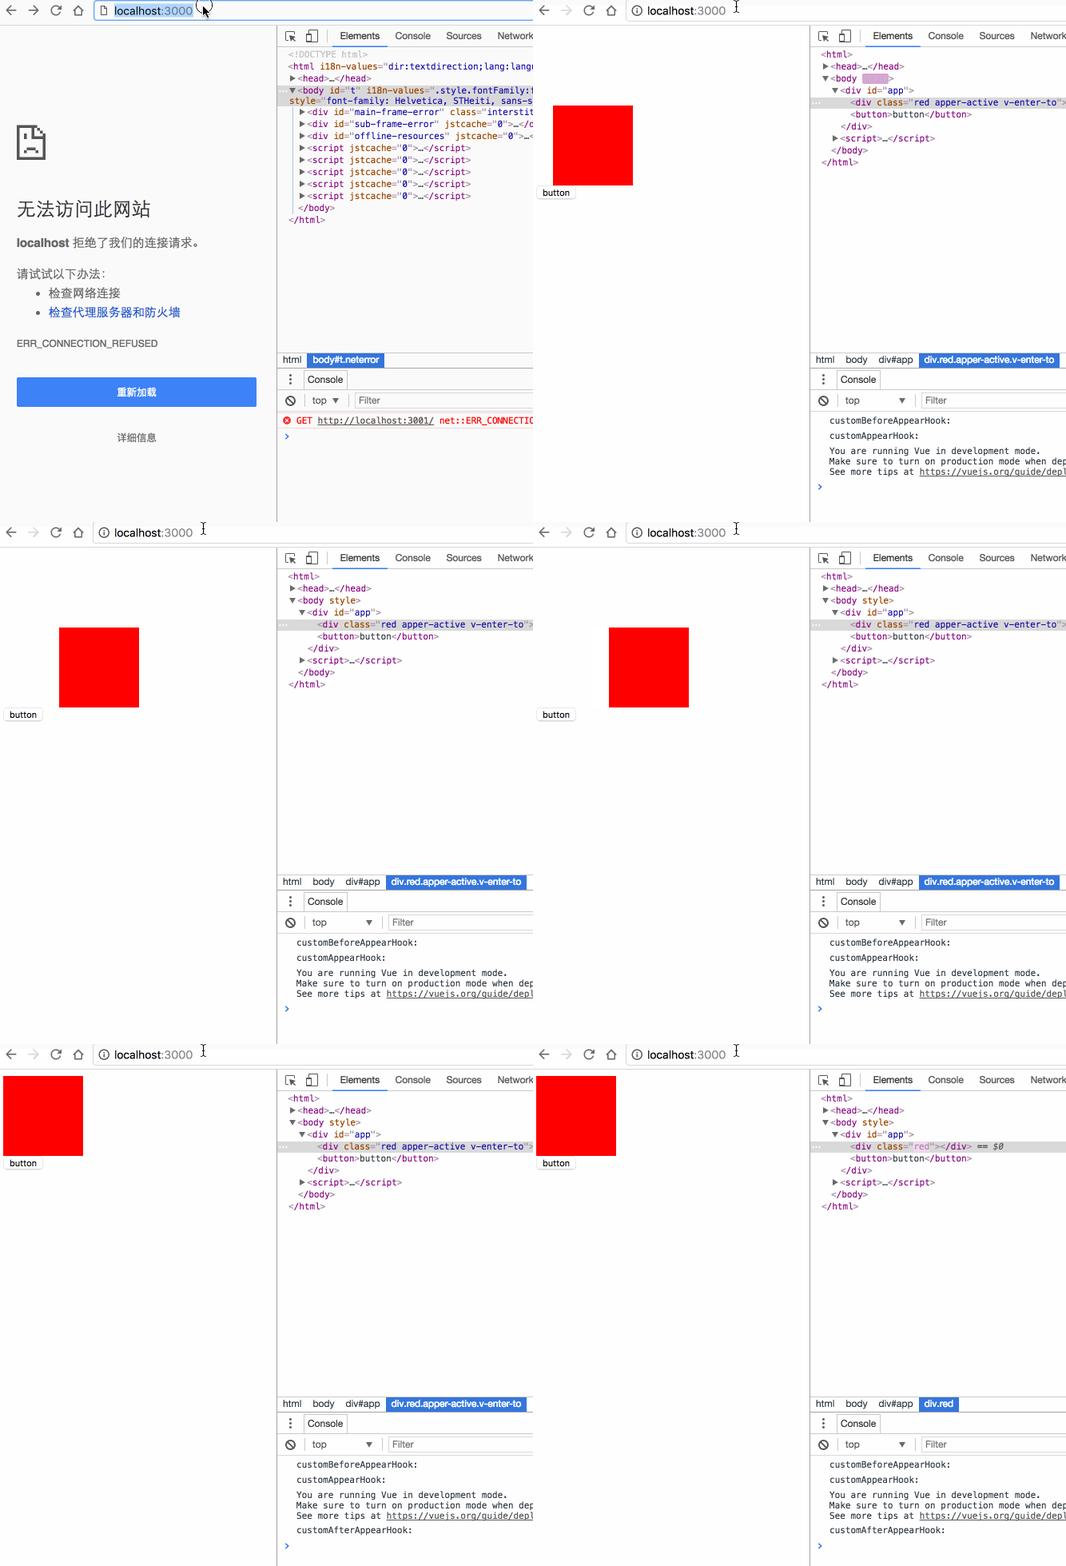
appear 属性表示开启初始化动画,appear-class 属性指定初始化前的样式,appear-active-class 属性指定初始化动画过程的样式;
transition 动画无法在初始化动画中起效,而 animation 动画则可以;
before-appear appear after-appear 是事件回调,看事例相当清晰。
6 动画元素的 key :
<script src="/public/javascripts/vuejs"></script>
<style>
  v-enter-active { transition: all 15s;}
  v-enter-to { margin-top: 100px;}
  v-leave-active { transition: all 15s;}
  v-leave-to { margin-top: 10px;}
</style>
<body>
<div id="app">
  <div class="show1">
    <transition>
      <button v-if="show1" @click="show1 = false">on</button>
      <button v-else @click="show1 = true">off</button>
    </transition>
  </div>
  <div class="show2">
    <transition>
      <button v-if="show2" key="on" @click="show2 = false">on</button>
      <button v-else key="off" @click="show2 = true">off</button>
    </transition>
  </div>
</div>
<script>
var app = new Vue({
  el: '#app',
  data: {
    show1: true,
    show2: true
  }
});
</script>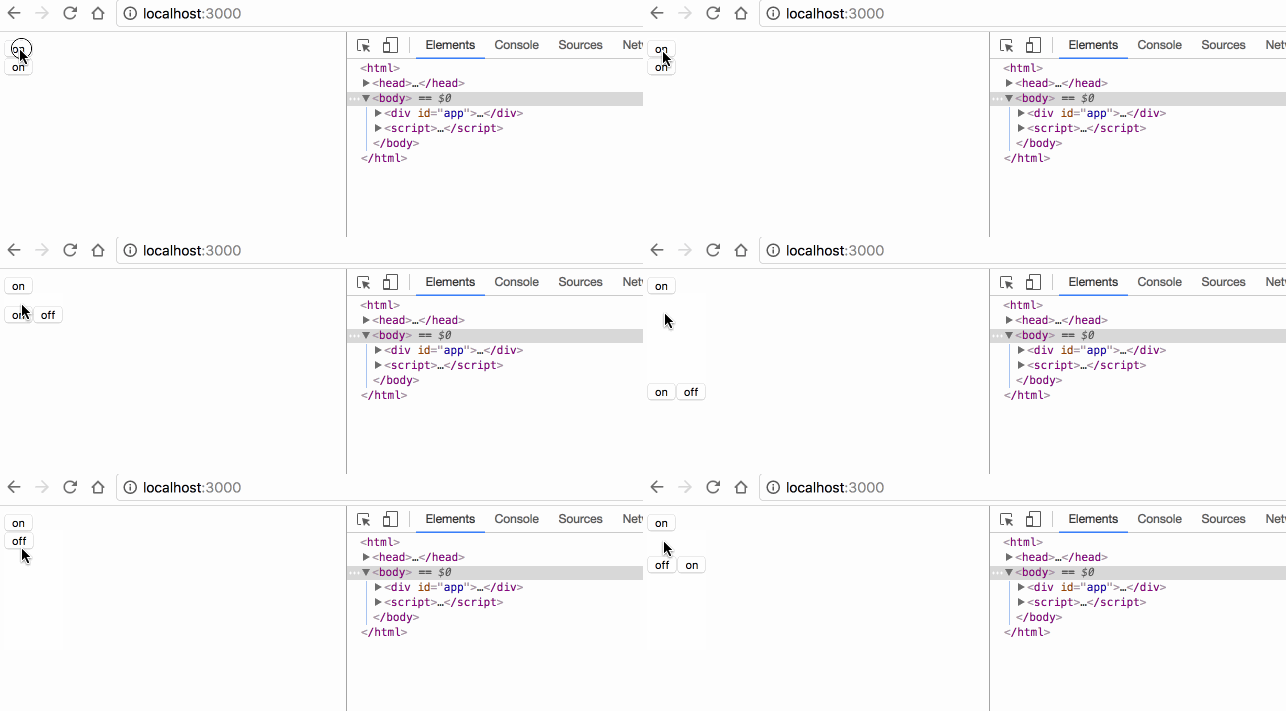
show1 为什么没有动画效果呢?因为 vue 会把切换中的两个 button 识别成同一个元素,只是修改了 button 中的不同内容,所以实际上页面并没有发生 DOM 元素的切换;
如果要让 vue 明确识别出这是2个不同的 button 元素,则为每个元素指定不同的 key 属性的值。
7 元素切换的动画模式:
<script src="/public/javascripts/vuejs"></script>
<style>
  v-enter { margin-left: 100px;}
  v-enter-active { transition: all 5s;}
  v-enter-to { margin-left: 10px;}
  v-leave { margin-left: 10px;}
  v-leave-active { transition: all 5s;}
  v-leave-to { margin-left: 100px;}
</style>
<body>
<div id="app">
  <div class="default">
    <transition>
      <button v-if="show" key="on" @click="show = false">on</button>
      <button v-else key="off" @click="show = true">off</button>
    </transition>
  </div>
  <div class="inout">
    <transition mode="in-out">
      <button v-if="show" key="on" @click="show = false">on</button>
      <button v-else key="off" @click="show = true">off</button>
    </transition>
  </div>
  <div class="outin">
    <transition mode="out-in">
      <button v-if="show" key="on" @click="show = false">on</button>
      <button v-else key="off" @click="show = true">off</button>
    </transition>
  </div>
</div>
<script>
var app = new Vue({
  el: '#app',
  data: {
    show: true
  }
});
</script>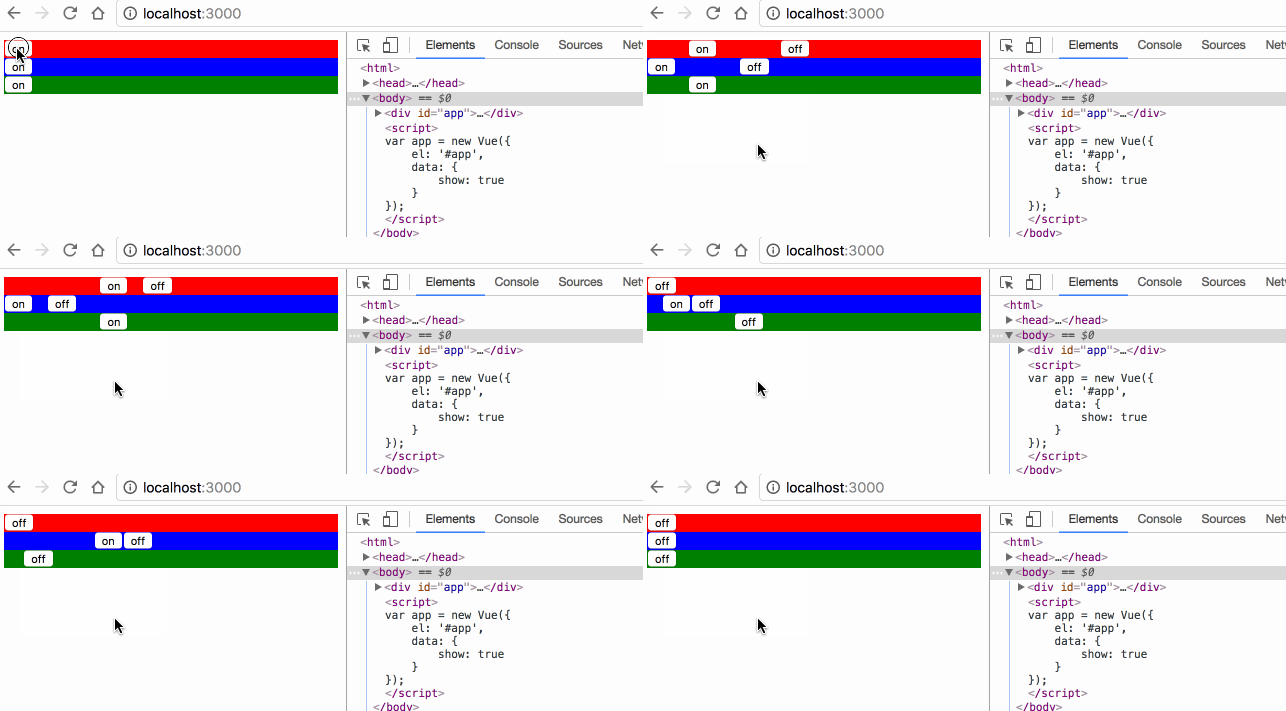
transition 默认是同时执行2个元素的切换动画的,案例中红色的 off 按钮其实是会同时向左移动的,只是因为布局上没有脱离布局流,被 on 按钮顶住,无法移动;
mode="in-out" 可以使切换元素先执行将要显示元素的动画,再执行将要隐藏元素的动画;
mode="out-in" 可以使切换元素先执行将要隐藏元素的动画,再执行将要显示元素的动画;
8 多元素动画:
<script src="/public/javascripts/vuejs"></script>
<style>
  v-enter { margin-left: 100px;}
  v-enter-active { transition: all 2s;}
  v-enter-to { margin-left: 10px;}
</style>
<body>
<div id="app">
  <transition-group>
    <li v-for="item in items" :key="item">{{item}}</li>
  </transition-group>
  <transition-group tag="ul">
    <li v-for="item in items" :key="item">{{item}}</li>
  </transition-group>
  <button @click="itemspush(itemslength)">add</button>
</div>
<script>
var app = new Vue({
  el: '#app',
  data: {
    items: [0,1]
  }
});
</script>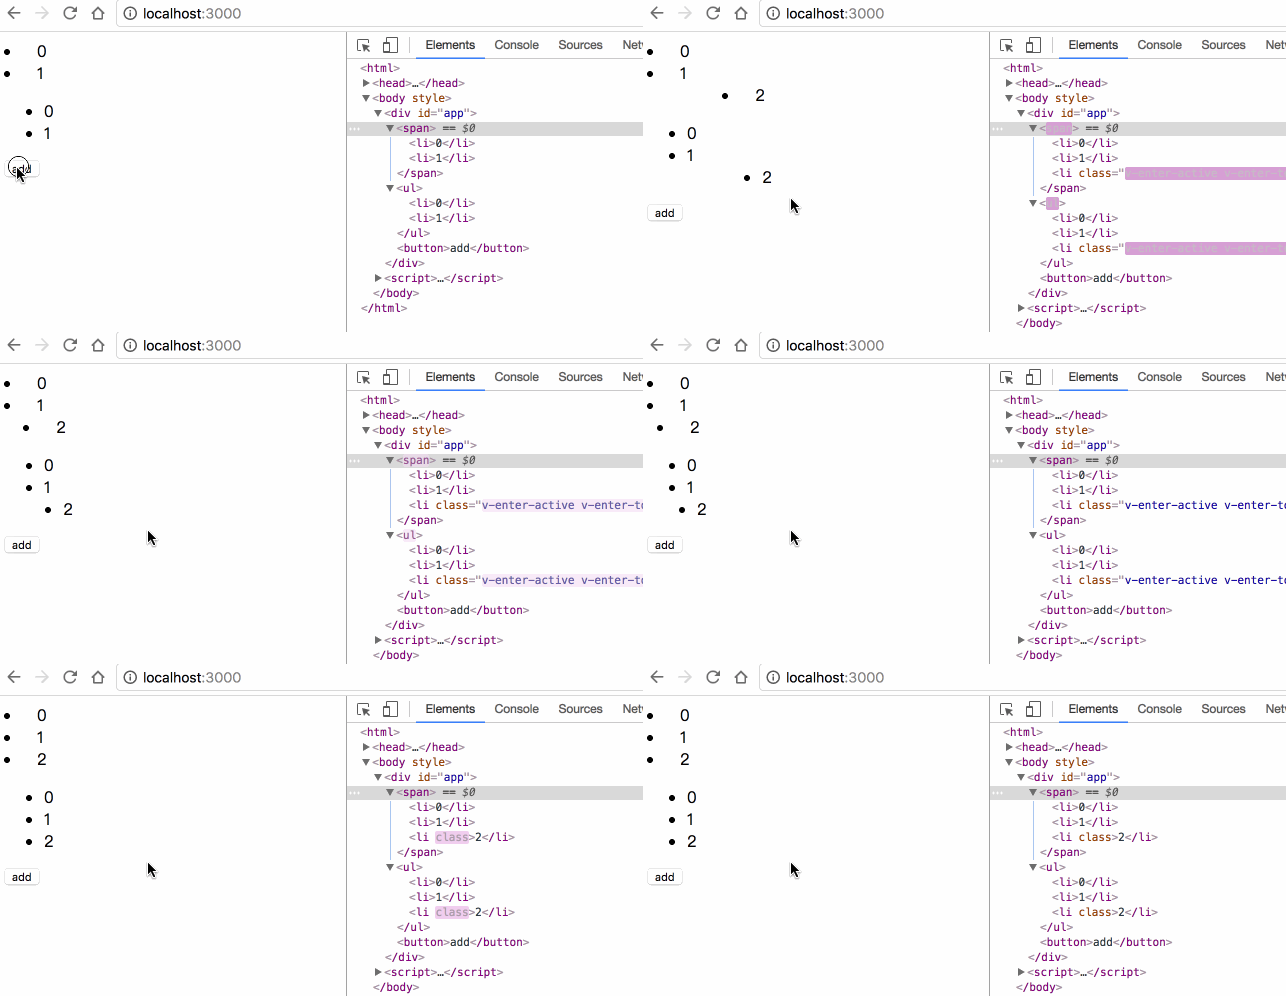
transition 里面只能放置单个元素或使用 v-if v-show 切换的单个元素,要想使用多个元素的动画,必须使用 transition-group;
transition-group 默认会在 DOM 里渲染成 span 标签,可使用 tag="ul" 指定渲染成其他标签;
transition-group 必须为每一个子元素指定 key;
8 多元素的位移动画:
<script src="/public/javascripts/vuejs"></script>
<style>
  v-move { transition: all 1s; }
</style>
<body>
<div id="app">
  <transition-group tag="ul" >
    <li v-for="item in items" :key="item">{{item}}</li>
  </transition-group>
  <button @click="itemsreverse()">reverse</button>
</div>
<script>
var app = new Vue({
  el: '#app',
  data: {
    items: [0,1,2,3]
  }
});
</script>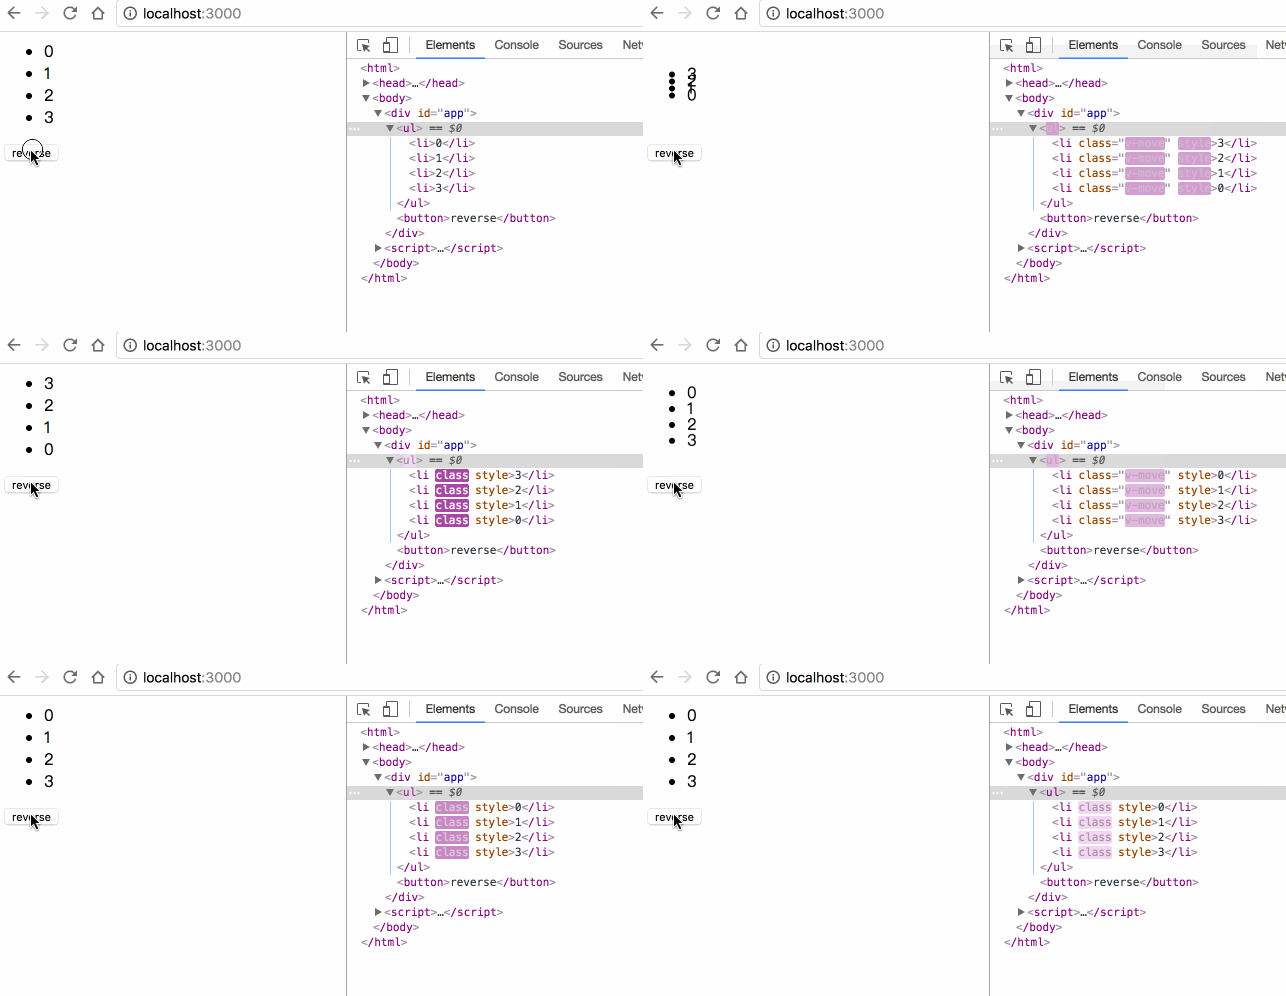
transition-group 允许在每个元素移动时,添加 v-move 的样式,移动完成后自动清除该样式;
transition 的属性, transition-group 都有,包括 name enter leave;
关于“vue元素如何实现动画过渡效果”这篇文章就分享到这里了,希望以上内容可以对大家有一定的帮助,使各位可以学到更多知识,如果觉得文章不错,请把它分享出去让更多的人看到。
亿速云「云服务器」,即开即用、新一代英特尔至强铂金CPU、三副本存储NVMe SSD云盘,价格低至29元/月。点击查看>>
免责声明:本站发布的内容(图片、视频和文字)以原创、转载和分享为主,文章观点不代表本网站立场,如果涉及侵权请联系站长邮箱:is@yisu.com进行举报,并提供相关证据,一经查实,将立刻删除涉嫌侵权内容。