本文实例为大家分享了SpringMVC框架实现图片上传与下载的具体代码,供大家参考,具体内容如下
1、新建一个Maven webapp项目,引入需要用的夹包,pom.xml文件的依赖包如下:
<dependencies>

  <!-- 用于生成图片的缩略图 -->
 <dependency>
  <groupId>net.coobird</groupId>
  <artifactId>thumbnailator</artifactId>
  <version>0.4.8</version>
 </dependency>

  <!-- 单元测试包 -->
  <dependency>
   <groupId>junit</groupId>
   <artifactId>junit</artifactId>
   <version>3.8.1</version>
   <scope>test</scope>
  </dependency>

  <!-- springmvc夹包 -->
  <dependency>
  <groupId>org.springframework</groupId>
  <artifactId>spring-webmvc</artifactId>
  <version>4.3.11.RELEASE</version>
 </dependency>

 <!-- spring核心包,用于依赖注入 -->
 <dependency>
  <groupId>org.springframework</groupId>
  <artifactId>spring-core</artifactId>
  <version>4.3.11.RELEASE</version>
 </dependency>

 <!-- servlet夹包 -->
 <dependency>
  <groupId>javax.servlet</groupId>
  <artifactId>javax.servlet-api</artifactId>
  <version>3.1.0</version>
 </dependency>

 <!-- javaee包,在jsp文件中使用-->
 <dependency>
  <groupId>javax</groupId>
  <artifactId>javaee-api</artifactId>
  <version>7.0</version>
 </dependency>

 <!-- 文件上传的夹包 ,用于文件上传-->
  <dependency>
  <groupId>commons-fileupload</groupId>
  <artifactId>commons-fileupload</artifactId>
  <version>1.3.1</version>
 </dependency>

 <!-- jstl标签包,在jsp中使用 -->
 <dependency>
  <groupId>javax.servlet</groupId>
  <artifactId>jstl</artifactId>
  <version>1.2</version>
 </dependency>

</dependencies>
2、配置文件设置如下:
(1) web.xml内容为:
<?xml version="1.0" encoding="UTF-8"?>
<web-app xmlns:xsi="http://www.w3.org/2001/XMLSchema-instance"
   xmlns="http://java.sun.com/xml/ns/javaee"
   xsi:schemaLocation="
   http://java.sun.com/xml/ns/javaee
   http://java.sun.com/xml/ns/javaee/web-app_2_5.xsd" version="2.5">

  <!-- 配置springmvc的前端控制器,可以配置多个前端控制器来拦截不同的url -->
 <servlet>
  <servlet-name>spring</servlet-name>
  <servlet-class>org.springframework.web.servlet.DispatcherServlet</servlet-class>
  <init-param>
   <param-name>contextConfigLocation</param-name>
   <param-value>classpath:springmvc.xml</param-value>
  </init-param>
  <load-on-startup>1</load-on-startup>
 </servlet>
 <servlet-mapping>
  <servlet-name>spring</servlet-name>
  <url-pattern>/</url-pattern>
 </servlet-mapping>

</web-app>
(2)springmvc.xml文件内容为:
<?xml version="1.0" encoding="UTF-8"?>
<beans xmlns="http://www.springframework.org/schema/beans"
  xmlns:xsi="http://www.w3.org/2001/XMLSchema-instance"
  xmlns:context="http://www.springframework.org/schema/context"
  xmlns:mvc="http://www.springframework.org/schema/mvc"
  xsi:schemaLocation="
   http://www.springframework.org/schema/mvc
   http://www.springframework.org/schema/mvc/spring-mvc-3.2.xsd
 http://www.springframework.org/schema/beans
 http://www.springframework.org/schema/beans/spring-beans-3.2.xsd
 http://www.springframework.org/schema/context
 http://www.springframework.org/schema/context/spring-context-3.2.xsd">

 <!-- 配置jsp的视图解析器,可以配置多个viewresolver-->
 <bean class="org.springframework.web.servlet.view.InternalResourceViewResolver">
 <!-- 会用到EL表达式以及jstl的标签,必须包含这个类 -->
    <property name="viewClass" value="org.springframework.web.servlet.view.JstlView"></property>
  <property name="prefix" value="/" />
  <property name="suffix" value=".jsp" />
 </bean>

 <!-- 1、自动注册defaultAnnotationHandlermapping ,AnnotationMethodhandlerAdapter,可以根据URL映射到方法-->
 <!-- 2、数据绑定,数字和日期的format,如@NumberFormat ,@DateFormat,还有xml和json的默认读写功能 -->
   <mvc:annotation-driven />

   <!-- 1.加入对静态资源的处理 -->
   <!-- 2.允许使用“/”做整体映射 -->
   <mvc:default-servlet-handler/>

   <!-- 自动扫描相关的包 -->
 <context:component-scan base-package="thumbnail"/>

 <!-- 对文件上传的处理,这里声明的id必须为multipartResolver-->
 <bean id="multipartResolver" class="org.springframework.web.multipart.commons.CommonsMultipartResolver" >
   <!-- 最大为100M,单位为字节 -->
  <property name="maxUploadSize" value="104857600"></property>
  <property name="defaultEncoding" value="utf-8"></property>
  <property name="maxInMemorySize" value="40960"></property>
 </bean>

</beans>
3、后端开发
(1) 控制器类:
@Controller
@RequestMapping("/")
public class ImageController {

 //使用Autowired时,该业务类需要声明为@service,此时xml中不用其它的配置
 @Autowired
  private Upload upload;
 @Autowired
  private Thumbnail thumbnail;

 //文件上传并生成缩略图
 @RequestMapping(value="/thumb",method=RequestMethod.POST)
 public String GenerateImage(@RequestParam("image")CommonsMultipartFile file,HttpServletRequest request) throws IOException
 {
 //根据相对路径获取绝对路径,图片上传后位于元数据中
 String realUploadPath=request.getServletContext().getRealPath("/")+"images";

 //获取上传后原图的相对地址
 String imageUrl=upload.uploadImage(file, realUploadPath);

 //获取生成的缩略图的相对地址
 String thumbImageUrl=thumbnail.generateThumbnail(file, realUploadPath);
 return "redirect:/images";
 }


 //显示所有图片
 @RequestMapping(value="/images",method=RequestMethod.GET)
 public ModelAndView showImages(HttpServletRequest request,HttpServletResponse response)
 {
 //根据相对路径获取绝对路径,图片上传后位于元数据中
 List<String> rawImagesList=new ArrayList<String>();
 String realUploadPath=request.getServletContext().getRealPath("/")+"images";
 rawImagesList=ImageList.printFile(realUploadPath+"/rawImages");

 ModelAndView mv=new ModelAndView();
 mv.addObject("imageList", rawImagesList);
 mv.setViewName("images");
 return mv;
 }

 //文件下载
 @RequestMapping("/download")
 public void download(HttpServletRequest request,HttpServletResponse response) throws IOException
 {
 String path=request.getServletContext().getRealPath("/")+"/images/rawImages/";
 String fileName=request.getParameter("filename");
 File file=new File(path+fileName);
 if(file.exists()){
 //设置MIME类型
 response.setContentType("application/octet-stream");
 //或者为response.setContentType("application/x-msdownload");

 //设置头信息,设置文件下载时的默认文件名,同时解决中文名乱码问题
 response.addHeader("Content-disposition", "attachment;filename="+new String(fileName.getBytes(), "ISO-8859-1"));

 InputStream inputStream=new FileInputStream(file);
 ServletOutputStream outputStream=response.getOutputStream();
 byte[] bs=new byte[1024];
 while((inputStream.read(bs)>0)){
 outputStream.write(bs);
 }
 outputStream.close();
 inputStream.close();
 }
 }
}
(2)业务类:
@Service
public class Upload {

 /*
 * 上传图片并返回图片的相对地址
 */
 public String uploadImage(CommonsMultipartFile file,String realUploadPath) throws IOException
 {
 //如果目录不存在则创建目录
 File uploadFile=new File(realUploadPath+"/rawImages");
 if(!uploadFile.exists()){
 uploadFile.mkdirs();
 }

 //创建输入流
 InputStream inputStream=file.getInputStream();
 //生成输出地址URL
 String outputPath=realUploadPath+"/rawImages/"+file.getOriginalFilename();
 //创建输出流
 OutputStream outputStream=new FileOutputStream(outputPath);
 //设置缓冲区
 byte[] buffer=new byte[1024];

 //输入流读入缓冲区,输出流从缓冲区写出
 while((inputStream.read(buffer))>0)
 {
 outputStream.write(buffer);
 }
 outputStream.close();

 //返回原图上传后的相对地址
 return "images/rawImages/"+file.getOriginalFilename();
 }

}
@Service
public class Thumbnail {

 //设置缩略图的宽度和高度
 public static final int witdth=100;
 public static final int heigth=100;

 /*
 * 生成缩略图并且返回相对地址
 */
 public String generateThumbnail(CommonsMultipartFile file,String realUploadPath) throws IOException
 {

 //如果目录不存在则创建目录
 File uploadFile=new File(realUploadPath+"/thumbImages");
 if(!uploadFile.exists()){
 uploadFile.mkdirs();
 }

 //缩略图保存的绝对地址
 String des=realUploadPath+"/thumbImages/"+file.getOriginalFilename();
 //生成缩略图
 Thumbnails.of(file.getInputStream()).size(witdth, heigth).toFile(des);
 //返回缩略图的相对地址
 return "images/thumbImages/"+file.getOriginalFilename();
 }

}
public class ImageList {

 //获取文件夹下所有文件名
 public static List<String> printFile(String path) {
 File file = new File(path);
 List<String> images = new ArrayList<String>();

 // 是文件夹的话
 if (file.isDirectory()) {
 String[] filelist = file.list();
 for (int i = 0; i < filelist.length; i++) {
 File readfile = new File(path + "/" + filelist[i]);
 if (!readfile.isDirectory()) {
  images.add(readfile.getName());
 }
 }

 }
 return images;
 }

}
4、前端开发
images.jsp的内容为:
<%@ page language="java" contentType="text/html; charset=UTF-8"
 pageEncoding="UTF-8"%>
<%@ taglib prefix="c" uri="http://java.sun.com/jsp/jstl/core" %>
<!DOCTYPE html PUBLIC "-//W3C//DTD HTML 4.01 Transitional//EN" "http://www.w3.org/TR/html4/loose.dtd">
<html>
<head>
<meta http-equiv="Content-Type" content="text/html; charset=UTF-8">
<title>上传图片</title>
</head>
<body>
<script type="text/javascript">
 function validate()
 {
 var a=document.getElementById("file");
 var form=document.getElementById("upload");
 if(a.value==""){
  alert("请先选择图片");
   return false;
 }
 else{
 form.submit();
 }
 }

</script>
<h2 align="center">图片上传与下载</h2>
<p>
 <c:forEach var="image" items="${imageList}">
  <a href="images/rawImages/${image}" rel="external nofollow" target="_blank"><img src="images/thumbImages/${image}" /></a>
  <a href="${pageContext.request.contextPath}/download?filename=${image}" rel="external nofollow" >${image}</a>
 </c:forEach>
</p>

<form id="upload" action="${pageContext.request.contextPath}/thumb" method="post" enctype="multipart/form-data">
 <input id="file" type="file" name="image" id="image" >
 <input type="button" value="上传" οnclick="validate()">
</form>

</body>
</html>
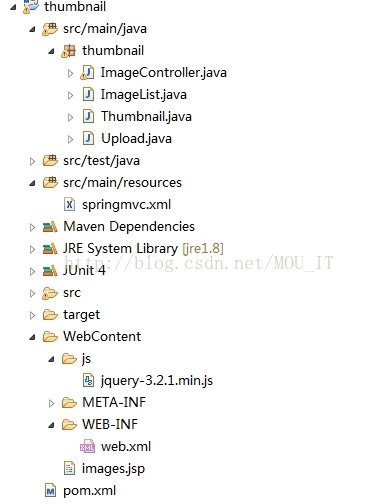
5、文件结构

6、在Tomcat上运行的最终成果:
URL:http://localhost:8080/thumbnail/images

以上就是本文的全部内容,希望对大家的学习有所帮助,也希望大家多多支持亿速云。
免责声明:本站发布的内容(图片、视频和文字)以原创、转载和分享为主,文章观点不代表本网站立场,如果涉及侵权请联系站长邮箱:is@yisu.com进行举报,并提供相关证据,一经查实,将立刻删除涉嫌侵权内容。