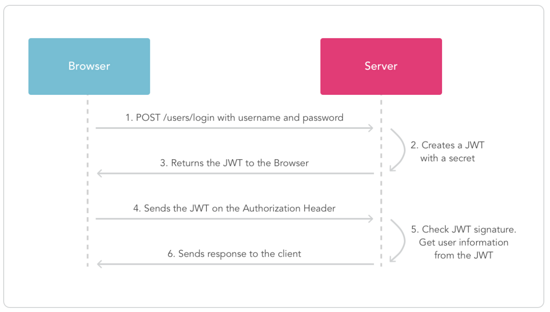
先介绍下利用JWT进行鉴权的思路:
1、用户发起登录请求。
2、服务端创建一个加密后的JWT信息,作为Token返回。
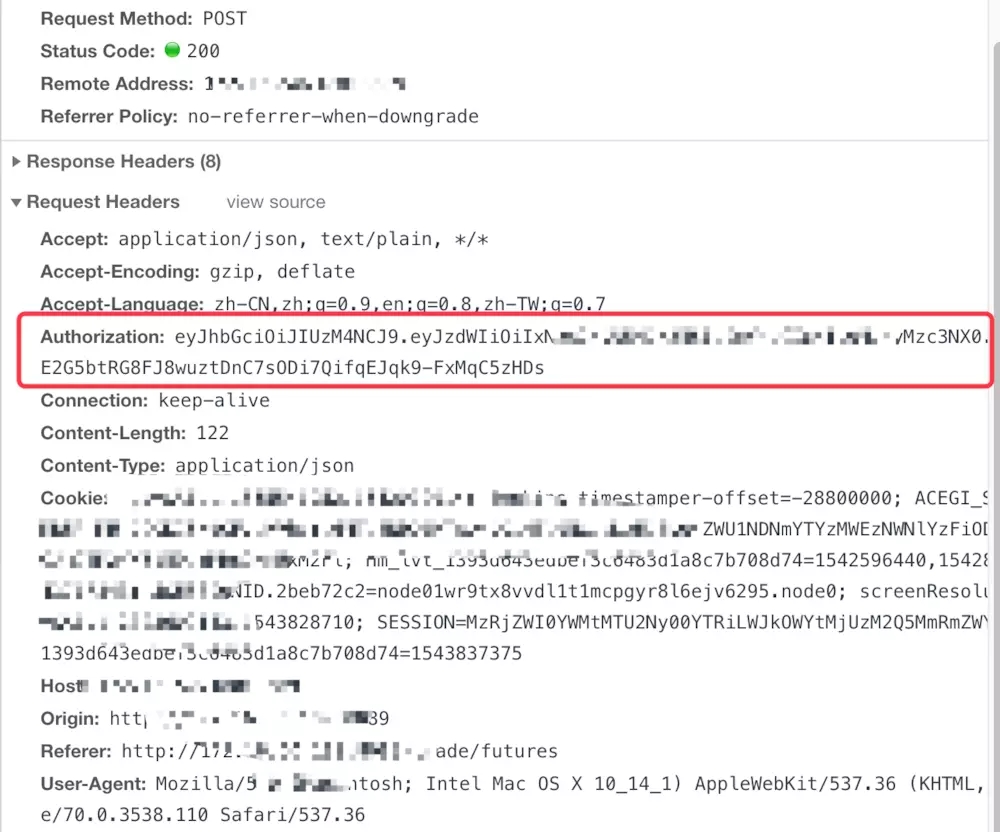
3、在后续请求中JWT信息作为请求头,发给服务端。
4、服务端拿到JWT之后进行解密,正确解密表示此次请求合法,验证通过;解密失败说明Token无效或者已过期。
流程图如下:
一、用户发起登录请求
二、服务端创建一个加密后的JWT信息,作为Token返回
1、用户登录之后把生成的Token返回给前端
@Authorization
@ResponseBody
@GetMapping("user/auth")
public Result getUserSecurityInfo(HttpServletRequest request) {
 try {
  UserDTO userDTO = ...
  UserVO userVO = new UserVO();
  //这里调用创建JWT信息的方法
  userVO.setToken(TokenUtil.createJWT(String.valueOf(userDTO.getId())));
  return Result.success(userVO);
 } catch (Exception e) {
  return Result.fail(ErrorEnum.SYSTEM_ERROR);
 }
}2、创建JWT,Generate Tokens
import javax.crypto.spec.SecretKeySpec;
import javax.xml.bind.DatatypeConverter;
import java.security.Key;
import io.jsonwebtoken.*;
import java.util.Date;

//Sample method to construct a JWT
private String createJWT(String id, String issuer, String subject, long ttlMillis) {

 //The JWT signature algorithm we will be using to sign the token
 SignatureAlgorithm signatureAlgorithm = SignatureAlgorithm.HS256;

 long nowMillis = System.currentTimeMillis();
 Date now = new Date(nowMillis);

 //We will sign our JWT with our ApiKey secret
 byte[] apiKeySecretBytes = DatatypeConverter.parseBase64Binary(apiKey.getSecret());
 Key signingKey = new SecretKeySpec(apiKeySecretBytes, signatureAlgorithm.getJcaName());

 //Let's set the JWT Claims
 JwtBuilder builder = Jwts.builder().setId(id)
        .setIssuedAt(now)
        .setSubject(subject)
        .setIssuer(issuer)
        .signWith(signatureAlgorithm, signingKey);

 //if it has been specified, let's add the expiration
 if (ttlMillis >= 0) {
 long expMillis = nowMillis + ttlMillis;
  Date exp = new Date(expMillis);
  builder.setExpiration(exp);
 }

 //Builds the JWT and serializes it to a compact, URL-safe string
 return builder.compact();
}3、作为Token返回
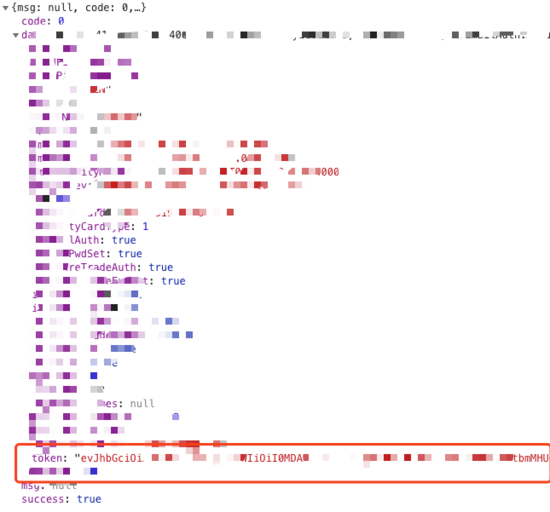
看后面有个Token
三、在后续请求中JWT信息作为请求头,发给服务端
四、服务端拿到JWT之后进行解密,正确解密表示此次请求合法,验证通过;解密失败说明Token无效或者已过期。
1、在拦截器中读取这个Header里面的Token值
@Slf4j
@Component
public class AuthorizationInterceptor extends HandlerInterceptorAdapter {
 private boolean chechToken(HttpServletRequest request, HttpServletResponse response) throws IOException{
  Long userId = ...;

  if (!TokenUtil.parseJWT(request.getHeader("Authorization"), String.valueOf(userId))){
   response.setContentType("text/html;charset=GBK");
   response.setCharacterEncoding("GBK");
   response.setStatus(403);
   response.getWriter().print("<font size=6 color=red>对不起,您的请求非法,系统拒绝响应!</font>");
   return false;
  } else{
   return true;
  }
 }
}2、拿到之后进行解密校验
Decode and Verify Tokens
import javax.xml.bind.DatatypeConverter;
import io.jsonwebtoken.Jwts;
import io.jsonwebtoken.Claims;

//Sample method to validate and read the JWT
private void parseJWT(String jwt) {
 //This line will throw an exception if it is not a signed JWS (as expected)
 Claims claims = Jwts.parser()
  .setSigningKey(DatatypeConverter.parseBase64Binary(apiKey.getSecret()))
  .parseClaimsJws(jwt).getBody();
 System.out.println("ID: " + claims.getId());
 System.out.println("Subject: " + claims.getSubject());
 System.out.println("Issuer: " + claims.getIssuer());
 System.out.println("Expiration: " + claims.getExpiration());
}五、总结
大家知道,我之前做过爬虫,实际这种思路在微博做反爬时也用过,做过我之前文章的同学应该知道。
以上就是本文的全部内容,希望对大家的学习有所帮助,也希望大家多多支持亿速云。
亿速云「云服务器」,即开即用、新一代英特尔至强铂金CPU、三副本存储NVMe SSD云盘,价格低至29元/月。点击查看>>
免责声明:本站发布的内容(图片、视频和文字)以原创、转载和分享为主,文章观点不代表本网站立场,如果涉及侵权请联系站长邮箱:is@yisu.com进行举报,并提供相关证据,一经查实,将立刻删除涉嫌侵权内容。


 计算
计算 安全
安全 数据库
数据库 网络和加速
网络和加速 企业服务
企业服务


